background image

8

FPX PREMIUM AMPLIFIER

U s e r   m a n u a l

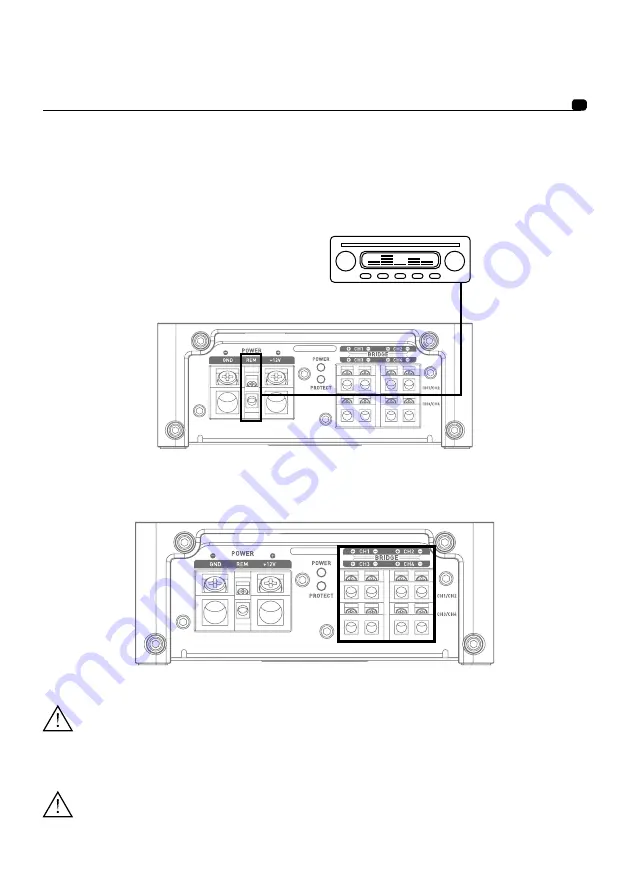
3.5 - Connecting the speakers and the remote to your FPX amplifier

Solder and insulate (using heat shrink sleeving) the REMOTE cable to the cable connector provided

 (Fig. 

4).

Connect the other end of the REMOTE cable to the REMOTE terminal on the head unit. 

Finally, connect the speaker cables to the amplifier, taking care to match polarities (+ to +, - to -). 

(Fig. 5).

fig. 5

fig. 4

WARNING

All speakers or speaker sets cabled to your FPX 4.800, FPX 4.400 SQ, FPX 2.750, FPX 5.1200 amplifier 

must always have an impedance greater than 2 Ohms.

WARNING

All speakers or speaker sets cabled to your FPX 1.1000 amplifier must always have an impedance greater 

than 1 Ohm.

Summary of Contents for FPX1.1000

Page 1: ...English page 3 Français page 17 Deutsch seite 31 中文 第45页 FPX Premium amplifier User manual Manuel d utilisation Gebrauchsanleitung 使用手册 ...

Page 2: ...follow these instructions may lead to serious injury or damage to property Contents 1 FPX amplifier 1 User manual 1 Set of accessories 1 Remote control FPX 1 1000 FPX 2 750 FPX 5 1200 CAUTION Do not activate any function that might distract you when driving the vehicle Functions and settings requiring prolonged attention should only be used when the vehicle is completely stopped Always stop the ve...

Page 3: ...consult a doctor Before beginning installation disconnect the negative battery terminal to avoid risk of injury fire or material damage Fig 1 fig 1 WARNING Prolonged listening at high volume above 110dB can cause permanent hearing damage Listening at volumes above 130 dB even for short periods can lead to untreatable hearing damage Stop listening in the event of any problem Failure to observe this...

Page 4: ...t of your FPX amplifier uncovered to prevent overheating Items required for installation in addition to accessories provided 2 appropriately sized cable sheaths 1 for the power cable and one for the set comprising speaker cables remote RCA modulation Multimeter volts amps Soldering iron and solder Crimping tool Wire stripper Wire cutter Battery terminal spanner Hand drill and drill bits Heat shrin...

Page 5: ... from being pinched or damaged with the consequent risk of an electrical short circuit 9 Always use fuses to protect the battery and the electrical circuit from any potential damage Install a fuse holder and an appropriate fuse in the 12V power supply cable less than 40cm from the battery terminal Ideally this distance should be as short as possible Fig 7 10 Prepare the chassis ground earth by rem...

Page 6: ...y adhere to the recommendations in this table for the safety of your electrical system it is also important to maintain the maximum performance of your FPX amplifier 3 2 Cabling your FPX amplifier s input signals Route all the modulation cables RCA speaker cables and the REM cable together isolating them from other high power consumption equipment in the vehicle and in particular electrical motors...

Page 7: ...timising the quality of the connection Drill through the sheet metal you have previously sanded making a hole to match the bolt you have chosen ensuring you are well clear of all cable routes reservoirs or tanks or other sensitive vehicle parts Solder and insulate using heat shrink sleeving the earth cable to the FPX amplifier earth connector supplied Fig 2 3 4 Connecting input connectors to your ...

Page 8: ...MOTE cable to the REMOTE terminal on the head unit Finally connect the speaker cables to the amplifier taking care to match polarities to to Fig 5 fig 5 fig 4 WARNING All speakers or speaker sets cabled to your FPX 4 800 FPX 4 400 SQ FPX 2 750 FPX 5 1200 amplifier must always have an impedance greater than 2 Ohms WARNING All speakers or speaker sets cabled to your FPX 1 1000 amplifier must always ...

Page 9: ... FPX 5 1200 must always have an impedance greater than 4 Ohms Any use of lower impedances would result in the voiding of the warranty To use a FPX amplifier in bridged mode and thus double the power available observe the connections and polarities shown below in BRIDGE Fig 6 FPX 2 750 FPX 4 400 FPX 4 800 FPX 5 1200 fig 6 fig 6 fig 6 fig 6 ...

Page 10: ...fuse holder Crimp the power cable into an appropriate connector and screw this to a source of battery power Strip 1 cm at the end of the remaining length of cable and tin Screw the cable into the other terminal of the fuse holder Solder and insulate using heat shrink sleeving the positive power cable to the FPX amplifier connector supplied Fig 7 3 7 Start up and checking The connection phase is no...

Page 11: ...11 FPX PREMIUM AMPLIFIER User manual FPX 2 750 FPX 5 1200 FPX 4 400 SQ FPX 1 1000 CH1 CH2 CH3 CH4 ...

Page 12: ...a right and a left you can still amplify all four channels by activating 2CH mode If you wish to use FPX in its four independent channel mode select 4CH FPX 5 1200 4CH mode allows channels 3 and 4 to mirror channels 5 and 6 PHASE The rotary PHASE control is used to adjust channel phasing with the rest of the system A readjustment of the phase of the subwoofer makes it possible for the subwoofer an...

Page 13: ...13 FPX PREMIUM AMPLIFIER User manual FPX 2 750 FPX 5 1200 FPX 4 400SQ FPX 1 1000 ...

Page 14: ...tive terminal on the vehicle battery GND The GND ground connector is designed to accept the negative power cable that connects the amplifier to the vehicle chassis REM The REM connector is for the connection between the amplifier and the source head unit via a REM or REMOTE output on the head unit This switches the amplifier on automatically when the source head unit is switched on POWER and PROTE...

Page 15: ...80 linear 0 to 180 linear Full range function Channels 1 2 and 3 4 Mirror mode Standby current A 1 1 A 0 95 A 0 6 A 1 75 A 1 75A Fuses 2x30 A 2x30 A 2x30 A 3x30 A 3 x 30A Remote control Protection Short circuit low impedance reverse polarity DC voltage drop overheat protection Dimensions LxWxH 921 64 x513 64 x23 32 237x132x53mm 921 64 x513 64 x23 32 237x132x53mm 1223 64 x657 64 x21 4 314x175x57mm ...

Page 16: ...ut entrainer de graves blessures ou des dommages matériels Contenu de l emballage 1 amplificateur FPX 1 manuel d utilisation 1 set d accessoires 1 télécommande FPX 1 1000 FPX 2 750 FPX 5 1200 AVERTISSEMENT N activez aucune fonction susceptible de détourner votre attention lors de la conduite du véhicule Les fonctions ou réglages requérant une attention prolongée ne doivent être exploitées qu à l a...

Page 17: ...onnectez la borne négative de la batterie pour éviter tout risque de blessure d incendie ou d endommagement du matériel fig 1 fig 1 ATTENTION L écoute prolongée à fort niveau au delà de 110 dB peut détériorer durablement l audition Des écoutes même brèves au delà de 130 dB peuvent provoquer des lésions auditives irrémédiables Interrompez toute utilisation en cas de problème Le non respect de cette...

Page 18: ...atif de ne pas couvrir la zone supérieure de votre amplificateur FPX afin de ne pas créer de surchauffe Matériel requis pour effectuer l installation en dehors des accessoires fournis 2 gaines de section adéquates 1 gaine pour le câble d alimentation 1 gaine pour le lot de câbles haut parleurs REMOTE modulation RCA Multimètre voltage ampérage Fer à souder étain Pince à sertir Pince à dénuder Coupe...

Page 19: ...acérées ou pointues Cela évitera ainsi de coincer ou d endommager les câbles et d engendrer un court circuit électrique 9 Protégez toujours la batterie et le circuit électrique de dommages potentiels à l aide de fusibles Installez un porte fusible et un fusible appropriés sur le câble d alimentation 12 V positif à moins de 40 cm de la borne de la batterie Idéalement cette distance doit être la plu...

Page 20: ...lage est indispensable à l aspect sécuritaire de votre installation électrique il est également important pour maintenir les performances maximales de votre amplificateur FPX 3 2 Câblage des signaux d entrée sur votre amplificateur FPX Faites cheminer ensemble les câbles de modulation RCA les câbles haut parleurs le câble REM en les isolant des autres accessoires automobiles de forte puissance par...

Page 21: ...i optimiser la qualité du contact Percez la tôle préalablement poncée au diamètre correspondant à la vis choisie en vous assurant qu aucun passage de câbles réservoir ou autre organe sensible du véhicule ne soit à proximité Soudez et isolez grâce à de la gaine thermo rétractable le câble de masse sur le départ de câble fourni vers votre amplificateur FPX fig 2 3 4 Connexion des signaux d entrée su...

Page 22: ... de l autoradio Enfin connectez les câbles haut parleurs à l amplificateur en respectant les polarités sur sur fig 5 fig 5 fig 4 ATTENTION Les haut parleurs ou kits de haut parleurs câblés sur votre amplificateur FPX 4 800 FPX 4 400 SQ FPX 2 750 FPX 5 1200 doivent systématiquement présenter une impédance supérieure à 2 Ohms ATTENTION Les haut parleurs ou kits de haut parleurs câblés sur votre ampl...

Page 23: ...Q FPX 5 1200 doivent systématiquement présenter une impédance supérieure à 4 Ohms Toute utilisation à des impédances inférieure entraînerait une annulation de garantie Pour utiliser FPX en mode bridgé et ainsi doubler la puissance disponible respectez les connexions et polarités indiquées ci dessous BRIDGE fig 6 FPX 2 750 FPX 4 400 FPX 4 800 FPX 5 1200 fig 6 fig 6 fig 6 fig 6 ...

Page 24: ...n dans une cosse prévue à cet effet et vissez cette dernière sur un point d alimentation batterie Sur la longueur de câble restante dénudez 1 cm puis étamer Vissez le câble dans l autre bornier du porte fusible Soudez et isolez grâce à de la gaine thermo rétractable le câble d alimentation positif sur le départ de câble fourni vers votre amplificateur FPX fig 7 3 7 Démarrage et vérifications La ph...

Page 25: ...25 AMPLIFICATEUR FPX Manuel d installation CH1 CH2 CH3 CH4 FPX 2 750 FPX 5 1200 FPX 4 400 SQ FPX 1 1000 ...

Page 26: ...t toutefois possible d amplifier les quatre canaux en activant le mode 2CH Si vous souhaitez utiliser FPX dans sa configuration 4 canaux indépendants en entrée sélectionnez le mode 4CH Le mode 4CH du FPX 5 1200 recopie les canaux 3 et 4 sur les canaux 5 et 6 PHASE Le potentiomètre rotatif PHASE permet d ajuster la mise en phase du canal avec le reste du système Un réajustement de la phase du subwo...

Page 27: ...27 AMPLIFICATEUR FPX Manuel d installation FPX 2 750 FPX 5 1200 FPX 4 400SQ FPX 1 1000 ...

Page 28: ...ce de l ampérage 5 Dépannage L état des différents témoins lumineux signifie certains modes de défaillance ou origines de pannes Vérifiez l ensemble des cas possibles ci dessous Si malgré ces vérifications le fonctionnement normal n est pas récupéré adressez vous à l installateur ou revendeur de votre amplificateur FPX Etat LEDs Témoins Présence de son Origine possible Dépannage PROTECT rouge NON ...

Page 29: ...néaire 0 à 12 dB linéaire 0 à 12 dB linéaire Canal 5 0 à 12 dB linéaire Phase 0 à 180 linéaire 0 à 180 linéaire Fonction Full range Sur canaux 1 2 et 3 4 Mode Recopie Courant de repos A 1 1 A 0 95 A 0 6 A 1 75 A 1 75 A Fusibles 2 x 30 A 2 x 30 A 2 x 30 A 3 x 30 A 3 x 30 A Télécommande Protections Court circuit impédance basse inversion de polarité DC Chute de tension Protection thermique Dimension...

Page 30: ...X1 1000 und FPX2 750 WARNUNG Schalten Sie während dem Steuern des Fahrzeugs keine Funktion ein die Ihre Aufmerksamkeit ablenken kann Die Funktionen oder Einstellungen die eine längere Aufmerksamkeit erfordern dürfen nur bei vollständigem Stillstand des Fahrzeugs genutzt werden Achten Sie darauf das Fahrzeug immer an einem sicheren Ort anzuhalten bevor Sie diese Funktionen einschalten Es besteht da...

Page 31: ...Sie den Minuspol der Batterie ab um jedes Risiko einer Verletzung eines Brandes oder einer Beschädigung des Gerätes zu vermeiden Abb 1 Abb 1 ACHTUNG Längeres Hören bei hoher Lautstärke über 110 dB kann das Gehör dauerhaft schädigen Auch kurzes Hören bei über 130 dB kann unheilbare Gehörverletzungen verursachen Unterbrechen Sie bei Problemen unverzüglich die Verwendung des Geräts Die Nichteinhaltun...

Page 32: ...uf keinen Fall abgedeckt werden um eine Überhitzung zu vermeiden Zur Durchführung der Installation erforderliches Gerät und Material über das mitgelieferte Zubehör hinaus 2 Kabelschläuche mit geeignetem Querschnitt 1 Schlauch für das Stromkabel 1 Schlauch für alle Lautsprecherkabel REMOTE Cinch Modulation Multimeter Spannung Stromstärke Lötkolben Zinn Drahtkripper Abisolierzange Drahtschere Batter...

Page 33: ...rnfalls können die Kabel eingeklemmt oder beschädigt werden was einen elektrischen Kurzschluss zur Folge haben kann 9 Schützen Sie die Batterie und den Stromkreis stets mit Sicherungen vor möglichen Schäden Installieren Sie einen geeigneten Sicherungshalter und eine geeignete Sicherung am Stromkabel mit 12 V positiv mindestens 40 cm vom Batterieanschluss entfernt Idealerweise sollte dieser Abstand...

Page 34: ...abels Die Einhaltung dieser Verkabelungsregeln ist für den sicheren Betrieb Ihrer elektrischen Anlage unerlässlich sie sind ebenso wichtig um die maximale Leistung Ihres FPX Verstärkers aufrechtzuerhalten 3 2 Verkabelung der Eingangssignale an Ihrem FPX Verstärker Verlegen Sie die Modulationskabel Cinch die Lautsprecherkabel und das REM Kabel zusammen indem Sie sie von dem anderen Hochleistungs Au...

Page 35: ...hbohren Sie das zuvor geschliffene Blech im Durchmesser der der gewählten Schraube entspricht und vergewissern Sie sich dass kein Durchlauf von Tankkabeln oder einem anderen empfindlichen Element des Fahrzeugs in der Nähe ist Schweißen Sie das Erdungskabel am mitgelieferten Kabelausgang der zu Ihrem FPX Verstärker führt an und isolieren Sie es mit einem Schrumpfschlauch Abb 2 3 4 Anschluss der Ein...

Page 36: ...MOTE Anschluss des Autoradios an Schließen Sie zum Schluss die Lautsprecherkabel an den Verstärker an und beachten Sie die Polaritäten an an Fig 5 Abb 5 Abb 4 ACHTUNG Die an Ihrem Verstärker FPX 4 800 FPX 4 400 SQ FPX 2 750 FPX 5 1200 verkabelten Lautsprecher oder Lautsprechersätze müssen durchgängig eine Impedanz von mehr als 2 Ohm aufweisen ACHTUNG Die an Ihrem Verstärker FPX 1 1000 verkabelten ...

Page 37: ...hersätze durchgängig eine Impedanz von mehr als 4 Ohm aufweisen Jede Verwendung bei niedrigeren Impedanzen führt zur Unwirksamkeit der Garantie Um den FPX in Brückenschaltung zu verwenden und so die verfügbare Leistung zu verdoppeln halten Sie bitte die nachstehend unter BRIDGE angegebenen Anschlüsse und Polaritäten ein Abb 6 FPX 2 750 FPX 4 400 FPX 4 800 FPX 5 1200 fig 6 fig 6 fig 6 fig 6 ...

Page 38: ...NG Das Kabel das den Pluspol der Batterie mit der Leiste BATT des Verstärkers verbindet muss UNBEDINGT eine für die Leistung Ihres Verstärkers geeignete Sicherung aufweisen max 40 cm von der Fahrzeugbatterieentfernt Die Anschlüsse des Sicherungshalters müssen dicht sein Montieren Sie den Sicherungshalter ab und entfernen Sie die Sicherung Befestigen Sie den Sockel des Siche rungshalters Schneiden ...

Page 39: ...39 CH1 CH2 CH3 CH4 FPX PREMIUM AMPLIFIER Gebrauchsanleitung FPX 2 750 FPX 5 1200 FPX 4 400 SQ FPX 1 1000 ...

Page 40: ...n einen rechts und einen links ist es dennoch möglich die vier Kanäle zu verstärken indem Sie den Modus 2CH einschalten Wenn Sie FPX in seiner Konfiguration mit 4 eigenständigen Kanälen am Eingang verwenden möchten wäh len Sie den Modus 4CH Das Modus 4CH FPX 5 1200 ermöglicht den Kanalen 3 und 4 den Kanalen 5 und 6 zu übertragen PHASE Das Drehpotentiometer PHASE ermöglicht die Synchronisierung des...

Page 41: ...41 FPX PREMIUM AMPLIFIER Gebrauchsanleitung FPX 2 750 FPX 5 1200 FPX 4 400SQ FPX 1 1000 ...

Page 42: ...hluss BATT dient dazu das Stromkabel aufzunehmen das den Verstärker mit dem Pluspol der Batterie verbindet GND Der Stromanschluss GND ground dient dazu das negative Stromkabel aufzunehmen das den Verstärker mit dem Fahrzeuggestell verbindet REM Der REM Anschluss stellt die Verbindung zwischen dem Verstärker und der Quelle Autoradio über einen REM oder REMOTE Ausgang des Autoradios sicher Dies ermö...

Page 43: ...inear 0 bis 12 dB linear Kanal 5 0 12 dB linear Phase 0 bis 180 linear 0 bis 180 linear Funktion Full range Für kanalen 1 2 und 3 4 Kopiermodus Ruhestrom A 1 1 A 0 95 A 0 6 A 1 75 A 1 75 A Sicherungen 2 x 30 A 2 x 30 A 2 x 30 A 3 x 30 A 3 x 30 A Fernbedienung Schutzvorrichtungen Kurzschluss niedrige Impedanz Polaritätsumkehrung Gleichstrom Spannungsabfall Wärmeschutz Maße in mm L x B x H 237 x 132...

Page 44: ... 不遵守使用规则而引起的问题可能导致保修失效 警告 此标志表示重要指示 不遵守这些指示可能会导致严重的伤害或财产损失 包装内容 1个FPX放大器 1本使用手册 1组配件 1个遥控器 FPX 1 1000 FPX 2 750 FPX 5 1200 警告 开车时请勿激活任何会使您分心的功能 需要持续的注意力的设置或功能只应在车辆完全停止后使用 激活这些 功能前 请务必把车辆停在安全的地方 可能有发生意外事故的风险 请将音量放低 让您在驾驶期间可以听到车外的声音 可能有发生意外事故的风险 请勿打开FPX放大器 也不要在产品上进行任何更改 否则可能有发生意外事故 火灾或触电的风险 请于10天内寄回随附的产品质保书 使Focal JMlab质保生效 您现在可以在线注册产品 www focal com warranty ...

Page 45: ...能会 禁用车辆控制系统 并引起火灾或其他损坏 请将螺栓 配件或螺钉等可能被摄入的小物件放在儿童接触不到的地方 吞下小物体可能会导致严重的伤害 如 果吞入 请立即就医 开始安装前 请先断开蓄电池负极 以免造成伤害 火灾或财产损失的风险 图1 图 1 注意 长时间以超过110分贝的高音量聆听音乐 可能会永久损害听力 即使短暂聆听超过130分贝的声音 也可能会导致 永久性的听力损伤 出现问题时 请停止使用 如果不遵守这些注意事项 可能会造成伤害或损坏该设备 如果故障仍然存在 请将该 设备送回Focal经销商修理 使用指定的配件并正确安装 请务必使用手册中指定的和包装中提供的配件 使用其他组件可能导致产品内部损 坏 也可能使安装不正确 这可能会导致零件松动 从而造成产品损坏或技术故障 并可能有发生意外事故 火灾 或触电的风险 请勿将设备安装在高湿多尘的地方 请避免将该设备安装在车内高湿或灰尘过多的...

Page 46: ...电平信号的干扰 FPX放大器的工作时间 请避免在车辆未启动的情况下长时间操作放大器 这可能会导致电池过早没电 通风 切勿覆盖FPX放大器的上方部位 以免产生过热现象 安装所需的硬件 提供的附件之外 2个合适的电缆护套管 1个护套管用于保护电源线 1个护套管用于保护扬声器电缆 REMOTE线和RCA线 万用表 电压 电流 焊烙铁片 锡 压接钳 剥线钳 线头剪刀 电池端子扳手 手钻和钻头套件 适用于各种电缆直径的热缩护套管 具有合适的长度和线规的电源线 具有合适的长度和线规的远程开机电缆 放大器REM输入端口 具有合适的长度和线规的地线 合适的保险丝和保险丝座 用于连接电池正极 的接线片 用于连接车辆底盘 的接线片 至少6毫米的螺钉和螺母 用于接地至车辆底盘 安装 以下部分说明安装放大器时应考虑的车辆因素 事先规划系统布局和布线 可以节省您的时间 在准备阶段中 请确保安装完成后所有设置均可使用...

Page 47: ...上的电缆可能会造成极大的危险 8 请避免将电缆穿过或越过锋利的边缘 越过金属的任何电线均必须使用绝缘垫圈进行保护 请让电缆远离运动 部件 座椅滑轨等 或锋利尖锐的金属边缘 以免夹住或损坏电缆 或者发生短路 9 始终以保险丝保护电池和电气系统免受潜在危害 请在距离电池端子40厘米内的12伏正极 电源线上安装一 个保险丝座及合适的保险丝 理想情况下 该距离应越短越好 图7 10 准备汽车底盘接地时 刮下金属表面上的任何涂料 以确保良好的接地 接地的配线应该越短越好 并且始 终连接到焊接在车体或底盘的金属上 图2 一般保留的接地点是连接电池负极端子与汽车底盘之间的连接 点 11 切勿将其安装在车辆的发动机舱内 这会使保修失效 I 安装FPX放大器 FPX放大器的安装位置 放大器有极大的功率 运行时必须散热 因此 放大器必须安装在通风处 特别是放大器顶部更是如此 在安装区 域附近应避免嵌入或覆盖放...

Page 48: ... 这对保持FPX放大器的最大性能也同样重要 3 2 FPX放大器输入信号的布线 连接全部电缆 RCA 扬声器电缆 REM电缆 并隔离其他高功率汽车配件 特别是电动机 雨刮器等 保留 电缆的整个长度 稍后再进行调整 3 3 电源线和FPX放大器布线 3 3 1 连接正极 电源线 小心地让其通过之前拉出的电缆的对面 以避免产生任何干扰 现在先不要连接电 缆 放大器 安培数 电缆长度 以米为单位 0 2米 2 4米 4 6米 FPX 4 800 和FPX 2 750 60安 16 mm2 5 AWG 21 mm2 4 AWG 35 mm2 2 AWG FPX 1 1000 90安 21 mm2 4 AWG 35 mm2 2 AWG 53 mm2 0 AWG FPX 4 400 SQ 50安 8 mm2 8 AWG 16 mm2 5 AWG 21 mm2 4 AWG FPX 5 1200 90安 ...

Page 49: ...放大器和车辆底盘之间的 连接完美无误 电缆和其线规应符合上方表格所示 第3 1节 找到合适的接地点后 磨去油漆或清漆的痕迹 以优化接触质量 打穿预先根据所选螺钉的直径打磨好的钢板 同时注意附近是否有任何油箱或其他敏感零件的电 缆经过 将随附的地线焊接至电缆引线上 并为其包上绝缘层 利用热缩护套管 然后将其连接至FPX放大器上 图2 3 4 FPX放大器输入信号的连接 现在 您可以开始连接输入 输出线路 根据RCA的极性和分布连接RCA 图3 将另一端连接到放大器的INPUTS 输入 连接面板 图 2 图 3 ...

Page 50: ...与遥控器的连接 焊接随附电缆引线与REMOTE电缆 并包上绝缘层 利用热缩护套管 图4 将REMOTE电缆的另一端连接到汽车音响的REMOTE端 最后 将扬声器电缆连接到放大器 连接时请注意极性是否连接正确 至 至 图5 图 5 图 4 注意 连接至FPX 4 800 FPX 4 400 SQ FPX 2 750 FPX 5 1200放大器的扬声器或扬声器系统的阻抗必须大于2欧姆 注意 连接至FPX 1 1000放大器的扬声器或扬声器系统的阻抗必须大于1欧姆 ...

Page 51: ...PX放大器 安装手册 FPX 2 750 FPX 4 400 FPX 4 800 FPX 5 1200 注意 在桥接模式下 连接至FPX 4 800 FPX 2 750 FPX 4 400 SQ FPX 5 1200放大器的扬声器或扬声器系统的阻抗必 须大于4欧姆 使用低于上述阻抗将使保修失效 要在桥接模式下使用FPX并加倍接通电的源时 请按照下面 桥接 所示的连接和极性 图6 图 6 图 6 图 6 图 6 ...

Page 52: ...10和40厘米 最长 之间的电源线 剥开1厘米的绝缘层 然后镀锡 用螺钉将电缆拧入电池保险丝 座的端子 将电源线压接至为此目的而提供的接线片上 并用螺钉将其拧紧于电池的供电点上 在剩余的电缆上剥开1厘米的绝缘层 然后镀锡 用螺钉将电缆拧入保险丝座的另一个端子 将随附的正极 电源线焊接至电缆引线上 并为其包上绝缘层 利用热缩护套管 然后将其连接至FPX放大器 上 图7 3 7 启动和检查 现在 连接阶段已经完成了 接下来 您还需要检查电源是否正确以及设备整体 汽车音响 放大器 扬声器 是否 运行正常 将音源的增益调到最小 将放大器的增益调到总程1 3的位置 打开各个装置的电源 开启所有装置的 电源后 以低音量运行测试 4 控制和连接面板 FPX 4 800 图8 ...

Page 53: ...53 CH1 CH2 CH3 CH4 FPX放大器 安装手册 FPX 2 750 FPX 5 1200 FPX 4 400 SQ FPX 1 1000 ...

Page 54: ...模式 此开关 FPX 4 800 FPX 4 400 SQ和FPX 5 1200 可以让声道3和4 FPX 5 1200则为3 4 5 6 复制声道1和2的信号 所以 即使您的汽车音响只有一个输出端口 一个在右边 另一个在左边 但是 您也可以通过激活2CH 双声 道 模式来放大四个声道 如果您想在FPX上使用4个独立输入声道的配置 请选择4CH 四声道 模式 FPX 5 1200的4CH模式会将声道3和4再复制至声道5和6 相位 PHASE 相位 旋钮可以调节声道与系统其他部分的相位 重新调整低音炮相位可以使低音炮和其他扬声器同时播送耦合频率 在一个理论信号周期中 我们稍微移开了其中 一个音源 使每个收听点上的相位调整均不完美 X OVER模式 此开关可用来启用 任选 高通滤波器 HPF 低通滤波器 LPF 或全频模式 FULL X OVER频率 赫兹 调节滤波器的截止频率 这一旋钮可调节...

Page 55: ...55 FPX放大器 安装手册 FPX 2 750 FPX 5 1200 FPX 4 400SQ FPX 1 1000 ...

Page 56: ...的操作异常 请参阅故障排除第5点 FUSES 保险丝 FUSES连接器专用于插入放大器的保险丝 更换时 请检查其安培数是否完全符合 5 故障排除 不同的指示灯状态表示某些故障模式或故障原因 请检查下面所有的可能情况 检查完后 如果放大器仍未恢复正常运行 请联系FPX放大器的安装人员或经销商 LED指示灯 状态 声音 可能 原因 故障排除 PROTECT红灯 亮起 无声音 输出短路 关闭音频系统 检查扬声器 其最小阻抗 连接和扬声器电缆 关闭 无声音 没有电源或电 源不佳 关闭音频系统 检查是否有12伏 检查电源线和其极性 检查保险丝 PROTECT红灯 亮起 灯光闪烁 没有声音 声 音断断续续或 声音变质 过热 关闭音频系统 静待放大器冷却后再使用 关闭 无声音 无REM信号 开启音频系统 检查REM端子是否有电压 关闭 无声音 保险丝故障 关闭音频系统 检查保险丝 必要时进行更换 POW...

Page 57: ...贝 亚音速滤波器 20赫兹 50赫兹 12分贝 倍频程 10赫兹 50赫兹 24分贝 倍 频程 20赫兹 50赫兹 高通 低通滤波器 可配置 50赫兹 500赫兹 高通 低通 可配置 高通 低通 50赫兹 500赫兹 可配置 40赫兹 5000赫兹 高通 低通 低通 50赫兹 250 赫兹 24分贝 倍 频程 可配置50赫兹 500赫兹高通 低 通 声道5 50 赫兹 250赫兹 低通滤波器 低音增强 0至12分贝 线性 0至12分贝 线性 0至12分贝 线性 声道5 0至12分 贝 线性 相位 0至180 线性 0至180 线性 全频功能 1 2和3 4声道 再复制模式 静态电流 安 1 1安 0 95安 0 6安 1 75安 1 75安 保险丝 2 x 30安 2 x 30安 2 x 30安 3 x 30安 3 x 30安 遥控器 保护 短路 低阻抗 极性反接 直流电 压降 热保护 外...

Page 58: ...氣部品 Cable Electrical Part X O O O O O 本表格依据 SJ T 11364 的规定编制 O 表示该有害物质在该部件所有均质材料中的含量均在GB T 26572规定的限量要求以下 O It means the harmful substances in the parts of content in all homogeneous materials are specified in GB T 26572 limited for the following X 表示该有害物质至少在该部件的某一均质材料中的含量超出GB T 26572规定的限量要求 X It means the harmful material in at least the parts of a homogeneous material content beyond the limited ...

Page 59: ...und die menschliche Gesundheit muss auf eine verantwortungsbewusste Wiederverwertung zur Förderung der Wiederverwendung von materiellen Ressourcen geachtet werden Für die Rückgabe von Gebrauchtgeräten verwenden Sie bitte zur Verfügung stehende Rückgabe und Recyclingsysteme oder wenden Sie sich an den Händler bei dem Sie das Produkt erworben haben Letzterer kann das Gerät sicher dem Wertstoffkreisl...

Page 60: ...hkäistäksesi mahdollisia vaaroja ympäristölle tai ihmisten terveydelle ja edistääksesi aineellisten voimavarojen uudelleenkäyttöä Palauta käytetty laite käyttämällä saatavilla olevia palautus ja keräysjärjestelmiä tai ota yhteys jälleenmyyjään jolta ostit tuotteen He voivat kierrättää tämän tuotteen turvallisesti RU Правильная утилизация продукта Данная маркировка указывает на то что в пределах ЕС...

Page 61: ...īkst izmest kopā ar citiem sadzīves atkritumiem Lai novērstu jebkādu risku videi vai cilvēku veselībai lūdzam nodot produktu otrreizējai pārstrādei lai veicinātu materiālo resursu otrreizējo izmantošanu Lai atgrieztu savu lietoto ierīci lūdzu izmantojiet pieejamās atpakaļnodošanas un savākšanas sistēmas vai sazinieties ar izplatītāju no kura iegādājāties šo produktu Tas var droši pārstrādāt šo pro...

Page 62: ...unálnym odpadom z domácností Aby sa predišlo rizikám pre životné prostredie alebo ľudské zdravie zabezpečte ich náležitú recykláciu čím podporíte opätovné využívanie prírodných zdrojov Ak chcete použité zariadenie vrátiť využite na to dostupné systémy zberu a recyklácie odpadu alebo požiadajte o pomoc predajcu u ktorého ste výrobok kúpili Ten dokáže tento výrobok bezpečne recyklovať EE Selle toote...

Page 63: ...Focal JMlab BP 374 108 rue de l Avenir 42353 La Talaudière cedex France www focal com Tel 33 04 77 43 57 00 Fax 33 04 77 43 57 04 SCAB 190304 4 CODO1485 ...

Reviews: