


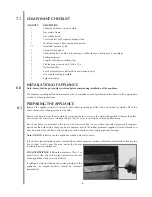


COMPONENT CHECKLIST
QUANTITY
DESCRIPTION
1
Firebox and burner tray assembly.
1
Decorative frame
1
Decorative hood
1
Cast front fret with seperate ashpan door.
1
Moulded ceramic fibre combustion matrix.
11
Individual ceramic coals.
1
Ceramic brick panel.
1
Cable fixing kit; 2 cables, 2 tensioners, 2 cable clamps, 4 fixing eyes, 4 rawlplugs
1
Sealing grommet
3
Lengths of adhesive sealing strip.
1
Self tapping screw pack; 4 No8 x 5/16.
1
Deflector baffle
1
Set of manufacturers instructions and warranty card.
1
Gas supply routing template
1
Spigot restrictor
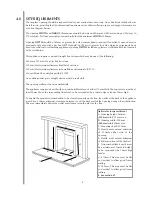
INSTALLATION OF APPLIANCE
Note: Ensure that the gas supply is isolated before commencing installation of the appliance.
The fireplace opening and environment must be in compliance with specifications laid down in the appropriate
sections of these instructions.
PREPARING THE APPLIANCE
Remove the appliance from it’s carton as described previously and stand on a dust sheet or similar. Place the
coals, ceramics and fixings safely to one side.
Remove the burner from the assembly by removing the two screws in the data/control plate. Lift away the plate,
and remove the two screws retaining the tray legs. The tray is now free and may be lifted away.
Knock out holes are provided in the rear of the convector box for use where concealed pipework is required.
Knock out the holes with a sharp tap from a hammer and fit the rubber grommet supplied. A small incision can
now be made in the rubber to slip snugly around the outside of the supply pipe and sleeving.
Note: DO NOT
install or use the appliance without this seal in place.
If the hole is inadvertently opened, reseal with an intact grommet. Failure to fit this seal correctly will cause the
flue suction to act upon the area under the burner
resulting in poor performance.
SPIGOT RESTRICTOR.
If fitting the fire into a Class 1 or
good Class 2 flue, attach the spigot restrictor to the rear
of the appliance using screws provided.
If spillage is detected during the commissioning of the
appliance, the spigot restrictor should be removed
immediately
6
7.1
8.1
8.0


