background image

Fluance Ai61   User Manual

13

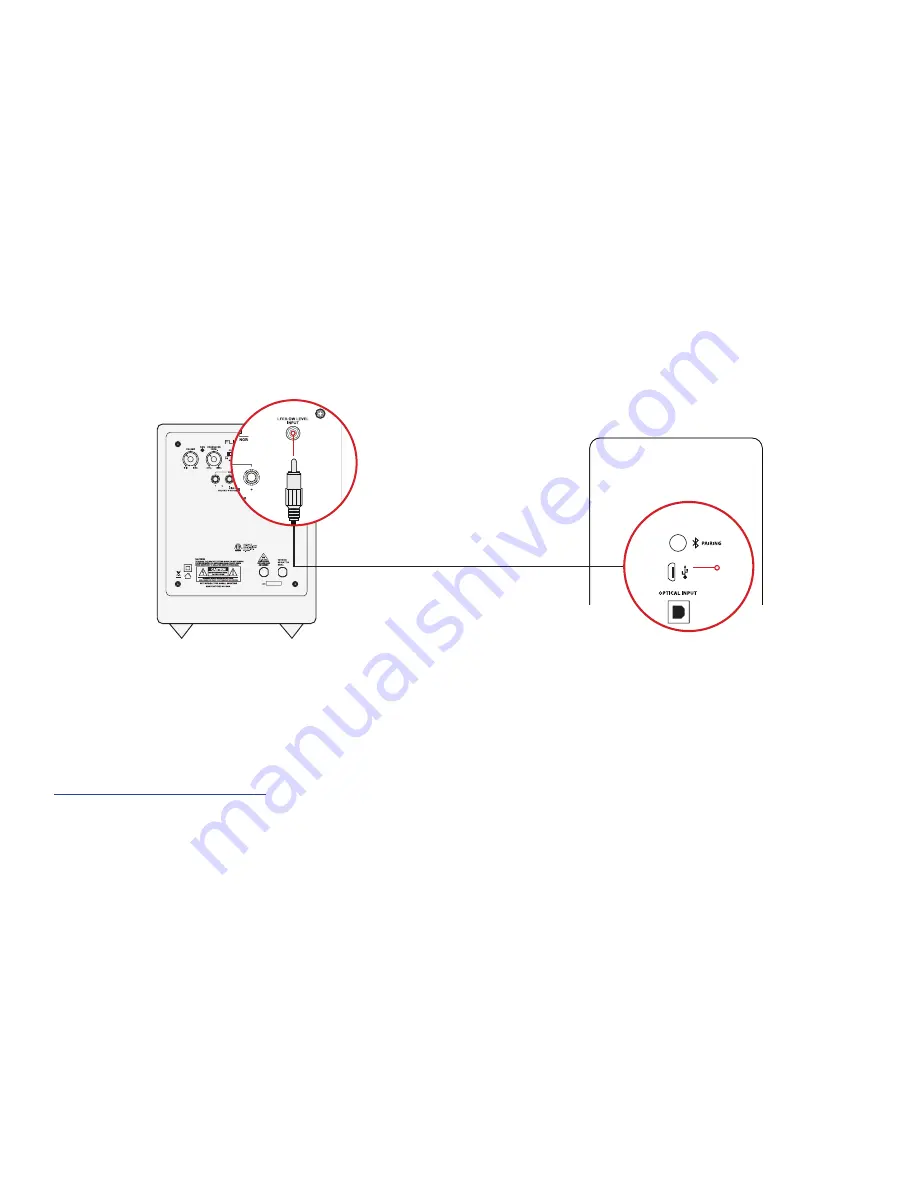
Subwoofer Output

IMPORTANT: When a subwoofer cable is connected, the Ai61 will automatically cut 
frequencies below 80Hz to optimize performance. The subwoofer cable must be removed  
to resume full frequency playback.

1.  Connect the Subwoofer cable to your powered subwoofer.

2.  Connect the other end of the Subwoofer cable to the back of the Active Speaker.

3.  Adjust the volume on the Subwoofer for the best listening experience.

Fluance offers matching subwoofers for the ultimate audio experience.  
For more information visit:

Fluance.com/subwoofer

DB10

*Subwoofer cable not included

Summary of Contents for Serious Performance Ai61

Page 1: ...Ai61 Powered 6 5 Bookshelf Speakers Manual v1 0 Serious Performance Fluance com...

Page 2: ...6 Product Setup 7 Turning On Off Unit 8 Source Selection 8 RCA Input 9 Bluetooth Pairing 10 Optical Input 11 USB Input 12 Subwoofer Output 13 Volume Adjustment 14 EQ Adjustment 14 Adjusting Source LE...

Page 3: ...t to the performance that can be achieved when a passion for music takes center stage The perfect complement to any audiophile s lifestyle you ll be enjoying live performances in your home for years t...

Page 4: ...cluded Quick Start Guide Speaker Wire LIFETIME Customer Support Lifetime Customer Support 2 Year Warranty Ai61 Passive Speaker Left Channel Ai61 Active Speaker Right Channel VOL VOL TREBLE BASS Remote...

Page 5: ...Standby Mode Red Flashing Mute Red Flash x2 Volume Set to Max Red Flash x2 Bass Treb Set to 5 or 5 Source Color Blue Green White Purple Flash x2 Bass Treb Set to 0 3 IR Sensor Front Back Panel Layout...

Page 6: ...mote Control Layout 1 Power ON OFF 2 Volume UP DOWN 3 Source 4 Treble UP DOWN 5 Mute 6 Play Pause Bluetooth Pairing Reset To enable Bluetooth Pairing Reset press hold for 3 seconds 7 Forward Back 8 LE...

Page 7: ...e back of the Passive Speaker IMPORTANT Ensure the same color wire is connected to the same color binding posts on each speaker Passive Speaker Active Speaker NOTE If placing the speakers in a cabinet...

Page 8: ...off the unit Press the Control Knob to cycle through the audio inputs Press on the remote to cycle through the audio inputs Press on the Remote to turn the unit on off VOL VOL TREBLE BASS VOL VOL TREB...

Page 9: ...r end of the RCA cable to back of the Active Speaker 4 Adjust volume on Ai61 as well as source device RCA to RCA cable not included NOTE When connecting a turntable to the Ai61 a phono preamplifier pr...

Page 10: ...and hold for 3 seconds to reset Bluetooth pairing Press the Bluetooth Pairing Reset Button on the back of the unit NOTE Unit will attempt to auto pair to the last paired device NOTE Adjust Volume on...

Page 11: ...i61 as well as source device Optical cable not included Optical Audio Signal Compatibility The Ai61 does not support Dolby Digital Audio or DTS Audio Locate the audio output settings on your source de...

Page 12: ...adjust volume in the different programs on the source device USB cable not included IMPORTANT The USB input on the Ai61 is for USB audio playback and not for USB charging USB Audio Output Settings Yo...

Page 13: ...moved to resume full frequency playback 1 Connect the Subwoofer cable to your powered subwoofer 2 Connect the other end of the Subwoofer cable to the back of the Active Speaker 3 Adjust the volume on...

Page 14: ...reble set to 0 Optical White Flash 2x Bass Treble set to 0 Bluetooth Blue Flash 2x Bass Treble set to 0 Adjusting Source LED Brightness Use the LED Brightness Button on the Remote to cycle between 100...

Page 15: ...ables Smartphones or Tablets How can I increase the volume when using the Ai61 with a turntable If turntable audio is too quiet you may need to add a preamplifier Some turntables have built in preamps...

Page 16: ...rly and fully inserted No Audio from Passive Speaker Check speaker wire connections between speakers and ensure securely connected to binding posts Poor Audio Ensure the colored wires are connected to...

Page 17: ...Composite Drivers with Butyl Rubber Surrounds AMPLIFIER POWER Class D 120 Watts Continuous Average Output 2x 60 watts FREQUENCY RESPONSE 32Hz 20KHz DSP Virtual Sound CROSSOVER FREQUENCY 2600Hz Phase...

Page 18: ...res Reorient or relocate the receiving antenna Increase the separation between the equipment and receiver Connect the equipment into an outlet on a circuit different from that to which the receiver is...

Page 19: ...osure limits set forth for an uncontrolled environment This equipment should be installed and operated with minimum distance 20cm between the radiator your body This transmitter must not be co located...

Page 20: ...uire warranty service please contact your Fluance Authorized Dealer and send your product fully insured and freight prepaid to the nearest Fluance authorized service center Before sending to Fluance y...

Page 21: ...uct We hope you enjoy your experience Questions Give us a chance to help we re just a click away Don t forget to register your product with us Fluance com registration Fluance com videos Fluance com r...

Reviews: