background image


Advanced Thermal  Solutions


ORION SC7000 User Manual


DCOO5U-F ORION SC7000 User Manual 

Page 25 

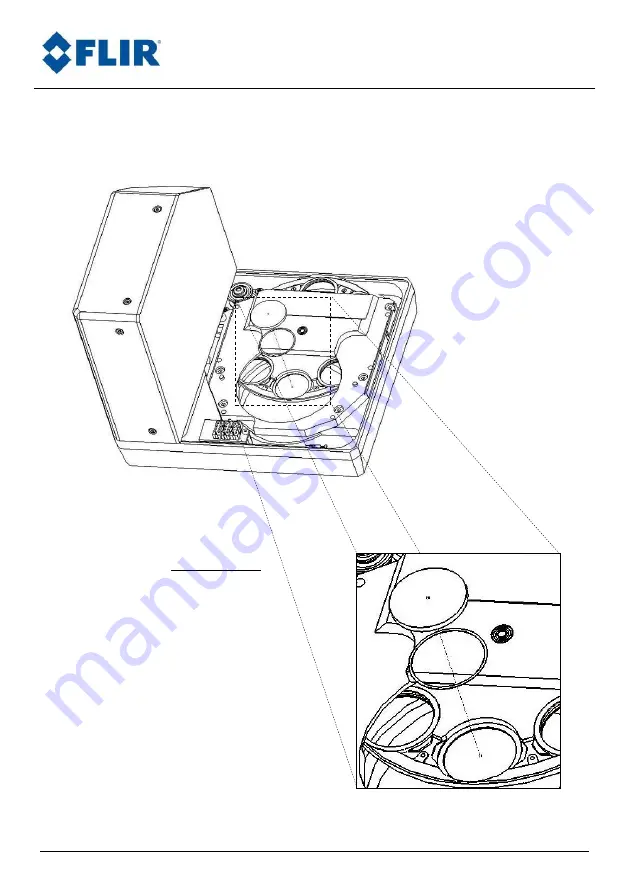
c.   One 2mm thick filter 


(1)  Place the 

spacer ring #2


in the slot 


(5)


Then  place  carefully  the 

filter  on  top  of  the 

spacer ring 

 
(6)


Put 

the 

slot 

ring 

according 

to 

step 

§6.3.1.5 


(7)


Follow  instructions  from 

step  §6.3.1.4  to  step 

§6.3.1.1 

(1) 

(2) 

Summary of Contents for ORION SC7000

Page 1: ...Advanced Thermal Solutions DCOO5U F ORION SC7000 User Manual ORION SC7000 User Manual ...

Page 2: ...Advanced Thermal Solutions ORION SC7000 User Manual DCOO5U F ORION SC7000 User Manual Page 2 PAGE LEFT INTENTIONNALY BLANK ...

Page 3: ...1 5 5 Pointing and focusing 12 5 6 Camera Power Off 12 5 7 Precautions 12 5 8 Training 13 6 Using your camera 14 6 1 Addition of an additional lens 14 6 2 Removing the lens interface 15 6 3 Filter wheel 16 6 4 Lockin connection Optional 29 7 Maintenance 30 7 1 Cleaning optical surfaces 30 7 2 Storing 30 8 Accessories 31 8 1 Additional lenses 31 8 2 Long cables 31 8 3 Interconnection transformation...

Page 4: ...ediately taking care not to burn yourself To continue using the equipment in this case can be dangerous Immediately contact FLIR to check Do not use your equipment in a flammable gas environment Do not use electronic material in the presence of flammable gas because that is likely to cause an explosion or a fire Do not dismount your material Touching internal parts of the camera can be extremely d...

Page 5: ...ly after being subjected to extreme environmental conditions Handle with great care the lenses and all moving parts Avoid abrupt changes of temperature Abrupt changes of temperature for example if you enter a heated place in cold weather conditions can cause condensation inside the device Do not drop your camera The camera may not function correctly after being subjected to violent shocks or stron...

Page 6: ...atest state of the art 320x256 or 640x512 pixels focal plane array FPA detector technology along with real time large dynamic range electronic modules The image frequency is programmable and the sub windowing modes are simple and flexible The integration time is adjustable by increments of 1µs External triggering allows the synchronization of the image with the most fleeting of events 4 2 Packing ...

Page 7: ...g tissue 1 CD ROM containing software and camera files 1 Camera User Manual 1 Camera Characterization file Optional 1 Cam LINK Frame Grabber Optional 1 Computer for camera command and image acquisition Optional 1 or more additional lenses Optional 1 Tripod Optional Splitter box for harsh environments Optional ...

Page 8: ...gger connector Giga Ethernet connector ON OFF button Handle with accessories interface Internal Filter wheel Standard M80 Lens interface Temperature sensor connector for temperature compensated lenses Focus motor control for motorized lens Video output connector Power Input connecor TITANIUM 590VL version TITANIUM 590VL version CamLink connector ...

Page 9: ...olutions ORION SC7000 User Manual DCOO5U F ORION SC7000 User Manual Page 9 NB Three different camera back panels are available hereafter described Threads for fixing on a plate Tripod Thread TITANIUM 590VL version 2 1 3 ...

Page 10: ...10 NB Configuration 3 is dedicated to harsh environments It comes with the following extension module for ON OFF button RS232 command Analog Video Trigger OUT connector Connection to Camera IRIG B connector Power IN connector Trigger IN connector Trigger Genlock selector Genlock IN connector ...

Page 11: ...mand software CIRRUS Altair software 5 3 Connecting the camera Connect the power and accessory cable to the connector behind the computer Connect the data cable to the connector behind the computer If required connect the camera to a video monitor in order to control the image Use a cable BNC 75 ohms or S video which you will connect to the camera by using the video adapter provided with the camer...

Page 12: ...ld have the same focusing point Focusing point is defined by material and thickness of the filter It is preferable to use both the same material and thickness for all filters 5 6 Camera Power Off The camera is turned off by pressing the ON OFF button for 2 seconds Repeated Power on operations may reduce the lifetime of the equipment It is better to leave the camera operating during intervals of us...

Page 13: ...is equipment and its use require knowledge of the field of infrared thermography in order to make best use of the camera and the processing of acquisitions FLIR offers training schemes allowing you to use this equipment to its full potential You can contact FLIR in order to establish your training requirements ...

Page 14: ... heavy Some lenses weight several hundred grams Be careful not to be surprised by its weight Depending on your configuration lenses are mounted with a M80 thread or a bayonet mount Turn gently the optic counter clockwise while placing a hand below It may be necessary to do some turns Place caps on the lens and store it Never force on lens Check that optics is clean before assembling it in the came...

Page 15: ... to be surprised by its weight The lens interface of the camera which also holds the filter wheel mechanism can be removed so a custom lens interface can be installed Turn gently the optic counter clockwise while placing a hand below It may be necessary to do some turns Place caps on the lens and store it Never force on lens Check that optics is clean before assembling it in the camera See section...

Page 16: ...lter wheel This wheel can be fitted with several filters from factory You may also want to upgrade the wheel yourself by fitting some additional filters In order to have your camera running as from factory after upgrading the filter wheel two important operations are required Inserting a filter in a slot removing a filter from a slot Balancing the filter wheel ...

Page 17: ...ng or removing an IR filter requires a proper clean environment e g clean room Use finger cots or gloves for any operation involving a filter An IR filter has different coatings on each side usually a metallic reflective layer and a colored or opaque layer the metallic layer side needs to be placed towards the radiation source The following steps indicate how to remove or insert one or two filter ...

Page 18: ...Advanced Thermal Solutions ORION SC7000 User Manual DCOO5U F ORION SC7000 User Manual Page 18 3 Remove the screws holding the stops with a 2 0 flat head screwdriver ...

Page 19: ...Advanced Thermal Solutions ORION SC7000 User Manual DCOO5U F ORION SC7000 User Manual Page 19 4 Remove the stops holding the filter slot ring ...

Page 20: ...Advanced Thermal Solutions ORION SC7000 User Manual DCOO5U F ORION SC7000 User Manual Page 20 5 Remove the slot ring ...

Page 21: ...one is used for 2mm thick filters or for a twin setup with two stacked 1mm thick filters iii Peelable laminated shims spacer this one is used for custom thickness filters The spacer can be peeled by 0 1 mm per shim allowing filters with thicknesses up to 2 1 mm to be inserted properly The following steps will help you peeling the spacer according to your filter thickness The slot has a depth of 2 ...

Page 22: ... Manual DCOO5U F ORION SC7000 User Manual Page 22 Peel the needed shims 0 1 mm per shim as indicated below Place the cutter blade edge on the peelable spacer as shown above Move the cutter blade towards your thumb and peel the shim as shown above ...

Page 23: ...SC7000 User Manual Page 23 a Inserting a 1mm thick filter 1 Place the spacer ring 1 first in the slot 2 Then place carefully the filter on top of the spacer ring 1 3 Put the slot ring according to step 6 3 1 5 4 Follow instructions from step 6 3 1 4 to step 6 3 1 1 1 2 ...

Page 24: ...Two stacked 1mm thick filters 1 Place carefully the first filter in the slot 2 Then place the spacer ring 2 on top of the filter 3 Place carefully the second filter on top of the spacer ring 4 Put the slot ring according to step 6 3 1 5 5 Follow instructions from step 6 3 1 4 to step 6 3 1 1 1 2 3 ...

Page 25: ...F ORION SC7000 User Manual Page 25 c One 2mm thick filter 1 Place the spacer ring 2 in the slot 5 Then place carefully the filter on top of the spacer ring 6 Put the slot ring according to step 6 3 1 5 7 Follow instructions from step 6 3 1 4 to step 6 3 1 1 1 2 ...

Page 26: ...ne filter of custom thickness up to 2 1mm 1 Place the peelable spacer ring in the slot that has been peeled to the correct thickness 2 Then place carefully the filter on top of the spacer ring 3 Put the slot ring according to step 6 3 1 5 4 Follow instructions from step 6 3 1 4 to step 6 3 1 1 1 2 ...

Page 27: ...lancing issues the number of filters must be the same on the opposite slot symmetrical slot regarding the rotation axis If needed a sapphire window can be used for fine adjustment see example below 1 filter or 1 sapphire window 2 filters or 1 filter 1 sapphire window 2 filters or 1 filter 1 sapphire window 1 filters or 1 sapphire window ...

Page 28: ...B 2 5µm Silica Glass SiO2 n 1 47 A MWBB 2 5µm Sapphire Al2O3 n 1 75 A LW VLW Germanium n 4 B That means that all material belonging to the same group A only or B only can be used together on the same wheel with the same thickness standard thickness 1mm Using a mix of material belonging to group A together with a material belonging to group B Germanium on the same wheel is prohibited except if the ...

Page 29: ...o the Orion SC7000 lockin connector Lockin Input Range 10V peak to peak AC only Rand 1 Input Range 5 5V AC DC Rand 2 Input Range 5 5V AC DC Connect the signal to Lockin for stress measurement and motion compensation Use Rand1 and Rand2 for Random analysis NB These signals can be displayed in Altaïr s TimingGraph thus allowing correlation of the thermal scene to external events ...

Page 30: ...panol 2 RECTAPUR 20 ref PROLABO 839 322 and wipe gently surface in only one direction while making movements in the figure eight Repeat the operation Start again previous step with acetone RECTAPUR ref PROLABO 20065293 Water finger marks oil or water spot cleaning Finger marks oil or water spots must be cleaned immediately Blow dust using a clean and dry gas ultra jet 2000 gas duster Using lens ti...

Page 31: ...ta sheet 8 2 Long cables Several lengths of cable are available up to 50m FLIR also offers optical fiber repeaters or Ethernet Gigabit repeaters allowing operation at several hundred meters 8 3 Interconnection transformation cases Several types of interconnection are available allowing a transmission of the commands and digital video through optical fiber Ethernet Gigabit or Camera Link 8 4 Tripod...

Page 32: ...Contact FLIR After Sale Service The Stirling engine does not seem not to reach its specified point It always turns to full power Check through CIRRUS software the temperature of the detector after 10 min of powering It is close to temperature specified in the data sheet 2 K Yes The temperature control is done correctly but may be overworking the Stirling engine Stay alert to any change that may re...

Page 33: ...No remake connections Yes Does Cirrus communicate with the camera No Contact FLIR After Sales Service Yes Check that external trigger is deactivated Is the problem solved No Contact FLIR After Sales Service No image in external trigger mode Check that synchro signal connected to the camera is TTL 0 5V under 50 Ohms No Adjust the input signal Yes Is the frequency of the signal in the range of the c...

Page 34: ...ter Sales Service Defect of image mosaic in corners Bad quality of NUC or search criteria of Bad pixels too severe Remake NUC and BPR The problem is solved No Contact FLIR After Sales Service Strongly concentric image Do a 1 point NUC to eliminate the Narcissus effect due to the filter The problem is solved Yes The emissivity of the filmed object is too low 0 75 To give angle with the object with ...

Page 35: ...128 16x4 up to 100Hz Full Frame 4 98kHz 64x4 7300M MCT 320x256 3 7 4 8 30µm F 2 or F 4 160x128 80x64 User defined 64x2 min up to 235Hz Full Frame Snapshot Integrate then read mode ITR 7300L 7 7 9 3 7700M 640x512 3 7 4 8 15µm F 2 320x256 160x128 User defined up to 115Hz Full Frame 2962Hz 132x3 ITR mode Snapshot Integrate then read mode ITR Integrate While Read mode IWR 7500L QWIP 640x512 7 5 9 1 20...

Page 36: ...r 12 VDC 5A 50W in cool down mode 30W in steady state mode 268 x 180 x 168 w o lens 7 kg IP54 20 C 55 C 7500M BB CamLINK GigE Ethernet 7600M BB 7300M 20mK 7300L 7700M 1µs to 20ms program mable 1µs step 25mK 7500L 3µs to 20ms programmable 1µs step 60mK 7900VL 25mK 24VDC 418 x 180 x 168 w o lens 12 550 kg Integration time NETD Analog video Digital video Cooling type Cooling time Motorized filter whe...

Page 37: ...Advanced Thermal Solutions ORION SC7000 User Manual DCOO5U F ORION SC7000 User Manual Page 37 10 1 Mechanical interface ...

Page 38: ...Advanced Thermal Solutions ORION SC7000 User Manual DCOO5U F ORION SC7000 User Manual Page 38 ...

Page 39: ...Advanced Thermal Solutions ORION SC7000 User Manual DCOO5U F ORION SC7000 User Manual Page 39 ...

Page 40: ... connector Connector reference LEMO ERP1S306CLN Mating part LEMO FFA1S306CLAC42Z Signal Characteristic 75 Ohms 10 2 2 Power supply connector Connector reference LEMO ECP1S302CLN Mating part LEMO FFA1S302CLAC52 10 2 3 Trigger connector Signal Pin Composite_Video 1 GND 2 SVideo_Chroma 3 GND 4 SVideo_Lumi 5 TX 6 Signal Pin GND 1 12V 2 ...

Page 41: ...304CLAC42Z Signal Characteristic 50 Ohms 10 2 4 Lockin connector Connector reference LEMO ECP1S305CLN Mating part LEMO FFA1S305CLAC42Z Signal Characteristic 10 MOhms Signal Pin characteristic Trigger OUT 1 LVTTL 3 3V GND 2 Trigger IN 3 LVTTL 3 3V GND 4 Signal Pin characteristic Lockin 1 0 10V AC only GND 2 Random1 3 5 5V DC AC GND 4 Random2 5 5 5V DC AC ...

Page 42: ...5 Camera LINK connector Connector reference 3M MDR26 Mating cable Signal Pin Signal Pin Inner Shield 1 Inner Shield 14 X0 2 X0 15 X1 3 X1 16 X2 4 X2 17 Xclk 5 Xclk 18 X3 6 X3 19 SerTC 7 SerTC 20 SerTFG 8 SerTFG 21 CC1 9 CC1 22 CC2 10 CC2 23 CC3 11 CC3 24 CC4 12 CC4 25 Inner shield 13 Inner shield 26 ...

Page 43: ...en this mode is activated see Cirrus User manual for more details it performs a rolling of the NUC table and integration time associated At each Top Frame the next image associated with the next NUC Table and integration time from 1 to 4 max is available Data_Frame Data_Clock Data_DX Table 1 Table 2 Table 3 Table 4 Table 1 ...

Reviews: