FLIR
MR160
USER
GUIDE
Document
Identifier:
MR160
‐
en
‐
US_AA
9
4.3
Menu
Icons
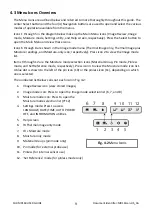
Overview
The
Menu
Icons
are
outlined
below
and
referred
to
more
thoroughly
throughout
this
guide.
The
center
Select
button
and
the
four
(4)
Navigation
buttons
are
used
to
open
and
select
the
various
modes
of
operation
available
from
the
menus.
Icons
1
through
5
in
the
diagram
below
make
up
the
Main
Menu
icons
(Image
Review,
Image
mode,
Moisture
mode,
Settings
utility,
and
Help
screen,
respectively).
Press
the
Select
button
to
open
the
Main
Menu
and
view
these
icons.
Icons
6
through
8
are
shown
in
the
Image
mode
menu
(Thermal
Image
only,
Thermal
Image
plus
Moisture
readings,
and
Moisture
‐
only
icon,
respectively).
Press
icon
2
to
view
the
Image
mode
list.
Items
9
through
12
are
the
Moisture
mode
selection
icons
(Material
Group,
Pin
mode,
Pinless
mode,
and
Set
Reference
mode,
respectively).
Press
icon
3
to
view
the
Moisture
mode
icon
list.
A
blue
dot
is
shown
to
the
left
of
the
pin
icon
(10)
or
the
pinless
icon
(11),
depending
on
which
one
is
selected.
The
numbered
list
below
calls
out
each
icon
in
Fig.
4
‐
2:
1.
Image
Review
icon
(view
stored
images)
2.
Image
mode
icon:
Press
to
open
the
Image
mode
selection
list
(6,
7,
and
8)
3.
Moisture
mode
icon:
Press
to
open
the
Moisture
mode
selection
list
(9~12)
4.
Settings
mode:
Press
to
access
LANGUAGE,
DATE/TIME,
AUTO
POWER
OFF,
and
INFORMATION
utilities.
5.
Help
screen
6.
IR
Thermal
image
only
mode
7.
IR
+
Moisture
mode
8.
Moisture
‐
only
mode
9.
Material
Groups
(pin
mode
only)
10. Pin
mode
(for
external
probe
use)
11. Pinless
(for
internal
sensor
use)
12. ‘Set
Reference’
mode
(for
pinless
mode
only)
Fig.
4
‐
2
Menu
Icons
6 7
1
2
3 4
5
8
9 10 11 12


