background image

3—Operating Your H-Series Camera

H-Series Operator’s Manual

24

November 2009

3–11 2× Extender

The 2× Optical Extender, compatible with both 

HS-324

 and 

HS-324


Pro

 (Command version) camera models, provides the user the ability 

to see twice as far and/or enhance the resolution of objects in the 
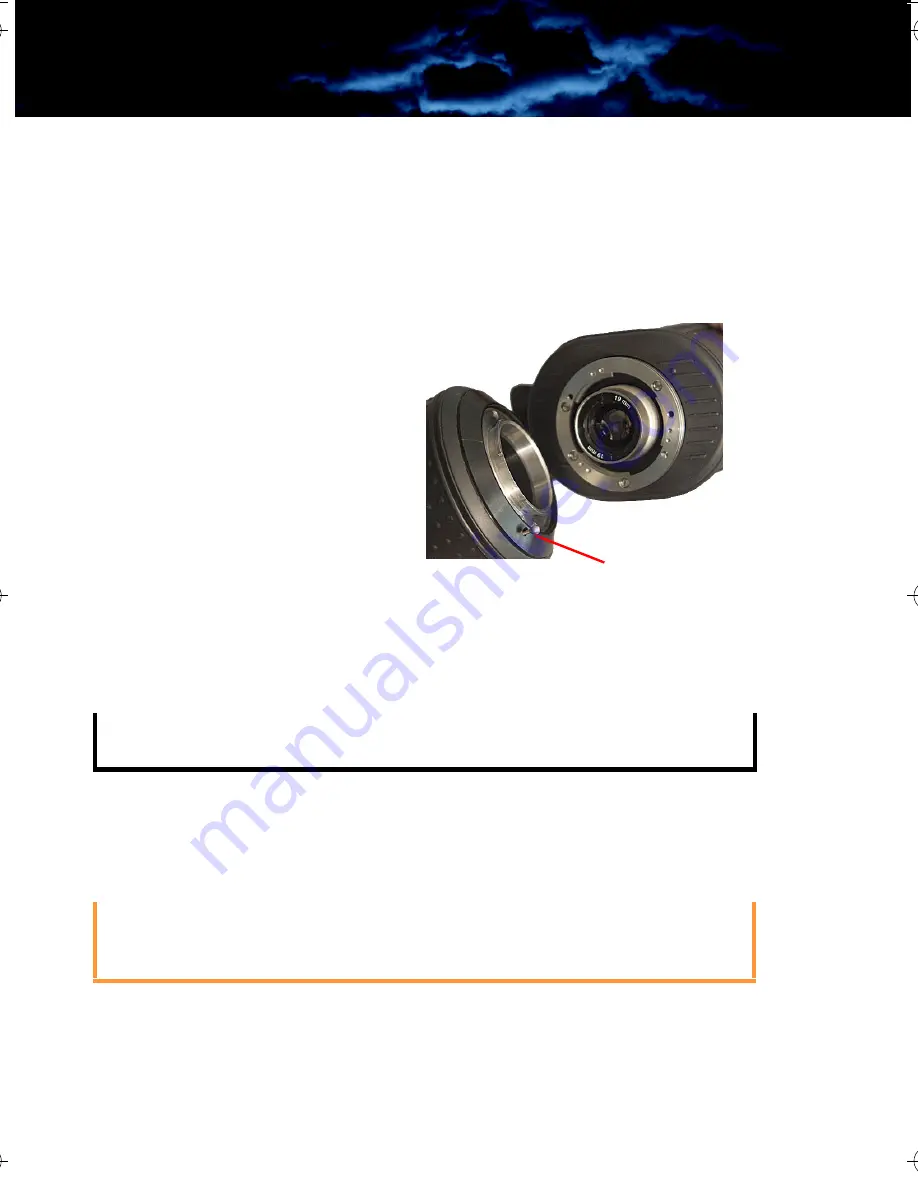
field of view. The 2× Optical Extender is mounted on the bayonet mount 
in front of the existing lens on the camera.

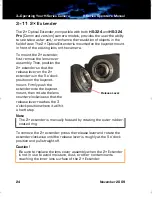
To mount the 2× extender, 
first remove the lens cover 
assembly. Then, position the 
2× extender so that the 
release lever on the 2× 
extender is in the 5 o’clock 
position on the bayonet 
mount. Firmly push the 
extender onto the bayonet 
mount, then rotate the lens 
counter-clockwise so that the 
release lever reaches the 3 
o’clock position where it will hit 
a hard stop. 

Note

To remove the 2× extender, press the release lever and rotate the 
extender clockwise until the release lever is roughly at the 5 o’clock 
position and pull straight off.

Caution!

The 2× extender is manually focused by rotating the outer rubber-
coated ring.

Be sure to replace the lens cover assembly when the 2× Extender 
is not in use to avoid moisture, dust, or other contaminants 
reaching the inner lens surface of the 2× Extender.

Release Lever

HS_Series_Operators.book  Page 24  Thursday, November 5, 2009  12:58 PM

Summary of Contents for FLIR H Series

Page 1: ...Manual Document Number 431 0003 01 10 Revision 110 November 2009 Your Source for Modern Thermal Imaging Systems P O BOX 4242 Middletown New York 10941 USA Phone 1 888 919 2263 Phone Intl 1 845 343 40...

Page 2: ...prior to returning a camera This documentation is subject to change without notice This equipment must be disposed of as electronic waste Contact your nearest FLIR Comm ercial Vision Systems Inc repre...

Page 3: ...lling the Batteries and SD Card 10 Charging the Camera 11 H Series Power Management 12 Buttons and Controls 14 Batteries 18 SD Card Door 19 Auto Standby Operation 21 The Hot Shoe 22 Bayonet Lens Mount...

Page 4: ...H Series Operator s Manual iv November 2009...

Page 5: ...s through smoke dust and light fog You can see better through camouflage and foliage in any lighting conditions Because H Series camerassee heat not light they are not fooled by suspects wearing dark...

Page 6: ...covert Two sided Hand Strap Accommodates both left handed and right handed users Software upgrades using SD card in the field SD Card Slot Allows for storing captured still images and video on the rem...

Page 7: ...lectronics to water or debris It is a good idea to avoid pointing the system directly at extremely high intensity radiation sources such as the sun lasers arc welders etc Use only the supplied power a...

Page 8: ...1 Introduction H Series Operator s Manual 4 November 2009...

Page 9: ...10 Revision 110 5 2 Getting Started The H Series cameras shown below are available with the features options and accessories described in this manual 19 mm Lens with 2 Extender 19 mm Lens Configuratio...

Page 10: ...the actual contents of your camera package HS 324 Patrol version Camera Package In addition to the camera Quick Start card Operator s manual and Documentation Training CD or DVD the following items a...

Page 11: ...e In addition to the camera Quick Start card Operator s manual and Documentation Training CD or DVD the following items are included in the HS 324 Pro Command version camera package Neck Lanyard Carry...

Page 12: ...ssories 2 Optical Extender for 19 mm lens The attachable 2 Optical Extender lens doubles the range of performance when needed without sacrificing the situational awareness benefits of the wide field o...

Page 13: ...perating Your H Series Camera 3 1 Camera Features and Controls Power 2 zoom White hot Display Black hot Adjustable diopter 2 Eyepiece Lens cap Capture Brightness SD Card door Battery door Hot Shoe Tri...

Page 14: ...ra package install the SD card 3 Loosen the four captive screws securing the battery cover 4 Pry off the battery cover by grasping the front edge exposed when the SD card cover was removed 5 Install t...

Page 15: ...the clockwise direction until tight 3 Plug the power adapter provided with the camera into its power source and also into the Hot Shoe Ensure that the plug is fully seated in the Hot Shoe The initial...

Page 16: ...rely turned off unless you do not plan to use it for a few days or more When near a power source AC power or a car cigarette lighter or when not in use you keep it on a charger When you turn it on fro...

Page 17: ...Auto Standby Operation on page 21 the camera goes to Standby after three minutes if no buttons are pushed A warning is shown in the display From the Standby state the camera comes back on within about...

Page 18: ...mera will enter the Off state if the countdown finishes Release the Power button at any time during this countdown to terminate Shutdown and resume normal operation Note From State To State Method Off...

Page 19: ...megabyte MB of storage on the SD card The image and video files must be transferred to a computer for viewing Note If the camera is not an HS 324 Pro Command version model this message will be shown...

Page 20: ...store a video sequence of what is currently being shown in the display press and hold the Capture button Video capture will begin immediately and continue until the Capture button is released During t...

Page 21: ...enhance contrast of certain objects or provide better visual perspective in some conditions When switching between modes the appropriate icon is displayed for approximately 3 seconds Zoom Button Use t...

Page 22: ...ge This indicator provides an estimation of the remaining battery charge Note Using Non Rechargeable Batteries The H Series camera allows Alkaline non rechargeable batteries to be used When non rechar...

Page 23: ...SD Card door grasp the two edges with your thumb and finger and pull straight up Caution To close the SD Card door slide the lanyard strap back into the camera position the door in place and then fir...

Page 24: ...mpatible with SDHC standards If an SD card is inserted into an HS 324 Patrol version model it will be ignored unless the camera software detects a valid upgrade file The HS 324 Patrol version model mu...

Page 25: ...tions are met you will see the following message in the display and the camera will enter the Standby state after the countdown is finished Press any button during this countdown to terminate Auto Sta...

Page 26: ...bottom ofthe camera and is secured via the tripod mount The following steps are recommended for quick and easy attachment of the Hot Shoe 1 With the camera positioned bottom side up hold the Hot Shoe...

Page 27: ...e bayonet mount Operation of the Lens cover Assembly The lens cover is a simple flip to open lens cover that provides protection for the camera lens when not in use To open simply flip the lens cover...

Page 28: ...he release lever on the 2 extender is in the 5 o clock position on the bayonet mount Firmly push the extender onto the bayonet mount then rotate the lens counter clockwise so that the release lever re...

Page 29: ...oughly centered on the unit In the Base position the index finger is comfortably positioned over the Power button as shown in Figure 3 1 Middle ring and little fingers naturally fall on the Camera 2 a...

Page 30: ...ll the Hot Shoe and connect to a power source Refer to The Hot Shoe on page 22 4 Turn on the camera During its Bootup process the camera will check the SD card for a valid upgrade file 5 Watch the dis...

Page 31: ...Manual USB Cable Video Output Cable HS 324 Pro Command version Everything in Patrol version Model plus Tactical Carrying Pouch image save function video save func tion with real time stamp USB2 port...

Page 32: ...line Battery Life Operating Stand By Approximately 5 Hours on NiMH batteries at 25 C 120 hours on NiMH batteries Ratings IP 67 Submersible 1 meter drop Operational Temp 4 F 140 F 20 C 60 C Weight incl...

Page 33: ...320 240 resolution Video Storage Format Approx 8 seconds Mb on SD card 320 240 MPEG 4 HS 324 with 2 Optical Extender Detect Man 1 8 m 0 5 m 1 445 440 m 2 362 720 m Recognize Man 360 110 m 590 180 m De...

Page 34: ...4 Technical Data H Series Operator s Manual 30 November 2009...

Page 35: ......

Page 36: ...Your Source for Modern Thermal Imaging Systems P O BOX 4242 Middletown New York 10941 USA Phone 1 888 919 2263 Phone Intl 1 845 343 4077 Fax 1 845 343 4299 Email support thermalvideo com...

Reviews: