


427-0101-01-12 Revision 100
September 2020
7
This document does not contain any export-controlled information.
Installation
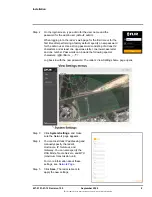
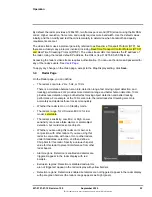
Step 2
Authenticate the radar.
Right-click the radar and select
Login
, or click the
Login
icon in the navigation bar.
In the
DNA - Login
window, type the password for the admin user (default:
admin
). Then,
click
Login
.
In the DNA Discover List, verify that the radar’s status is
Online
and
Authenticated
.
Step 3
Configure the radar’s networking settings.
Right-click the radar and select
IP Setup
, or click the
IP Setup
icon in the navigation bar.
In the
DNA - IP Setup
window, you can clear
Use DHCP
and manually specify the radar’s
IP Address
,
Mask
, and
Gateway
. Then, click
Update
and wait for Ok status to appear.
To configure the Elara Radar for networking using its web page:
Step 1
Open the radar’s web page either by double-clicking the radar in the DNA Discover List or
by typing the radar’s IP address in a web browser’s address bar. The radar’s web page
supports the latest versions of popular web browsers.