FLIR Ariel CM-3202-11-I Quick Install Manual Download Page 6

CM-3202-11-I QIG Rev 100

June 2020

This document does not contain any export-controlled information.
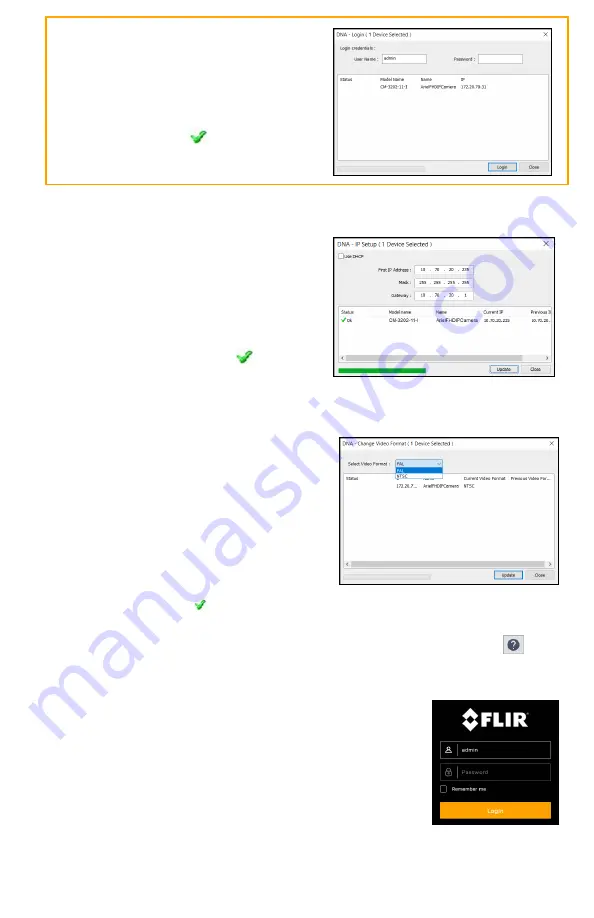
In the 

DNA - Login

 window, type the

password for the admin user. If you do
not know the admin user password,
contact the person who configured the
camera's users and passwords.

Click 

Login

, wait for 

 Ok status to

appear, and then click 

Close

.

In the DNA Discover List, verify that the camera's status is 

Authenticated

.

d. Change the camera’s IP address.

Right-click the camera and select 

IP

Setup

.

In the 

DNA - IP Setup

 window, clear

Use DHCP

 and specify the camera's 

IP

address

. You can also specify the 

Mask

(default: 255.255.255.0) and 

Gateway

.

Then, click 

Update

, wait for 

 Ok status

to appear, and then click 

Close

.

4.2 Change Video Format (Optional)

By default, NTSC is the camera's video
format.

To change the camera's video format to
PAL using the DNA tool:

a. In the DNA Discover List, right-click the

camera and select 

Change Video

Format

.

b. In the 

Change Video Format 

window,

select 

PAL

.

c. Click 

Update

, wait for   Ok status to appear, and then click 

Close

.

For more information about using the DNA tool to configure one or more cameras,

see the 

DNA User Guide

. While the software is open, click the Help icon 

.

4.3 Complete Camera Setup

Specify the camera's zoom and focus, and format the
microSDXC card, using the camera's web page, which
supports Google Chrome (recommended), Firefox, Microsoft
Edge, and Internet Explorer 11 (32-bit), on PCs running 64-
bit Windows 7, 8, 8.1, or 10.

a. Log in to the camera’s web page.

In the DNA Discover List, double-click the camera.

On the login screen, type a user name and password.
Both are case-sensitive.

Summary of Contents for Ariel CM-3202-11-I

Page 1: ...t the camera and then unzip the file The DNA tool does not require a license to use and is a free download from FLIR com Products Security Visible Security Cameras FLIR ARIEL CM 3202 2 2 Perform a Ben...

Page 2: ...ty Cameras Accessory Guide 3 Install the Camera 3 1 Fit Mounting Hardware If required install the mounting hardware for the camera according to the instructions for the hardware 3 2 Remove Camera Cove...

Page 3: ...ed b Attach an Ethernet cable from the network switch to the RJ45 connector for a 100 Mbps Ethernet and PoE Power over Ethernet IEEE 802 3af Class 3 connection Ethernet is required for streaming video...

Page 4: ...ew 3 5 Place the Desiccant in the Camera a Carefully tear open the vacuum packed aluminum desiccant bag along the slit on one edge b Remove the desiccant c Remove the paper backing of the double sided...

Page 5: ...on a network with static IP addressing you can manually specify the camera s IP address using the DNA tool or the camera s web page The camera s default IP address is 192 168 0 250 To manually specif...

Page 6: ...Change Video Format Optional By default NTSC is the camera s video format To change the camera s video format to PAL using the DNA tool a In the DNA Discover List right click the camera and select Ch...

Page 7: ...new password for the admin user Use a strong password consisting of at least eight characters and at least one uppercase letter one lowercase letter and one number Passwords can include the following...

Page 8: ...scovery Attach procedures to attach the camera to a VMS 5 Camera Dimensions The Ariel CM 3202 11 I camera s dimensions are Side Dimensions Base Dimensions 6 Register the Product Register your Product...

Reviews: