Flexco H-Type Installation, Operation And Maintenance Manual Download Page 11

9

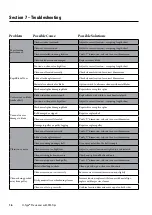
Recommended range for tip size
Optional extended range

Extra Small (SS) XF2 Tips

for Head Pulley Diameters 

250 - 475mm

Diameter 

(Over Belt)

X

Y

C

Gap

250

51

302

305

60

275

64

305

311

57

300

73

308

318

54

325

86

311

324

51

350

98

314

330

48

375

111

318

337

44

400

124

321

343

41

425

137

324

352

38

450

149

327

359

38

475

159

330

368

35

500

171

333

378

35

525

184

337

384

32

550

197

340

394

32

575

210

343

403

29

600

222

349

413

29

625

235

352

422

29

Small (S) XF2 Tips

for Head Pulley Diameters

350 to 925mm

Diameter 

(Over Belt)

X

Y

C

Gap

350

70

371

378

79

375

83

375

381

73

400

95

378

387

70

425

108

381

394

67

450

117

384

400

64

475

130

387

410

57

500

143

391

416

54

525

156

394

422

54

550

168

397

432

51

575

181

400

438

48

600

194

403

448

44

625

203

406

454

44

650

216

410

464

41

675

229

413

473

38

700

241

416

483

38

725

254

419

489

35

750

267

422

498

35

775

279

425

508

32

800

292

429

518

32

825

302

432

527

29

850

314

435

537

29

875

327

438

546

25

900

340

441

559

25

925

352

445

568

25

Medium (M) XF2 Tips

for Head Pulley Diameters

650 to 1125mm

Diameter

(Over Belt)

X

Y

C

Gap

650

206

451

495

64

675

219

454

505

60

700

232

457

511

57

725

244

460

521

57

750

254

464

530

54

775

267

467

540

51

800

279

470

549

51

825

292

473

556

48

850

305

476

565

44

875

318

479

575

44

900

330

483

584

41

925

343

486

594

41

950

352

492

603

38

975

365

495

616

38

1000

378

498

625

35

1025

391

502

635

35

1050

403

505

645

35

1075

416

508

654

32

1100

429

511

667

32

1125

438

514

676

32

Large (L) XF2 Tips

for Head Pulley Diameters

850 to 1325mm

Diameter 

(Over Belt)

X

Y

C

Gap

850

298

511

591

60

875

311

514

600

57

900

324

518

610

54

925

337

521

619

54

950

349

524

629

51

975

362

527

638

51

1000

375

530

648

48

1025

384

533

657

44

1050

397

537

667

44

1075

410

540

679

41

1100

422

543

689

41

1125

435

546

699

41

1150

448

549

708

38

1175

460

552

718

38

1200

473

556

730

35

1225

483

559

740

35

1250

495

562

749

35

1275

508

565

762

32

1300

521

568

772

32

1325

533

575

781

32

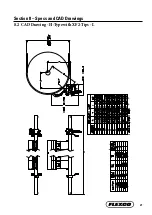
4.2  Pole Location Charts

Section 4 – Installation Instructions

Summary of Contents for H-Type

Page 1: ...H Type Precleaner with XF2 Tips Installation Operation and Maintenance Manual www flexco com www flexco com...

Page 2: ...chased From _____________________________________________________________ Installation Date _____________________________________________________________ Serial number information can be found on the...

Page 3: ...ation Instructions 6 4 2 Pole Location Charts 9 Section 5 Pre Operation Checklist and Testing 10 5 1 Pre Op Checklist 10 5 2 Test Run the Conveyor 10 Section 6 Maintenance 11 6 1 New Installation Insp...

Page 4: ...ice 91 44 6551 7771 Visit www flexco com for other Flexco locations and products Please read this manual thoroughly and pass it on to any others who will be directly responsible for installation opera...

Page 5: ...isengage any takeups Clear the conveyor belt or clamp securely in place Use Personal Protective Equipment PPE Safety eyewear Hardhats Safety footwear Close quarters springs and heavy components create...

Page 6: ...rts are included Review the Tools Needed list on the top of the installation instructions Check the conveyor site Will the cleaner be installed on a chute Is the install on an open head pulley requiri...

Page 7: ...itedownknowndimensions Wecannowdeterminetwoofthethreerequireddimensionswhichwillallowusto findthethird Weknowwecannotalterthe C dimension sothiswillremainthesame Alsowearerequiredtolower theunitinthe...

Page 8: ...B Belt Direction Fig 2 Physically lock out and tag the conveyor at the power source before you begin cleaner installation Pole Location Specs For specific cleaner specs see charts on page 8 A X C A P...

Page 9: ...tion marks Intersecting mark Y X Fig 5 11 Position the pole Rotate the pole upward until the tips touch the belt Center the tips across the belt While applying light pressure on the center tip shift t...

Page 10: ...r tensioning Make adjustments as necessary 14 Reassemble the spring assembly Slide the spring washer and bushings onto the pivot arm and turn the two adjusting nuts so about 6mm 1 4 of the pivot arm i...

Page 11: ...2 527 29 850 314 435 537 29 875 327 438 546 25 900 340 441 559 25 925 352 445 568 25 Medium M XF2Tips for Head Pulley Diameters 650 to 1125mm Diameter Over Belt X Y C Gap 650 206 451 495 64 675 219 45...

Page 12: ...d from the belt and the conveyor area 5 2 Test Run the Conveyor Run the conveyor for at least 15 minutes and inspect the cleaning performance Check the tensioner spring for recommended length proper t...

Page 13: ...that are dirty If the blade is worn out and needs to be replaced If there is damage to the blade or other cleaner components If fugitive material is built up on the cleaner or in the transfer area If...

Page 14: ...y are flush with the ends of the pivot arms Fig 1 This releases the tension of the blade on the belt Physically lock out and tag the conveyor at the power source before you begin cleaner installation...

Page 15: ...oper tensioning Make adjustments as necessary 3 Install the new tips Locate each tip onto each suspension arm then install the hardware to fasten the tip to the cushion Fig 3 HXF2 Spring Length Chart...

Page 16: ...ty Date Work done by Service Quote Activity Date Work done by Service Quote Activity Date Work done by Service Quote Activity Date Work done by Service Quote Activity Date Work done by Service Quote A...

Page 17: ...cted Is blade making complete contact with belt Yes No Blade wear LEFT MIDDLE RIGHT Blade condition Good Grooved Smiled Damaged Measurement of spring Required Currently Was Cleaner Adjusted Yes No Pol...

Page 18: ...sual wear or damage to blade Mechanical splice damaging blade Repair skive or replace splice Belt damaged or ripped Repair or replace belt Cleaner not correctly located Verify C dimension relocate to...

Page 19: ...For special extra long pole length requirements a Pole Extender Kit 76024 is available that provides 750mm 30 of extended pole length Pole Diameter 73mm 2 7 8 HXF2 Spring Length Chart for optimal bla...

Page 20: ...3 1 8 13 1 2 13 3 8 13 1 4 12 5 8 12 3 4 12 1 2 12 7 8 DIAMETER OVER BELT 2 1 2 2 7 8 3 3 8 3 7 8 POLE LOCATION CHART 2 10 12 14 13 11 X 11 7 8 12 12 1 8 12 1 4 12 3 8 12 13 Y 1 1 8 1 1 8 1 3 8 1 1 8...

Page 21: ...8 20 16 1 4 16 3 8 16 1 2 16 1 8 16 18 5 8 19 1 4 19 18 1 4 17 7 8 OVER BELT DIAMETER 16 17 14 15 20 18 19 22 23 24 21 14 5 8 2 3 4 14 7 8 5 1 8 6 5 8 7 1 8 7 5 8 5 5 8 6 1 8 3 3 4 4 5 8 4 1 4 3 1 4 1...

Page 22: ...3 3 4 24 1 4 25 3 8 25 3 4 24 5 8 26 5 8 26 1 4 18 1 2 11 32 20 16 3 8 17 1 4 16 7 8 44 45 20 1 4 20 1 8 11 1 2 12 1 2 13 1 2 14 3 8 13 7 8 15 3 8 15 7 8 14 7 8 38 41 42 43 39 40 35 36 37 33 34 13 12...

Page 23: ...LOCATION CHART 21 15 1 8 41 22 1 4 20 1 2 53 52 21 22 5 8 22 3 8 15 5 8 16 1 8 17 1 8 17 5 8 18 1 8 19 1 2 18 5 8 16 5 8 46 49 50 51 48 47 19 20 44 45 43 42 21 5 8 21 3 4 21 7 8 22 1 8 22 30 21 1 8 21...

Page 24: ...Arms HFC2 75901 4 0 2d H2 F Tip Cushion Neoprene oil resistant for SS HXF2 Tips or SS Susp Arms HFC2SS 77043 4 0 3 HXF2 Tip Extra Small HXF2 SS 75979 3 0 HXF2 Tip Small HXF2 S 75980 3 4 HXF2 Tip Medi...

Page 25: ......

Page 26: ......

Page 27: ...he belt Slide Out Service gives direct access to all impact bars for change out Impact bar supports for longer bar life 4 models to custom fit to the application A belt cleaner for the tail pulley Exc...

Page 28: ...dwide through superior service and innovation New Door No 51 Anna Salai Nagalkeni Pammal Village Chennai 600 044 Tamil Nadu India Tel 91 44 4856 6762 E mail info india flexco com Visit www flexco com...

Reviews: