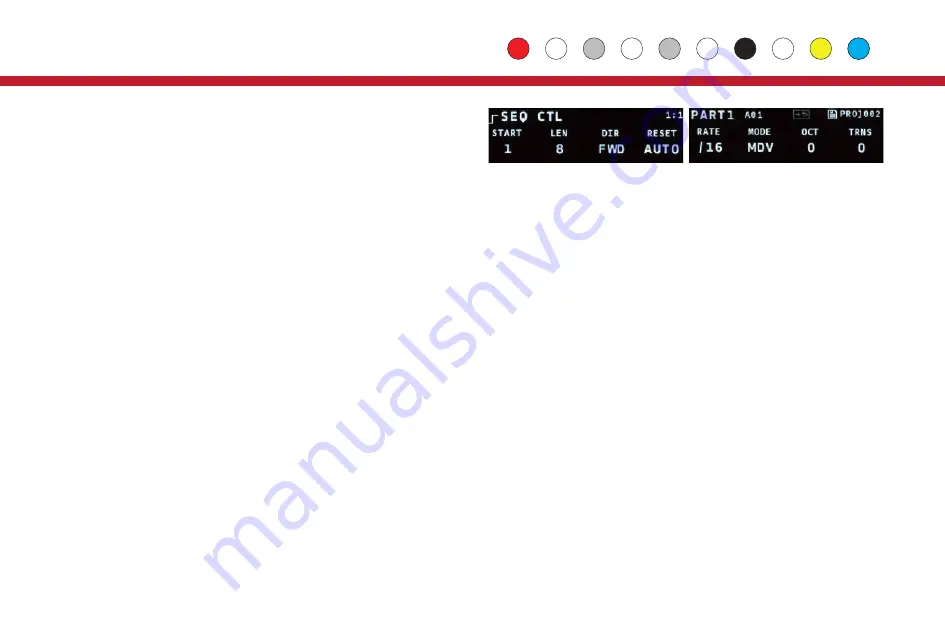
Five12 Vector User Manual Download Page 5

START, LEN

:

 Sets the starting step and pattern length within the maximum 

sequence length for the part.

DIR

:

 Sets the sequence direction: Forwards, backwards, alternate with or 

without repeating the ends, or run randomly.

RESET

:

 Sets the sequence to reset automatically, every 

beats, or 

externally (

EXT

). For external reset, see 

Tips & Tricks 

on page 25.

RATE, MODE

:

  The default rate for sequences is set using common musical 

divisions (

MDV

), but there are several alternate modes: 

   MDV 

: Musical Division 


X16

X8T

X8 

: Crossfade modes

   PCT 

: % of a beat   


P16

P8T

P8

: Phase modes.

   SPD 

: Speed, higher is faster.     

1/1 

16/16 

: Fractions of a beat.

The 

and 

modes are phase-based, where the rate deviates (faster or 

slower) from a default rate of 16th, 8th note triplets or 8th notes. The 

modes have a wider range than the 

modes.

OCT, TRANS

:

 Add an octave or semitone transposition to all notes.

TIP: On the 

Seq Ctl 

page, the mini keyboard can be used to set the 

transposition. Use 

Prev 

and 

Next 

to shift the keyboard down or up an 

octave.

Sequence Controls: Page 2

VEL VAR, TIM VAR

:

 Add random variations to Velocity and Timing 

(groove).

Key, Scale:

 Override the global settings for key and scale.

TIP: The master tempo for the Vector, and the default key and scale 

settings for all parts are in 

Globals

.

TUN

:

 Sets the tuning. See the next page for details.

GEN

:

 Sets the algorithm for pattern generation. See 

Generate & Evolve 

on Page 11 for details.

EVO

:

 Sets the amount of change the evolve operation has: Low, Medium 

or High. 

Sequence Controls: Page 3

CC 1-3

:

 Sets the CC numbers for the three CC lanes in the Velocity 

pages.

PQNT

:

 Preset Quantization, sets whether presets change immediately, on 

the next beat, or on the next bar.

CHABAR

:

  Chance Bar Mode, sets whether the settings on the 

CHNC BAR 

page count by musical bars, or by pattern repeats.

VELO

:

 Controls display of Velocity.  

BAR 

is the standard setting, 

NUM 

will 

display velocity as numeric values.  TIP: Use 

EDIT+Twist 

to edit Velocity 

values in smaller increments in 

NUM 

mode.

SPR CH

:

 Spread MIDI Channels.  This setting only appears for Chord and 

Drum parts. If it is on, MIDI notes from those parts will be spread across 4 

MIDI channels, starting with the one assigned for the MIDI output on the 

Routing 

page. So if you have a Chord part and the MIDI output references 

channel 10, your four voices will be spread across MIDI channels 10 

through 13. 

Sequence Controls: Page 4

This page only appears for Drum Parts.  Use this page to set the MIDI notes 

generated for each of the 4 drum voices.  Use encoder 

1

 to set the voice to 

work with, encoder 

2

 to select the MIDI note, and encoders 

&

 4

 to set a 

two character name for the voice.  That name will appear in the title of the 

DRUM 

edit page.

4

Control

Velocity:

 Sets the velocity CV output level and MIDI note velocity.To 

mute a note, use a zero gate or mute the step.

CC1, CC2, CC3:

 Sets the value for up to three lanes of MIDI CC 

outputs (Chord Parts only have 2 CC lanes). If a CC number is set for a 

lane (see 

Sequence Controls 

on the next page), a CC message is 

generated for every step that is not muted.  

Step Len:

 Sets the length of a step in multiples of the base step time. 

Repeat:

 Sets the step to repeat up to 8 times. 

Ratchet:

 Sub-divides the step up to 4 times.

On the 

Step Len 

and 

Seq Ctl 

pages, the Vector will calculate the 

length of the sequence in beats and display it in the top-right corner of 

the 1st OLED.

Sequence Controls

Press the yellow Control button above the 2nd OLED to access the 

Seq 

Ctl 

pages. These are overall settings for the sequence, such as 

sequence length and rate. There are 3, somtimes 4 pages here, turn 

encoder 

to move between them. The most commonly accessed 

settings are on the first page.

Velocity Len/Rpt Ratchet

Seq Editing & Contols

Summary of Contents for Vector

Page 1: ...User Guide Vector Sequencer v2 0 ...

Page 2: ...e Vector or Vector Expander combo to your Eurorack format case Don t forget to power down first The Vector consumes 140mA on 12V 20mA on 12V The Expander adds 30mA on both 12 and 12 Anything plugged into the USB A to device jack may draw additional current on 12V Most controllers including Launchpads pull less than 100 mA but a cellphone or tablet may pull up to an additional 210 mA Firmware Updat...

Page 3: ...ypes output assignments Shift Sequence Ops Use Shift other buttons to trigger operations global to a sequence Shift Pitch to reset all pitch values to their defaults ditto for gate velocity etc Use Shift Skip Mute Select to un Skip Mute Select all steps One Octave Mini Keyboard Use for step recording transposing in Rec mode Use white keys for skip mute or select in other modes Presets Scenes Per p...

Page 4: ...rameters for sequence editing are accessed via the Pitch Gate Groove Velocity Len Rpt and Ratchet buttons Repeatedly pressing those buttons will cycle into secondary pages such as Glide and Groove The current edit mode is shown top left of the 1st OLED and each page has a distinctive graphic value readout that makes it easy to keep track of where you are Use Next Prev to edit steps beyond the firs...

Page 5: ...d to set the transposition Use Prev and Next to shift the keyboard down or up an octave 4 Control Velocity Sets the velocity CV output level and MIDI note velocity To mute a note use a zero gate or mute the step CC1 CC2 CC3 Sets the value for up to three lanes of MIDI CC outputs Chord Parts only have 2 CC lanes If a CC number is set for a lane see Sequence Controls on the next page a CC message is...

Page 6: ... by musical bars or by pattern repeats VELO Controls display of Velocity BAR is the standard setting NUM will display velocity as numeric values TIP Use EDIT Twist to edit Velocity values in smaller increments in NUM mode SPR CH Spread MIDI Channels This setting only appears for Chord and Drum parts If it is on MIDI notes from those parts will be spread across 4 MIDI channels starting with the one...

Page 7: ... can set an alternate tuning on the 2nd page of Seq Ctl settings There are several options built in and you can load tunings in the MIDI Tuning Specification MTS format Many of the built in tunings use an alternate numeric notations The Built In tunings include NORM 12TET displayed as note names ITVL 12TET displayed as roman numerals NUMS 12TET displayed as MIDI note numbers 3 7 12TET displayed as...

Page 8: ...coder switches NORM Follow the behavior of the white keys on the mini keyboard GATE Add or remove gates to sequence steps SKIP MUTE SEL Skip Mute or Select sequence steps PART Pick which of the 8 Parts to edit OFF Do nothing 7 FOLLOW Automatically load the previous project on power up SLEEP Sets the time before the OLED displays are put to sleep in minutes 5 NR sets a sleep time of 5 minutes when ...

Page 9: ... MIDI you can set which Part that output listens to MIDI outputs can listen to up to all 8 Parts CV outputs can only listen to any one Part The trigger jacks on the Vector labeled Run Clock Reset and on the Expander Trigger 1 8 are a bit special They can output clock signals at a variety of rates as well as gate and reset outputs from a Part They can also be used as inputs Run Clock Reset can be u...

Page 10: ...particularly useful for programming in custom chords ST T Step Thru This mode combines step recording and the behavior of the THRU mode described below TRANS Incoming MIDI notes are used to transpose the sequence MIDI note number 60 is used as the center point THRU Incoming MIDI notes are sent directly to the outputs for the current part both CV and MIDI they also override any notes generated by t...

Page 11: ...ages for chance ops use the Chance button to cycle between them CHANCE TYP Pick an operation the default is mute CHANCE PROB Set the probability that op will happen CHANCE PTN Limit the operation to specific pattern repeats or bars A couple examples Mute a Step Un Mute a Step Skip a Step Un Skip a Step Jump Backwards Anywhere Forwards Velocity Less More Max Gate Shorter Longer Tie Ratchet 2 3 4 Pi...

Page 12: ...16th notes with a variety of pitch tones including minor seconds and tritones Gates and Velocity steps are set to 50 and then a few accents Velocity 100 are added ACD2 Acid 2 similar to ACD1 but adds in a few pitch glides ACD3 ACD4 Similar to ACD1 2 but no changes to SEQ CTL settings BRL1 Berlin School 1 Generates an 8 step sequence at 1 8th notes emphasis on octaves and fifths BRL2 Similar to BR1...

Page 13: ...ax values will automatically update to match the range of the target parameter Also the initial values of the sub sequence will be set to the current value of that parameter 3 Enable the parameter modulation by turning encoder 8 to ON 4 Turn encoder 9 to page over to the steps for the sub sequence so you can edit them There are three rows of numbers here The top row are the step numbers of course ...

Page 14: ...nge PIT5 Pitch mod 5 octave range approx 1V oct POCT Pitch mod octaves only P712 Pitch mod octaves and fifths VELN Velocity mod narrow range VELW Velocity mod wide range GATE Gate time STLN Step Length STRP Step Repeat RCHT Number of ratchets PROB The probability amount for Chance Ops STRT Start step LEN Sequence length DIR Sequence direction RATE Sequence rate For all targets modulation is calcul...

Page 15: ...y jump to the other Part PART SETUP To edit the name colors maximum length or type of a Part look in GLOBALS Press Global and use Next Prev to find the 2nd page titled PARTS There are two sub pages here use the encoder 9 to move between them On the first PARTS page use encoder 1 to select the Part you want to modify Using encoders 3 4 you can set the LED colors for the foreground current step and ...

Page 16: ...built in chords These chords progress through all dyads two note chords up to an octave represented by semitone values from 1 to 12 followed by triads M major m minor A augmented D diminished S2 sus2 S4 sus4 then seventh chords M7 maj 7th D7 dominant 7th m7 min 7th 15 h7 half diminished d7 fully diminished If you want to make a custom chord which allows much greater flexibility in both note select...

Page 17: ...et originally The D is for drums 5 is for Part 5 and 1 is the first Drum Voice From there release the Shift key and turn the encoder to pick the Drum Part and Voice you want the trigger to output Then push the encoder to latch the mapping change To setup a MIDI output for a Drum Part use encoder 9 to scroll to one of the MIDI outputs on the ROUTING page then turn any encoder to select the desired ...

Page 18: ...ject will be automatically generated DISK MODE Running the Vector in disk mode allows you to mount the contents of the SD card onto your computer which makes it very quick and easy to back up copies of your Projects and calibration files and for loading new firmware To run the Vector in disk mode connect it to your computer Mac PC Linux with a USB A B Printer cable and hold down the Shift button w...

Page 19: ...Alternatively use Prev Next to move between Preset Edit Preset and Scene pages The Playlist is simple in concept but very flexible Each Preset can Play forever by default Play for x beats bars then go to a later Preset Play for x beats bars then go to an earlier Preset and repeat y times Use encoders 4 8 to edit the Playlist settings for a Preset The master on off switch for all Playlists is on th...

Page 20: ...al 19 MIDI Beat Clock 1 Connect a MIDI Clock source to the Vector via the USB A or B jacks on the front panel or use the 5 pin MIDI Input connector on the Jack Expander 2 In Globals page 1 select USB A for sync via the USB to device jack USB B for sync via the USB to host jack or JxMID for sync via the MIDI Input on the Jack Expander 3 Start playback from your MIDI Clock source External Clock Puls...

Page 21: ...urrent value for the parameter To change the parameter being edited you can turn encoder 9 or press any of the white keys on the mini keyboard The white keys will page through the parameters in the same order that they appear on the Seq Ctl page START LEN DIR etc In addition to the 8 parameters from Seq Ctl there are 3 additional parameters only available in the Dashboard You can reach them using ...

Page 22: ...ovides top level control of the Vector project Use the top row to select a Part the second row to enable per Part REC modes and the third row to mute or un mute them If you have any Parts formatted as Chord or Drum parts you can use buttons on rows 4 5 to mute individual voices for those Parts On rows 6 7 you can select a Scene The current Scene is yellow the selected next Scene is red and the res...

Page 23: ...an the first 8 Use buttons in the rightmost column to select all Presets in that row The Keys page works as a 4 octave keyboard for use with the Vector s REC modes Use the buttons to the right of the main grid to set the velocity level On the Launchpad X and Pro all pads are velocity sensitive Use the up and down buttons to transpose the keyboard 22 Launchpad Keys PresetPage Preset KeysPage Keys ...

Page 24: ... wish to enter notes while the lower 7 rows are used for entering pitches Each column is one step and each row is one pitch value starting with the unison scale degree I pitch on the bottom row then proceeding through scale degrees as you go up II III IV V VI VIII To enter a sharped or flatted note hold the pad for a that note then press the pad above or below it Pitches that are in the current oc...

Page 25: ...owest If you try to program a note in voices 2 4 below the 1st one it will be placed on octave higher Editing Drum Parts The edit page for Drum Parts allows you to edit 16 steps across 4 voices Each voice is allocated two rows with alternating colors Voices 1 3 are red 2 4 are amber Use the left and right arrow keys to page through sequences longer than 16 steps Drum sequences progress left to rig...

Page 26: ...or decreases the pitch by one octave For values like gate and velocity it jumps between low medium and high values When naming Parts and Projects Shift Twist will jump between vowels the number 0 the symbol and a space character Shift Twist is especially helpful for assigning the output of trigger jacks which have a very wide range of parameters Warm Reboot Press and hold Encoder 9 for 5 seconds t...

Page 27: ... find the latest firmware updates visit http vector five12 com Download and un zip the Vector firmware file VECTOR BIN zip Press and hold the Shift button while powering up the Vector to enter USB Disk mode Use a USB A to B cable to connect the Vector to your computer After a few seconds the SD Card for the Vector will show up as a new disk Unzip VECTOR BIN zip On a Mac the Finder may do that auto...

Page 28: ...ro SD Card Part Eight parts per project Note Sequence 16 32 or 64 steps long Preset Up to 20 presets per part depending on sequence length Sub Seq 1 Sub Seq 2 Ext Mod Preset Playlist Scenes Globals Tempo Key Scale Sync Output Routings etc www five12 com ...

Reviews: