background image

EU and EW Series Valves

Instruction Manual

August 2010

11

18.  

For spring-loaded PTFE V-ring packing

,

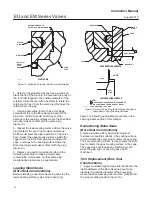
tighten the packing flange nuts until the shoulder on
the packing follower (key 13, figure 5) contacts the
bonnet.

For graphite packing

, tighten the packing flange

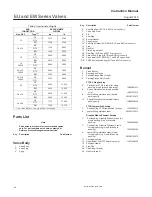
nuts to the maximum recommended torque shown in
table 3. Then, loosen the packing flange nuts and
retighten them to the recommended minimum torque
shown in table 3.

For other packing types

, tighten the packing flange

nuts alternately in small, equal increments until one
of the nuts reaches the minimum recommended
torque shown in table 3. Then, tighten the remaining
flange nut until the packing flange (key 3, figure 5) is
at a 90-degree angle to the valve stem.

19.  Mount the actuator on the valve assembly, and
reconnect the actuator and valve stem according to
the procedure in the appropriate actuator instruction
manual. Check for leakage around the packing
follower when the valve is being put into service.
Retighten the packing flange nuts as required.

Trim Maintenance

Trim Removal

Except where indicated, key numbers in this section
are shown in figure 8 for EUT-2 and EWT-2 valves
and in figure 7 for EUD and EWD valves.

1.  Isolate the control valve from the line pressure,
release pressure from both sides of the valve body,
and drain the process media from both sides of the
valve. If using a power actuator, also shut off all
pressure lines to the power actuator, release all
pressure from the actuator, and use lock-out
procedures to prevent injury while you work on the
equipment.

2.  Remove the actuator and the bonnet according to
steps 2 through 5 of the Replacing Packing Section.

CAUTION

Use care to avoid damaging gasket
surfaces.

The surface finish of the valve stem
(key 7) is critical for making a good
packing seal. The inside surface of the
cage or cage assembly (key 3) is
critical for smooth operation of the
valve plug and for making a seal with

the seal ring (key 28). The seating
surfaces of the valve plug (key 2) and
seat ring (key 9) are critical for proper
shutoff. Assume all these parts are in
good condition, and protect them
accordingly unless inspection reveals
otherwise.

3.  Packing parts can be removed if desired.
Replace these parts as described in the Packing
Replacement section.

4.  Lift the valve plug and stem assembly out of the
valve body and set it on a protective surface. If the
valve plug is to be reused, protect the valve plug
seating surface to prevent scratches.

5.  Install screws or bolts into the tapped holes in the
top of the cage assembly (key 3), and carefully lift it
out of the valve body. Remove the gaskets (keys 10
and 11).

6.  Proceed as appropriate:

For EUT-2 or EWT-2 valves (figure 7)

, the valve

has a seat ring seal ring (key 6). Inspect this seal
ring, and remove it if replacement is necessary. The
seat ring is screwed into the cage and secured with
two tack welds, one on each side of the cage.
Remove the tack welds by grinding or filing them off.

D

For all sizes except the NPS 12 and 16 x 12

,

there are slots cut in the seat ring. Insert a bar
through the slots and turn the seat ring out of the
cage.

D

For the NPS 12 and 16 x 12

, there are two

3/8-inch UNC tapped holes in the bottom of the seat
ring. Screw cap screws into these holes. Use a bar
to pry against the cap screws and turn the seat ring
out of the cage.

For EUD, EWD, EUT, and EWT valves (figure 8)

unscrew the seat ring cap screws (key 49). Install
screws or bolts into the tapped holes in the top of the
seat ring (key 9) and carefully lift it out of the valve
body. Remove the gasket (key 13).

7.  Inspect parts for wear or damage that would
prevent proper operation of the valve. Replace or
repair trim parts according to the following Lapping
Seating Surfaces or Valve Plug Maintenance
procedures as appropriate.

Lapping Seating Surfaces

A certain amount of leakage should be expected
with metal-to-metal seating in any valve body. If the
leakage becomes excessive, however, the condition
of the seating surfaces of the valve plug and seat

Summary of Contents for EUD

Page 1: ...20 CL150 through 600 Fisher EUD EUT EUT 2 EWD EWT and EWT 2 valves and the NPS 16 and 20 x 16 CL900 EUD EUT 2 EWD and EWT 2 valves Size designations such as NPS 20 x 16 are end connection size x nomi...

Page 2: ...vitrol Trim Class V EUT EUT 2 EWT and EWT 2 with Soft Metal Seats Class V Shutoff Classifications per ANSI FCI 70 2 and IEC 60534 4 continued EUD and EWD with Metal Seats Standard Class III Optional C...

Page 3: ...instruction manual and in any applicable standard limitations should not be exceeded Description All valve types covered in this manual EUD EUT EUT 2 EWD EWT and EWT 2 valves can be used for either th...

Page 4: ...the valve is part of a complete control valve assembly Installation WARNING To avoid personal injury or property damage resulting from the sudden release of pressure do not install the valve assembly...

Page 5: ...rtical above the valve Other positions may result in uneven valve plug and cage wear and in improper operation Support the actuator if it is not installed in the vertical position For more information...

Page 6: ...that the above measures stay in effect while you work on the equipment D The valve packing box may contain process fluids that are pressurized even when the valve has been removed from the pipeline P...

Page 7: ...tion or other packings that require lubrication it will be installed in place of the 1 4 NPT pipe plug key 14 figure 5 Use a silicon base lubricant To operate the lubricator turn the cap screw clockwi...

Page 8: ...ew valve stem is critical for making a good packing seal If the leakage comes from the outside diameter of the packing it is possible that the leakage is caused by nicks or scratches around the packin...

Page 9: ...e that the valve body fluid pressure has been relieved 4 Hex nuts key 16 figures 7 or 8 attach the bonnet to the valve body Loosen these nuts or cap screws approximately 3 mm 1 8 inch Then loosen the...

Page 10: ...could cause packing box leakage or damage to the new packing If the surface condition cannot be improved by light sanding or honing with a tool similar to an automotive brake cylinder hone replace the...

Page 11: ...nd for making a seal with the seal ring key 28 The seating surfaces of the valve plug key 2 and seat ring key 9 are critical for proper shutoff Assume all these parts are in good condition and protect...

Page 12: ...ricant Then gently stretch the seal ring and work it over the top edge of the valve plug Give the PTFE material in the seal ring time to cold flow during the stretching procedure Avoid jerking sharply...

Page 13: ...at ring to the cage using minimal heat Two welds 6 mm 1 4 inch long and 180 degrees apart are required Install the seat ring seal ring key 6 so that its open side faces the valve stem for Cavitrol III...

Page 14: ...e valve body Remove the temporary screws or bolts Secure the seat ring key 9 with the cap screws key 49 Tighten the cap screws in a criss cross pattern to a torque of 39 NSm 29 lbfSft for NPS 12 and 1...

Page 15: ...icate the outside diameter of the seat ring seal ring with lithium grease 3 Slide the valve plug key 2 and stem assembly into the cage For valves with a seal ring make sure the valve plug seal ring ke...

Page 16: ...EU and EW Series Valves Instruction Manual August 2010 16 Figure 9 Typical Fisher EUT or EWT Valve with HTS1 Option...

Page 17: ...ing the following instructions CAUTION To avoid leakage when the valve is returned to service use appropriate methods and materials to protect all sealing surfaces of the new trim parts while assembli...

Page 18: ...t to the threads on the plug Then place the Bore Seal retainer onto the plug and tighten the retainer using an appropriate tool such as a strap wrench For flow down constructions skip to step 7 6 Remo...

Page 19: ...ce applied and the valve plug fully seated align the actuator travel indicator scale with the lower end of valve travel Refer to the appropriate actuator instruction manual for information on this pro...

Page 20: ...ng to the following procedure for lapping metal seats remachining metal seats or other valve plug maintenance procedures as appropriate Lapping Metal Seats Bore Seal Constructions Before installing a...

Page 21: ...erosion the valve plug must be initially seated with sufficient force to overcome the resistance of the Bore Seal and contact the seat ring You can correctly seat the valve plug by using the same for...

Page 22: ...g EUT 2 and EWT 2 valves only 28 Piston Ring 2 req d EUD and EWD valves only 49 Cap Screw EUD EWD EUT and EWT valves only 219 PEEK Anti extrusion ring EUT and EWT valves only Bonnet 1 Valve Bonnet 3 P...

Page 23: ...EU and EW Series Valves Instruction Manual August 2010 23 Figure 14 Typical Fisher WhisperFlo Trims EWD EUD EWT EWT 2 EUT 2 CAP SCREW SEAT RING WhisperFlo CAGE CAGE RETAINER BONNET...

Page 24: ...st We reserve the right to modify or improve the designs or specifications of such products at any time without notice Neither Emerson Emerson Process Management nor any of their affiliated entities a...

Reviews: