


• Make sure the shifter is in the
LOW SPEED position.
• Press the foot pedal. The vehicle will drive forward at a
maximum of 2
1
/
2
mph.
• Help your child practice steering to learn how far and
how quickly to turn the handlebar when driving forward
in low speed.
• Your vehicle has a patented, electronic braking system
that automatically stops the vehicle when your child’s
foot is lifted from the pedal.
• Make sure your child is comfortable with steering the
vehicle and automatically knows how to stop.
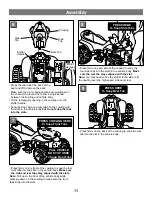
Beginner - Low Speed Drive
IMPORTANT! To avoid damaging the motors and
gears, make sure to stop the vehicle before
switching from forward to reverse.
• Move the shifter to the REVERSE position.
• Press the foot pedal. The vehicle backs-up at a
maximum of 2
1
/
2
mph.
• Help your child practice steering to learn how far
and how quickly to turn the handlebar when driving
in reverse.
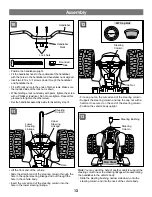
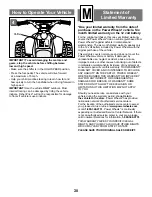
REMOVE LOCK-OUT
SCREW ON SIDE
OF SHIFTER FOR
HIGH SPEED
OPERATION
REMOVE LOCK-OUT
SCREW ON SIDE
OF SHIFTER FOR
HIGH SPEED
OPERATION
Shifter
Shifter
How to Operate Your Vehicle
L
As assembled, your vehicle is ready to roll in low speed (2
1
/
2
mph, maximum). When your
child is ready to drive the vehicle in high speed (5 mph, maximum), follow the instructions
(step 3) to disconnect the high speed lock-out.
Reverse
19
Hint: Once your child is comfortable operating the vehicle
forward, introduce reverse.
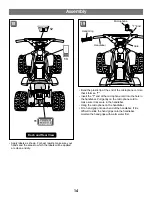
Advanced - High Speed Drive
Before you disconnect the high speed lock-out, make
sure your child knows how to start and stop the vehicle
and knows the rules for safe driving. When the high speed
lock-out is removed, the vehicle can be driven forward in
low speed (2
1
/
2
mph, maximum) or high speed (5 mph,
maximum).
• Remove the lock-out screw from the shifter box using a
Phillips screwdriver. Store the screw in the hole in the
shifter for future use. You can re-insert the screw into the
shifter box if you want to lock-out high speed and allow
operation of the vehicle in low speed only.
REMOVE LOCK-OUT
SCREW ON SIDE
OF SHIFTER FOR
HIGH SPEED
OPERATION
Lock-Out
Screw
Shifter
1
3
2