background image

11

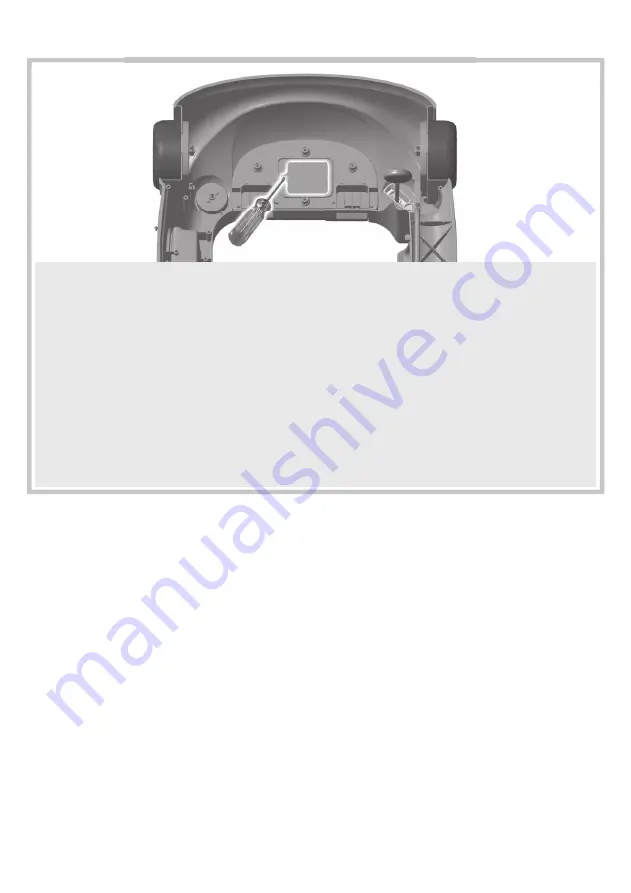
Loosen the screw in the battery compartment door with a Phillips screwdriver and remove 
the battery compartment door.
Insert three AA (LR6) 

alkaline

 batteries into the battery compartment.

Replace the battery compartment door and tighten the screw. 
If the electronic toy product begins to operate erratically, you may need to reset the 
electronics. Slide the power/volume switch off and then back on.
When sounds or lights become faint or stop, it’s time for an adult to replace batteries.

Afloja el tornillo de la tapa del compartimento de pilas con un destornillador de cruz y retira 
la tapa.
Inserta 3 pilas 

alcalinas

 AA (LR6) en el compartimento.

Cierra la tapa del compartimento de pilas y aprieta el tornillo.
Si el juguete electrónico no funciona correctamente, restablece el circuito electrónico. Pon 
el botón para encender o dar volumen en apagado y nuevamente en encendido.
Sustituye las pilas cuando los sonidos o las luces pierdan intensidad o dejen de funcionar.

BATTERY INSTALLATION  

|

  COLOCACIÓN DE LA PILA

Battery Safety Information

In exceptional circumstances, batteries may 
leak fluids that can cause a chemical burn 
injury or ruin your product. To avoid battery 
leakage:
Do not mix old and new batteries or batteries 
of different types: alkaline, standard (carbon-
zinc) or rechargeable.
Insert batteries as indicated inside the battery 
compartment (+ and -).
Remove batteries during long periods of 
non-use. Always remove exhausted batteries 
from the product. Dispose of batteries safely. 
Do not dispose of this product in a fire. The 
batteries inside may explode or leak.
Never short-circuit the battery terminals.
Use only batteries of the same or equivalent 
type, as recommended.
Do not charge non-rechargeable batteries.
Remove rechargeable batteries from the 
product before charging.
If removable, rechargeable batteries are used, 
they are only to be charged under adult 
supervision.

Información de seguridad acerca de las pilas

En circunstancias excepcionales, las pilas 
pueden derramar líquido que puede causar 
quemaduras o dañar el producto. Para 
evitar derrames:
No mezclar pilas nuevas con gastadas ni 
mezclar pilas alcalinas, estándar (carbono-
cinc) o recargables.
Cerciorarse de que la polaridad de las pilas 
sea la correcta (+/-).
Sacar las pilas si el producto no va a ser usado 
durante un periodo prolongado. Sacar las 
pilas gastadas del producto y desecharlas 
apropiadamente. No quemar las pilas ya 
que podrían explotar o derramar el líquido 
incorporado en ellas.
No provocar un cortocircuito con 
las terminales.
Usar solo el tipo de pilas recomendadas 
(o su equivalente).
No cargar pilas no recargables.
Sacar las pilas recargables antes de cargarlas.
La carga de las pilas recargables solo debe 
realizarse con la supervisión de un adulto.

Summary of Contents for GPN16

Page 1: ...ASSEMBLY AND USE GUIDE GU A DE MONTAJE Y USO GPN16...

Page 2: ...ayuda y no debe poder caminar ni salirse del producto Modo estaciona y juega Para ni os de 6 a 36 meses Adult assembly is required Phillips screwdriver not included required for assembly Product feat...

Page 3: ...o is not able to walk or climb out of product PELIGRO DE CA DAS Los beb s se pueden CAER del producto lo que podr a provocar lesiones en la cabeza NO dejar al ni o fuera de su alcance Siempre mantener...

Page 4: ...package and identify them before assembly Some parts may be packed in the pad IMPORTANTE Sacar todas las piezas del empaque e identificarlas previo al montaje Algunas piezas pueden venir embaladas en...

Page 5: ...5 ASSEMBLY MONTAJE 1 2 PRESS PRESIONAR PRESS PRESIONAR PRESS PRESS PRESIONAR PRESIONAR PRESS PRESIONAR PRESS PRESIONAR...

Page 6: ...tabs on the side of the pad to the matching pegs Coloca la almohadilla del asiento con las leng etas rojas apuntando hacia ti y la silla saltarina con las etiquetas de instrucciones tambi n apuntando...

Page 7: ...maining four tabs on the seat pad to the pegs on the seat ring Voltea la silla saltarina de modo que el frente apunte hacia ti Conecta las cuatro leng etas restantes de la almohadilla en las clavijas...

Page 8: ...8 ASSEMBLY MONTAJE 6 7 x 4...

Page 9: ...9 ASSEMBLY MONTAJE 8...

Page 10: ...10 DECORATION DECORACI N 1 2 5 8 3 4 7 10 6 9...

Page 11: ...arbon zinc or rechargeable Insert batteries as indicated inside the battery compartment and Remove batteries during long periods of non use Always remove exhausted batteries from the product Dispose o...

Page 12: ...a de almacenamiento en la parte inferior del veh culo Position the car under the jumperoo seat Insert the 2 tabs on the front of jumperoo seat into the openings in the front of the car Coloca el veh c...

Page 13: ...BOUNCE EXPLORE MODE MODO SALTA Y EXPLORA 3 Lift the back of the car until it snaps onto the jumperoo seat Levanta la parte posterior del veh culo hasta que haga clic en el asiento de la silla saltari...

Page 14: ...not touching the floor at all adjust the height to any of three positions one for the smallest child and three for the tallest child Con el veh culo acoplado a la silla saltarina coloca al beb en el...

Page 15: ...las capas de malla y ajusta la barra del cintur n en la ranura que quieras Atenci n Quiz sea necesario meter el cintur n del interior de la conexi n para poder meter la barra del cintur n en la ranur...

Page 16: ...6 SEAT HEIGHT ADJUSTMENT AJUSTE DE ALTURE DE LA SILLA 6 Pull the strap on the inside of the hub to remove any slack Jala el cintur n al interior de la conexi n para que no quede ning n segmento suelto...

Page 17: ...ward to release the car from the jumperoo seat Tira ambos seguros hacia afuera para liberar el veh culo del asiento de la silla saltarina 1 2 Lower the back of the car until it rests on the floor Baja...

Page 18: ...at then set the car on the floor Tira del veh culo hacia delante hasta que se suelte del asiento de la silla saltarina y coloca el veh culo en el suelo Place the shape sorter tray on top of the car Co...

Page 19: ...lors and opposites along with fun sounds music and lights Level 2 Explore 6M This level is designed for the Park Play mode Press the horn to hear colorful flavors of ice cream Explore fun phrases abou...

Page 20: ...y sonidos divertidos Nivel 2 Explora de 6 meses en adelante Este nivel est dise ado para el modo Estaciona y juega Presiona la bocina para escuchar los extravagantes sabores de los helados Explora fr...

Page 21: ...TS AND SOUNDS SI NTATE Y EXPLORA A TUS ALREDEDORES CON M SICA LUCES Y SONIDOS Remove the sweet treats to sort them in the door shape sorter or puzzle tray Quita las golosinas y ord nalas en el clasifi...

Page 22: ...eh culo y los juguetes con un pa o humedecido en una soluci n limpiadora No uses blanqueador No uses limpiadores fuertes o abrasivos Enjuaga con agua para eliminar el residuo de jab n No sumerjas el j...

Page 23: ...puede causar interferencia da ina a radiocomunicaciones Sin embargo no hay ninguna garant a de que no haya interferencia en una instalaci n particular Si este equipo llega a causar interferencia da in...

Page 24: ...ura Santiago Tel 1230 020 6213 VENEZUELA Servicio al consumidor Venezuela Tel 0 800 100 9123 ARGENTINA Mattel Argentina S A Av Libertador 1000 Piso 11 Oficinas 109 y 111 Vicente L pez Prov Buenos Aire...

Reviews: