background image

3

CONTENTS

Registration

To register your product visit our website: fisherpaykel.com/register

Safety and warnings 

5

Before you begin 

9

Using the control panel 

10

Using your appliance 

11

Cleaning and care 

22

Foodcare 

32

Moving or storing your appliance 

33

ActiveSmart™ sounds 

34

Troubleshooting 

35

Manufacturer’s warranty 

40

Installation guide

Summary of Contents for ACTIVESMART RF730Q

Page 1: ...USERƫ ƫGUIDEƫ NZ AU ACTIVESMART REFRIGERATOR CONTEMPORARY QUAD DOOR FRIDGE FREEZER ICE WATER RF730Q ...

Page 2: ......

Page 3: ...sherpaykel com register Safety and warnings 5 Before you begin 9 Using the control panel 10 Using your appliance 11 Cleaning and care 22 Foodcare 32 Moving or storing your appliance 33 ActiveSmart sounds 34 Troubleshooting 35 Manufacturer s warranty 40 Installation guide ...

Page 4: ......

Page 5: ...sure that they do not play with the appliance z Cleaning and user maintenance shall not be made by children without supervision z Do not use mechanical devices or other means to accelerate the defrosting process other than those recommended by the manufacturer z Do not damage the refrigerant circuit z In case of damage to the refrigerant circuit ventilate the area by opening all windows Do not ope...

Page 6: ...r of the appliance Servicing z The LED light cannot be serviced by the user Contact your Fisher Paykel trained and supported service technican z Your refrigerator is designed to operate for many years without the need for service checks However if your refrigerator is malfunctioning have it attended to by your Fisher Paykel trained and supported service technician as soon as possible All electrica...

Page 7: ...o cause damage when brought into contact with bare skin eg frozen ice cubes Power failure food safety z Do not refreeze frozen foods that have thawed completely The food may be dangerous to eat Follow the recommendations below if you discover food in your freezer has thawed z Ice crystals still visible food may be refrozen but should be stored for a shorter period than recommended z Thawed but ref...

Page 8: ... dispose of ice in the storage container If the problem persists replace the water filter cartridge and refer to the flushing instructions detailed in the guide provided with your filter or your installation guide for your appliance z If the water tank has not been used for an extended period of time or has developed an unpleasant taste or odour flush the water system If the problem persists repla...
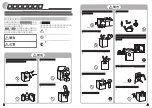
Page 9: ...Remove all packaging and dispose of it responsibly Recycle items that you can Refrigerator features 1 Adjustable shelving 2 Humidity control bins small 3 Humidity control bin large 4 Door shelves 5 Water filter Freezer features 1 Ice storage bin with scoop 2 Tray 3 Mid bin 4 Bottom bin large 5 Variable Temperature Zone Freezer compartment 5 2 3 1 1 3 4 Fridge compartment 5 4 2 ...

Page 10: ...ezer compartment is selected 3 Alarm mute deactivates the door alarm for 20 minutes 4 Displays the set temperature of the Fridge Freezer compartments To change between Celsius and Fahrenheit on the display Press for six seconds 5 Allows you to adjust the temperature of the selected compartment 6 Displays the set temperature of the Variable Temperature Zone To change between Celsius and Fahrenheit ...

Page 11: ...t time the cooling system will automatically cool all compartments to their set temperatures within 2 3 hours The internal control panel enables you to change and control the temperature of all compartments accurately and independently The internal control panel default setting is to show the set temperature for the fridge compartment For common foodstuffs the factory default setting provides the ...

Page 12: ...ors remains open subsequent beeps will sound every 30 seconds for five minutes and the internal light s will turn off Alarm mute To activate deactivate ALARM MUTE press once The light above the button will illuminate to indicate the refrigerator is muted ALARM MUTE will automatically deactivate after 20 minutes or when the door is closed BOTTLE CHILL alarm is still operational 1 Press twice to adj...

Page 13: ...activated for 80 hours Once in Sabbath mode z The interior light will not turn on when you open the refrigerator z The door alarms will not operate z The display will not illuminate except the Sabbath mode icon z The internal and external control panels will not operate z Sabbath mode automatically deactivates after 80 hours To activate deactivate SABBATH MODE press and together for four seconds T...

Page 14: ... the dispensing pad will not increase the flow or dispense more water Dispensing Your water dispenser is designed for one handed operation 1 Filter change indicator Icon will illuminate when water filter requires changing 2 Bottle Chill indicator An alarm will sound and BOTTLE CHILL will flash after the elapsed time to remind you to remove your beverage 3 Dispenser lock button and LED light Locks ...

Page 15: ...s in the refrigerator z There is a replacement indicator icon on the internal control panel and external display which will appear when the filter needs replacing The icon will flash as a reminder when water is dispensed z Replacement filter cartridges are available from your Fisher Paykel dealer online or from a Fisher Paykel service technician The details of the replacement filter cartridge are ...

Page 16: ...of door openings The ice tray will fill with water When cubes are frozen they will be ejected from the ice tray into the ice storage bin Ice making will continue until the storage bin is full Ice making will resume once you start to use the stored ice Your Ice Water product comes with a smaller ice bin inside a tray Attached to the ice storage bin is the scoop for the ice This scoop provides hygie...

Page 17: ...they retain their vital freshness and quality These items will last slightly longer here compared with storage at FRIDGE MODE Highly perishable meats poultry and seafood Alcoholic beverages such as beer FRIDGE MODE 3 C The ideal mode for fresh everyday foods such as fruit and vegetables dairy products meats and drinks Fruit and vegetables dairy products jams and chutneys preserves meats and drinks...

Page 18: ...isplay will change at the coldest setting pressing the button will sound the invalid button press melody The digital display will not change 1 2 Each FOOD MODE will automatically default to the recommended temperature setting for that food mode which is illuminated on the digital display Once you have selected the required FOOD MODE the temperature can be adjusted as desired If you adjust the temp...

Page 19: ...seconds until the flashing light turns solid An alarm will sound after 15 minutes to remind you to remove your beverage 1 1 To deactivate before the 12 hours has elasped press the button and scroll to FAST FREEZE Press button for two seconds USING YOUR APPLIANCE Features Fast Freeze FAST FREEZE boosts freezing speed by dropping the lower left freezer compartment to its coldest temperature for 12 h...

Page 20: ... On Off ICE ON OFF activates automatic ice this is only available in the lower left compartment Your ice maker is designed to automatically dispense ice into the ice storage bin below until it detects the bin is full The more ice you use the more it makes Before first use the automatic ice systems needs to be flushed To deactivate press the button scroll to ICE ON OFF Press button for two seconds ...

Page 21: ... and will automatically deactivate after 24 hours Press and hold and together for four seconds The ice tray will flip twice and empty the water into the bin below Repeat the cycle to help remove any dust in the ice tray collected during manufacture and transport To flush the automatic icemaker 1 Empty the water in the bin and return the bin correctly Ensure that the scoop is located in front of th...

Page 22: ...n 1 Wind up the feet and carefully ease the refrigerator out of its position Switch off and unplug 2 Exterior Clean the full surface of the exterior door with liquid dishwashing detergent dissolved in warm water and a soft cloth Wipe with a clean damp cloth to remove excess detergent Dry the door with a lint free cloth Clean off any oil or grease as soon as possible for ease of removal Do not use ...

Page 23: ...r Some of these chemicals may dissolve damage and or discolour the interior of your refrigerator Remove the shelves from the cabinet and door Wipe all interior surfaces using only liquid dishwashing detergent dissolved in warm water or baking soda dissolved in warm water add 1tsp of baking soda to every 500ml of water and a soft lint free cloth Rinse with clean water and dry with a clean lint free...

Page 24: ...lves Refrigerator To remove Remove the shelf from the compartment 1 As you pull the shelf towards you tilt the front downwards and lower until it is vertical 3 Remove all door shelves 2 Lift the shelf slightly and pull towards you 4 ...

Page 25: ...f vertical manouvre the shelf back into the compartment Tilt the shelf back into the compartment guide the shelf onto the shelf supports and slide into the compartment Glass shelves Refrigerator To replace 1 2 Re install the door shelves 3 ...

Page 26: ...2 How to replace Extend the runners out from the refrigerator Place the bin on top of the runners Gently push the bin down on both sides at the same time until you feel it click into place At the same time on the left and right hand sides push the clip up and lift the bin to release Push the slides back into the compartment ...

Page 27: ...ush the bin back over the ledge Remove food from the bin Lift the bin up at the front and pull out over the ledge Humidity control lid small To remove Remove the glass shelf sitting on top of the humidity control lid follow the steps in section Glass shelving Hold the humidity control lid and lift straight up 1 ...

Page 28: ...he front of the humidity control lid and firmly pull down in the middle Then pull the lid down at the back sides to dislodge 2 Humidity control lid large To replace Put the humidity lid into the correct position Slot the front of the humidity lid back into place 1 Once the front is in place push the back and sides of the humidity lid into position 2 ...

Page 29: ...e bin out to full extension 1 2 How to replace Extend the runners out from the refrigerator Place the bin on top of the runners Gently push the bin down on both sides at the same time until you feel it click into place Lift up the bin to dislodge Push the slides back into the compartment ...

Page 30: ...zer VTZ tray and large bottom bin To remove Remove food from the tray or bin Lift the tray bin up at the front and pull out over the ledge 1 Line up the tray bin in position and push the bin back over the ledge 1 How to replace ...

Page 31: ...an your ice bin and discard any old ice in the bottom of the bin regularly Ensure that the ice scoop is placed in the correct position in the front of the bin Pull out the tray Tilt the front of the ice bin up to remove CLEANING AND CARE ...

Page 32: ...cery shopping This feature will ensure the food is frozen within the shortest period of time locking in the freshness and extending the shelf life of your food z For storage of general household foods in the most efficient manner it is recommended to use the product in the factory configuration supplied Moving the shelves and bins will have a minimal impact on efficiency z Storing at temperatures ...

Page 33: ...long as you can a few hours before turning on Ease the refrigerator out of its position Tuck the power cord away tape the shelves in place and tape the doors closed If the cabinet needs to be placed at an angle or laid down carefully lay it on its side the right hand side when viewed from the front 2 3 Turn off the power supply to the refrigerator Unplug the power cord turn off water supply at the...

Page 34: ... and can be heard as a boiling or gurgling noise z An audible hissing sound after closing the freezer door This is due to the pressure difference between the warm air that has entered the cabinet and suddenly cooled and the outside air pressure z Other sounds may be heard for the following reasons z Cabinet not level z Floor uneven or weak z Bottles or jars rattling on shelves z If this is your fi...

Page 35: ...ained and supported service technician Refrigerator not working Check refrigerator is turned on at wall Light and display not working Product in SABBATH MODE Press and hold and together for four seconds Motor operates for long periods Hot weather Minimise door openings to allow temperature to stabilise Frequent door openings Large amount of food recently added Temperature control set too low Refer...

Page 36: ...ing Check that gasket is sitting flat and sealing tightly Not unusual during periods of high humidity Wipe dry Door out of alignment With time and usage movement may occur Refer to your installation guide Tray bin does not slide in and out evenly Packaging trapped Check to ensure no food or packaging is trapped behind the tray bin Runners not extending fully Holding onto sides of tray bin extend t...

Page 37: ...sition Check knob is in lock position Ice cubes have odour taste Unsealed packages may be transmitting odour taste Old cubes need to be discarded Ensure food packaging is sealed Interior of freezer needs cleaning Ice storage bin needs to be emptied and washed Clean refrigerator Poor taste from incoming water Filter may need to be replaced with new one Force 2 3 ice tray flips Slow ice cube freezin...

Page 38: ...artment Freezer door not closing tightly Arrange items in freezer so door can close tightly Check and clean door gasket seal Ice maker makes unfamiliar sounds or seems too loud Normal ice maker operation Refer to section ActiveSmart sounds Ice boost function not increasing rate of ice production Ambient temperature very warm Minimise door openings Refrigerator is in high usage ...

Page 39: ... be blocked and need replacing Replace filter see your Service Warranty document provided with your refrigerator DISPENSER LOCK activated Press and hold for four seconds Water frozen in tank Increase temperature to a warmer setting in fridge compartment and freezer Water in first glass is warm Water dispenser not used for extended period Discard first glass of water dispensed Tank capacity used re...

Page 40: ...sidential environment This product is not designed for any commercial use Any commercial use by the customer will affect this products Manufacturer s Warranty For spare parts please contact Fisher Paykel Customer Care Spare parts are available for all Fisher Paykel refrigerators for a minimum period of 10 years from the date of manufacture Complete and keep for safe reference Model Serial No Purch...

Page 41: ...nge at any time The product specifications in this guide apply to the specific products and models described at the date of issue Under our policy of continuous product improvement these specifications may change at any time For current details about model and specification availability in your country please go to our website or contact your local Fisher Paykel dealer ...
Reviews: