background image

Page  31

REMOTE Access

Remote Surveillance

Remote Surveillance

Remote Surveillance using Internet Explorer 8 or 9:

The DVR features built-in browser-based software that allows you to access your system remotely over your local area network 
(LAN) or over the Internet using Internet Explorer®. Once you have configured the network settings on the DVR to match those on 
your router and forwarded the ports needed by the DVR to enable remote access over the Internet, you will be ready to remotely 
view your cameras using a webcam program based on an ActiveX control. For this to work, you will have to enable the ActiveX 
control options that are built into Internet Explorer.  You will also need to check your “User Account Control” setting.

Configuring Windows “User Account Control”:

Check the “User Account Control” setting in Windows Vista or Windows 7 to be sure the setting is configured as shown below. If 
not you might receive an error message informing of a codec that is missing or not installed.

Windows Vista

1.  Open the Control Panel
2.  Select “User Accounts and Family Safety”
3.  Select “Add or Remove User Account”
4.  Select user account to change
5.  Select Turn User Account Control on or off”. Note: Depending on your version of Vista, this screen might be accessible 

on the bottom of the “Select User Account to Change” screen under “Additional things you can do” > “Go to main user 
account page”.

6.  Uncheck the box next to “Use User Account Control (UAC) to help protect your computer.”
7.  You will need to re-start your computer for the change to take effect.

Windows 7

1.  Open the Control Panel
2.  Select “User Accounts”
3.  Select “Change User Account Control Settings”
4.  In the “Choose to be notified about changes to your computer” screen, move the slider to the lowest setting “Never notify”.
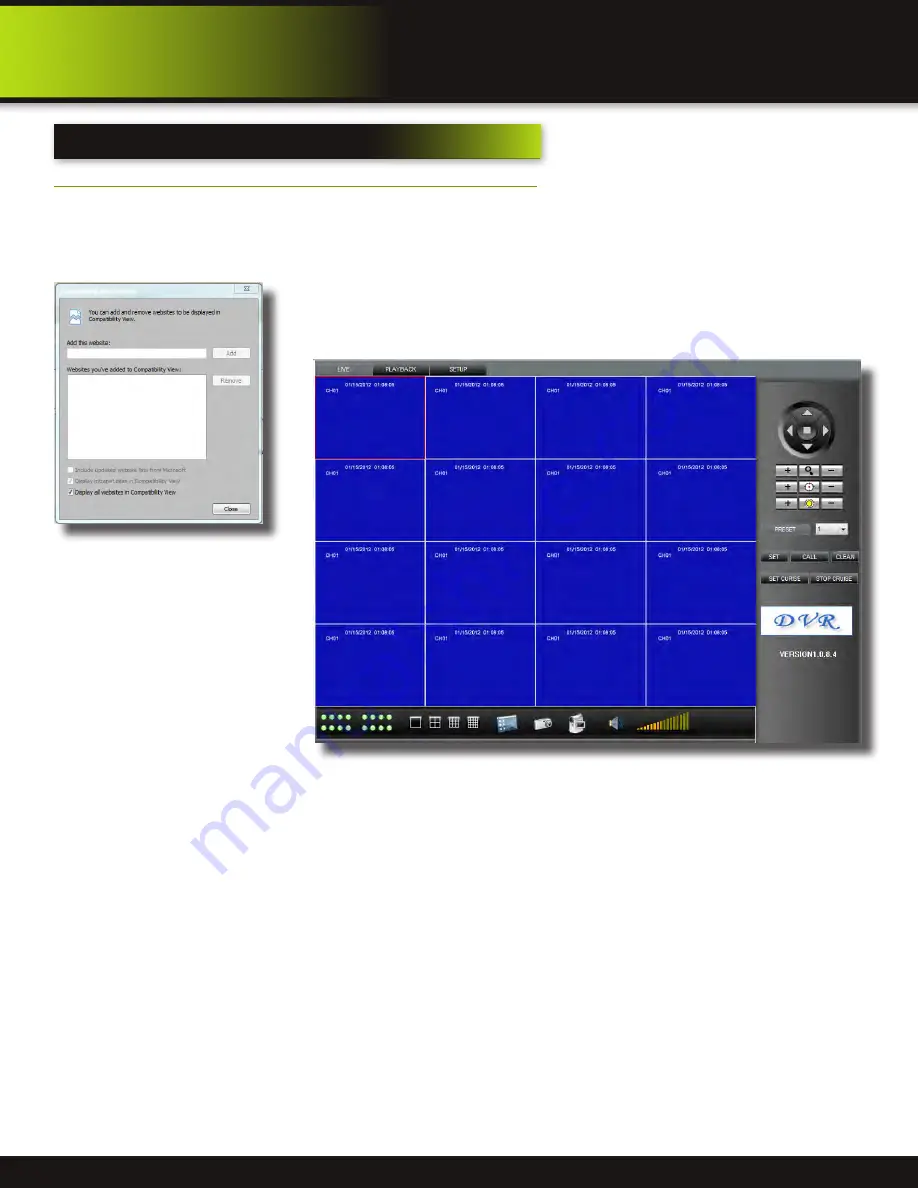
IE9 Compatibility  

View Setting Screen

Note: To use Internet Explorer 9 you must en-
able “Display all websites in Compatibility View” 
before you connect to the DVR. 

Summary of Contents for PRO-D1610

Page 1: ...H 264 Digital DVR user S manual VIDEO COMPRESSION DIGITAL DVR RECORDER MOBILE PHONE WEB READY H 264 BRK Series DVR OPTIMIZED SATA HDD 1 0TB MODEL PRO D1610 16 Channel DVR ...

Page 2: ...ing effort to constantly improve our products additional features and functions may have been added since that time and on screen displays may change We encourage you to visit our website at www brkelectronics com to check for the latest manuals English and Spanish firmware updates downloads other security camera products and announcements You ll find this product line under Products Security Came...

Page 3: ...tion simultaneous record playback mobile phone live view backup control remote access 1 TB SATA hard drive installed Supports smart phone live view E mail alarm Customizable E mail alerts Supports 16 channel CIF real time simultaneous recording Supports 4 channel simultaneous playback User friendly interface 16 bit true color semi transparent GUI with notes for selected menu items Advanced motion ...

Page 4: ...w Screen 14 Quick Access Menu 14 Main Menu Access 14 Password Setup and User Permissions 15 Camera Display Setup 16 Display Video Audio 16 Language Date and Time 17 Language Date Time and Daylight Savings Time DST 17 5 Basic Operation 18 Recording 18 Configure Recording Options 18 Recording Schedule Timer Recording 18 Recording Schedule TIMER RECORD Example 19 Privacy Mask Field 19 Motion Detect S...

Page 5: ...nP Universal Plug and Play 28 PPPoE Point to Point Protocol Over Ethernet 28 DDNS Dynamic Domain Name Service 29 30 Port Forwarding 30 32 Remote Surveillance 33 Remote Surveillance using Internet Explorer 8 33 34 Using Remote Surveillance 34 Remote Surveillance Main Screen 35 Live Viewing Tab 36 Playback Tab 37 38 Setup Tab 39 Setting Maintenance and Host Info Tabs 40 8 Mobile Phone 41 Mobile Setu...

Page 6: ... relocate the receiving antenna Increase the separation between the equipment and receiver Connect the equipment into an outlet on a circuit different from that of the receiver Consult the dealer or an experienced radio or TV technician for help Notice Only peripherals complying with FCC class B limits may be attached to this equipment Operation with non compliant peripherals or peripherals not re...

Page 7: ...E UNDER 24 HOUR VIDEO SURVEILLANCE 2 Window Warning Decals Installation Software and Manuals Power Supply for DVR RJ45 Ethernet Cable cable color may be different H 264 Digital DVR quick install guide MODELS PRO D1610 16 Channel VIDEO COMPRESSION DIGITAL DVR RECORDER MOBILE PHONE WEB READY H 264 BRK Series DVR OPTIMIZED SATA HDD 1 0TB Quick Install Guide Remote Control ...

Page 8: ...hen press again to advance frame by frame Press to start playback Press to slow playback speed by 1 2 1 4 1 8 Press to increase forward playback speed 2X 4X 8X 7 Navigation OK PTZ Select direction arrow then press OK to start PTZ motion In menus press to confirm selections in PTZ mode press to change the navigation but tons to control the connected PTZ camera not included Press to move cursor up i...

Page 9: ...AL 5 Alarm Input 4 alarm inputs Alarm Output 2 alarm outputs RS485 For connecting PTZ cameras 12V Power supply for alarm block inputs the current is 100mA to prevent short circuits 6 Audio Input For connecting audio signal from audio capable cameras or self powered microphones RCA jacks 7 Audio Output For connecting audio signal to amplified speakers RCA jacks 8 Video Input For connecting video si...

Page 10: ...login screen or log off system 3 Number Channel Buttons Press buttons 1 9 to view the selected channel in full screen To display 2 digit channels press both buttons slowly Pressing 0 returns screen to 16 camera display 4 Window Display Toggle between split screen displays Channels 1 4 5 8 9 12 13 16 1 9 8 16 1 16 5 MENU Opens the main menu 6 PTZ Press to open the PTZ control window 7 EXIT Close me...

Page 11: ... screen double click on a channel to view the selected channel in full screen Double click the channel again to return to split screen view Selecting letter or number on the virtual keypad 2 Right Button Click to open the Quick Access Menu Exits any window Exits any menu or re opens previous menu 3 Scroll Wheel Forward switch to VGA backward switch to BNC CVBS MOUSE controls DVR Front Face Connect...

Page 12: ...cluded RCA Audio In from 2 Audio Cameras or Powered Microphone Not included Powering Cameras Power from each Camera Adaptor that came with your camera Not included RCA Audio Out to Powered Speakers Not included To each DVR Channel 1 16 BNC to Security Camera Monitor Monitor and Cable Not included BNC Video DC Power Cable 1 per Camera Note Cables Power Adaptors and Cameras not included Power from 1...

Page 13: ...t stop Standby Mode 1 Press and hold the POWER button on the front panel or the STANDBY button on the remote control until the prompt closes The system enters standby mode You can also enter Standby mode through the Quick Access Menu See next page 2 To exit standby mode press and hold the POWER button on the front panel or remote control until the system beeps The system will begin powering up Use...

Page 14: ...enabled START RECORD Start manual recording STOP RECORD Stop manual recording START CRUISE or STOP CRUISE Toggles between both com mands Click to start preset PTZ Camera motion When Cruise is started and you bring up this Quick Access Menu again the option will now show STOP CRUISE STANDBY Puts system in standby mode VIDEO SEQUENCE Rotates through ONE CHANNEL FOUR CHANNEL and NINE CHANNEL Live Vie...

Page 15: ...ce ID using the Virtual Keyboard Next in the USER SETUP Menu click CONFIG to set up users NOTE Only the Administrator can enter the CONFIG setup You can change the STATE active or not Note for User Set 1 ADMIN the STATE of ACTIVE or INACTIVE cannot be changed USER NAME Assign or change user name using the virtual keyboard PASSWORD ENABLE enable or disable the password for this user PASSWORD Passwo...

Page 16: ... info box below 2 Under VGA RESOLUTION select 800 x 600 1024 x 768 1280 x 1024 1366 x 768 1440 x 900 3 Under LOOP TIME SECOND enter with virtual keypad from 1 to 300 Sets the time each channel is visible when VIDEO SEQUENCE from the Quick Ac cess Menu 4 Under ADJUST MARGIN adjust TOP BOTTOM LEFT RIGHT margin with slider from 0 6 Also adjust Display from VGA or CVBS Default is VGA and 0 for all mar...

Page 17: ...x for US codes 3 Click SAVE DATE AND TIME The new date and time are saved Click EXIT Daylight Savings Time DST To set daylight savings time 1 Under DST select ON DST options appear 2 Under DST MODE select one of the following DEFAULT The Default setting will apply the United States daylight savings time period from the second Sunday of March to the first Sunday in November go to step 3 CUSTOM Set ...

Page 18: ...tead of recording data as one large file the system will divide the data into blocks of 15 30 45 or 60 minutes This makes the recorded data easier to search 7 MASK FIELD lets you block a specific portion of a channel you do not want recorded or shown on the display screen This can be useful if you need to conceal a sensitive area being captured by the camera See next section for details 8 Click AP...

Page 19: ...AREA click SETUP The red motion grid appears over the se lected channel in full screen 5 Click the blocks in the grid to enable disable motion detection Red motion detection enabled Clear motion detection disabled 6 Right click anywhere on the screen to return to the Motion Detection menu 7 Click EMAIL then select ON OFF to turn on e mail notification E mail must be configured See manual for detai...

Page 20: ...slow down playback 2 Click X to quit playback and return to the Search menu 8 Under RECORD STATE the system shows recorded events in a Month Grid and a Time Grid The selected day of the month will be outlined in red Green normal recording Red alarm recording includes both alarm and motion events Click a date in the month grid to view recorded video files for that selected date in the hour grid Fil...

Page 21: ... internal HDD and external USB flash drive not included If there is no hard drive in DVR or the DVR cannot read the hard drive or the hard drive is not formatted it will display a red H in the video preview interface To access this menu from the MAIN MENU click DEVICES then HDD The HDD menu displays the following 1 HDD STATUS The system will display OK for normal operation 2 HDD SIZE The size in g...

Page 22: ...CHANNEL screen Click APPLY to save your settings Repeat if desired for the remaining I O devices Note If in the RECORD screen a Channel is set to OFF ALARM is also disabled for that Channel 2 To activate Loss Alarms use the drop down menu and select ON OFF HDD LOSS The alarm will sound if the internal HDD is damaged HDD SPACE The alarm will sound when the HDD is full overwrite must be disabled VID...

Page 23: ...n both outputs Alarm inputs 1 and 2 activate alarm output COM1 NO1 Alarm inputs 3 and 4 activate alarm output COM2 NO2 E mail Setup The system can send an e mail notification with a JPEG snapshot for triggered events on the system Please consult your e mail provider for information to enter in this screen To setup e mail notification 1 Under EMAIL select ON 2 Under SSL select OFF NOTE SSL deals wi...

Page 24: ...anage System Maintain ALL Selects all settings CLEAN Clears all settings LOAD DEFAULT Restores all settings to factory defaults 2 Click OK in the prompt This will restore all or selected items to the original factory settings NOTE Recorded video on the HDD will not be erased To restart the DVR soft reset 1 Click RESTART 2 Click OK in the prompt The system will perform a soft reset and load to a li...

Page 25: ...ck APPLY Click OK in the REMARK window 6 Click EXIT in all menus until all windows are closed Step 3 Configure the Operation Control of your PTZ Camera s After your PTZ camera s are set up you can control their operation from your DVR Note Individual features must be available on your camera to operate 1 In Live View double click on the Channel with the connected PTZ Camera to open to full screen ...

Page 26: ...E The total time in seconds for the camera to move through its defined operation Note This includes travel time from the previous set point completion plus the length of time you want the camera to hold on a position For example if the STOP TIME is set to 10 seconds and the travel time from the previous set point is 6 seconds then the camera will hold on the position for only 4 seconds It can take...

Page 27: ...e TYPE drop down box and set the IP address between 1 100 For example if your IP address is 192 168 0 107 change the last digits to 90 i e 192 163 0 90 This ensures that port forwarding will not change in the event of power failure or resetting of your network To configure DHCP settings 1 Select DHCP from the TYPE drop down box in the NETWORK SETUP Menu You should see the message Getting IP The ro...

Page 28: ... UPnP select ON 5 Click APPLY to save your settings and then click OK in the confirmation window 6 Using a remote PC open Internet Explorer 7 In the address bar enter your Router WAN IP address immediately followed by WEB PORT no spaces Example http XXX XXX XXX XXX Router WAN IP XXX WEB PORT 8 Enter your system ADMIN password and select INTERNET NOTE If you have not enabled passwords on the system...

Page 29: ... com 4 The DynDNS com update server receives the information and assigns the new IP address to your Dynamic DNS hostname you created In addition to automatically keeping up with the changes in the address you will now be able to enter a domain name rather than a string of digits when accessing the DVR in Internet Explorer How to obtain your Domain Name from www dyndns com 1 Using a computer that i...

Page 30: ...en the Network Setup window and the IP address of the DVR will now be listed This is the address to which you will forward ports 80 and 9000 If you plan to access your DVR via a smartphone you will need to forward port 100 as well Be sure to configure the Mobile Network screen of this DVR with port 100 See Mobile Phone Setup in this manual for details Step 2 Configure your Router for Port Forwardi...

Page 31: ...ing is configured as shown below If not you might receive an error message informing of a codec that is missing or not installed Windows Vista 1 Open the Control Panel 2 Select User Accounts and Family Safety 3 Select Add or Remove User Account 4 Select user account to change 5 Select Turn User Account Control on or off Note Depending on your version of Vista this screen might be accessible on the...

Page 32: ... gave your DVR see Port Forwarding section or your static IP address given to you by your Internet Service Provider or IT administrator To view remotely In the address bar enter your IP address for your computer not the DVR IP address This is either your IP address received via ipconfig as described in Network Setup To get the router settings or your IP address as described in DDNS setup or by goi...

Page 33: ...hannel Channel number appears in the top left corner 5 PTZ Control PTZ control for any connected PTZ cameras not included 6 Functions Click the icons to show hide channels take screen captures and record 7 Display Modes Click the icons to view channels in single channel full screen quad and split screen configurations 8 Volume Mute Select a channel outlined in red and then click the bars to increa...

Page 34: ...ust have a PTZ camera not included connected to the system in order to use the PTZ controls To control a PTZ camera 1 Select the channel of the connected PTZ camera s 2 Click the navigation arrows to pan and tilt the camera 3 Click to control zoom focus and iris 4 Enter presets 5 Click SETTING HAND and CLEAR to further control presets Screen Captures Use the remote surveillance software to take a ...

Page 35: ...n exclamation mark icon 3 Double click a file from the File List to playback the file in the main screen The icon in the file list changes to Control playback using the buttons at the bottom of the main screen The purple bar indicates the download progress The green marker indicates playback progress You can click and drag the playback marker will turn from green to orange to advance or rewind pla...

Page 36: ...o your PC using the Replay menu in the remote surveillance software To backup files remotely 1 Click PLAYBACK at the top of the main screen 2 Double click a file from the File List to begin playback 3 Click BACKUP Backup begins to C DVR ip_address Backup NOTE If you playback a file you must wait for the file to load before backing it up otherwise you may receive an error message 4 When file backup...

Page 37: ...g tabbed options RECORD ALARM PTZ NETWORK SETTING MAINTENANCE HOST INFO Remote Setup Record Screen RECORD You can check and change the parameter settings as configured in the DVR Remote Setup Alarm Screen ALARM You can check and change the parameter settings as configured in the DVR Remote Setup PTZ Screen PTZ You can check and change the parameter settings as configured in the DVR Remote Setup Ne...

Page 38: ...WIDTH Set the bandwidth in kbps 128k 192k 256k 384k 512k 1024k that you want to allocate for traffic based on internet bandwidth available This bandwidth does not include audio 2 FILE SAVE PATH The path where you want to save captured picture and recording video Remote Setup Maintenance Screen MAINTENANCE You can check and change the parameter settings as configured in the DVR along with rebooting...

Page 39: ... Step 2 Configure Your Phone 1 From your phone go to your App Store or Market Search for the MEye application 2 Download and Install the App 3 Go to the settings screen See below for examples of iPhone Android Windows and Blackberry phones Your screens may vary Enter a name Enter your IP address for your computer not the DVR IP address You can easily get your IP address as described in Network Set...

Page 40: ...elect a Channel number to view each connected camera Depending on your setup and phone you can control PTZ cameras and other functions See your application for available features Below are screen shots from various phones iPhone Main Screen Android Main Screen Windows Phone PTZ Screen Windows Phone Main Screen Blackberry Phone Main Screen ...

Page 41: ...VR unit make sure you use a static free workstation Any electrostatic energy coming in contact with the hard disk or DVR can damage it permanently Hard Drive Format NOTE A new hard drive must be formatted after installation Format per instructions in the HDD MANAGEMENT section of this manual Hard Drive Connected to Circuit Board Hard Drive Remove Install Screws from Below CAUTION TO REDUCE THE RIS...

Page 42: ...n ADPCM Picture processing and storage Picture compression H 264 Picture resolution CIF Audio style ADPCM Video code rate CIF 384 768 Kbps Audio code rate 32 KB s Data storage One 1 TB SATA HDD included up to 2 TB capable Alarm Alarm input 4 alarm inputs Alarm output 2 alarm outputs Connector Serial interface Supports 2 RS485 PTZ interface Supports PELCO D PELCO P Mouse Mouse USB 1 1 Data USB 2 0 ...

Page 43: ... Item Device Parameter Data User Name Passwords Admin Name Password User 1 Name Password User 2 Name Password User 3 Name Password User 4 Name Password User 5 Name Password Network Setup Media Port Web Port Mobile Port DNS IP Address DVR IP Address Computer Subnet Mask Gateway DDNS Host Name DDNS User Name DDNS Password ...

Page 44: ... signal or too weak The DVR hardware is defective Question Why can t the DVR record after startup and why is there an H showing on the screen Answer Make sure power adaptor is DC 12V Make sure hard drive is formatted Check the power and data connection cables of the hard drive The hard drive is defective The SATA port is not working Question What is the meaning of the letters R M I and H showing o...

Page 45: ...ow Remote control is damaged or the receiver port on the front panel of DVR is damaged or blocked Question Why can t I log in over the Internet Answer Please check the network to see if it is connected Check if LINK or 100M LED is displayed normally on the panel use ping xxx xxx xxx xxx DVR IP to check if the Internet is linked properly Make sure you are running Windows 7 Vista or XP operating sys...

Page 46: ...o the system Firmly connect the mouse cable to the USB Mouse port not the USB Data port on the front panel System needs to be reset Power off the system Turn power switch off position on back of unit Firmly connect a USB mouse to the USB Mouse port on the front panel of the system Power on the system Turn power switch to on position on back of unit There is no picture on selected channels camera p...

Page 47: ...n the users system as a result of installing the software provided This warranty is in lieu of other warranties expressed or implied and BRK neither assumes nor authorizes any person to assume for it any other obligation or liability in connection with the sale or service of the product In no event shall BRK be liable for any special or consequential damages arising from the use of the product or ...

Page 48: ... 2012 BRK Brands Inc a Jarden Corporation Company NYSE JAH 3901 Liberty Street Road Aurora IL 60504 8122 Phone 630 851 7330 Tech Services 800 323 9005 www brkelectronics com M08 0403 002r4 2012 ...

Reviews: