


English
- 22 -
Press “ ” or “ ” button to select
Default Zoom
. You
can set
Default Zoom
to
Panoramic
,
16:9
,
4:3
or
14:9
by pressing “ ” or “ ” button.
Blue Background
If the signal is weak or absent, the TV will automatically
change to a blue screen. To enable this, set
Blue
Background
to
On
.
By pressing “ ” or “ ” button, select
Blue
Background
. Press “ ” or “ ” button to set
Blue
Background
as
On
or
Off
.
Menu Background
Press “ ” or “ ” button to select
Menu Background
.
You can set menu background level by pressing “
” or “ ” button.
Power Save Mode
Use “ ” or “ ” button to select Power Save Mode.
Press “ ” or “ ” button to set Power Save Mode as
On or Off.
See the section, “Environmental Information” in
this manual for further information on Power Save
Mode.
Note : Backlight function will be invisible if Power Save
Mode is set to on.
Backlight
This setting controls the backlight level. Select
Backlight
by pressing “ ” or “ ” button. Press“
” or “ ” button to set
Backlight
to
Auto, Medium
,
Maximum
or
Minimum
.
Menu Timeout
To set a speci
fi
c display timeout for menu screens,
set a value for this option.
Press “ ” or “ ” button to select
Menu Timeout
. Use
“ ” or “ ” button to change menu timeout to
15 sec
,
30 sec
or
60 sec
.
Teletext Language
Press “ ” or “ ” button to select
Teletext Language
.
Use “ ” or “ ” button to change
Teletext Language
to
West, East
,
Turk/Gre
,
Cyrillic, Arabic
or
Persian
.
HDMI PC Full Mode (optional)
If you want to view PC screen in HDMI mode by using
external connection, HDMI PC FULL MODE option
should be On to adjust the screen ratio correctly. This
item might be inactive in some resolutions.
Note
: If you connect an HDMI device and switch the
TV to HDMI mode, this feature will be visible (except for
1080i/1080P resolution).
Full Mode (optional)
If you connect a device via HDMI or YPbPr connectors
and set 1080i/1080P resolutions, Full Mode item will
be visible.You can set Full Mode as 1:1 or Normal
by using “ ”or “ ”.If you select 1:1, screen ratio will
be adjusted correctly. If you set Normal, screen ratio
may expand.
Ext Out
Press “ ” or “ ” button to select Ext Out. Use “ ” or
“ ” button to set the Ext Out as On or Off.
Note
:
For copying from a DVD or VCR device, you should choose
desired source from source menu and turn “On” to EXT Out
from feature menu.
Ext Out should be On in order to use Timers function in the
DTV mode.
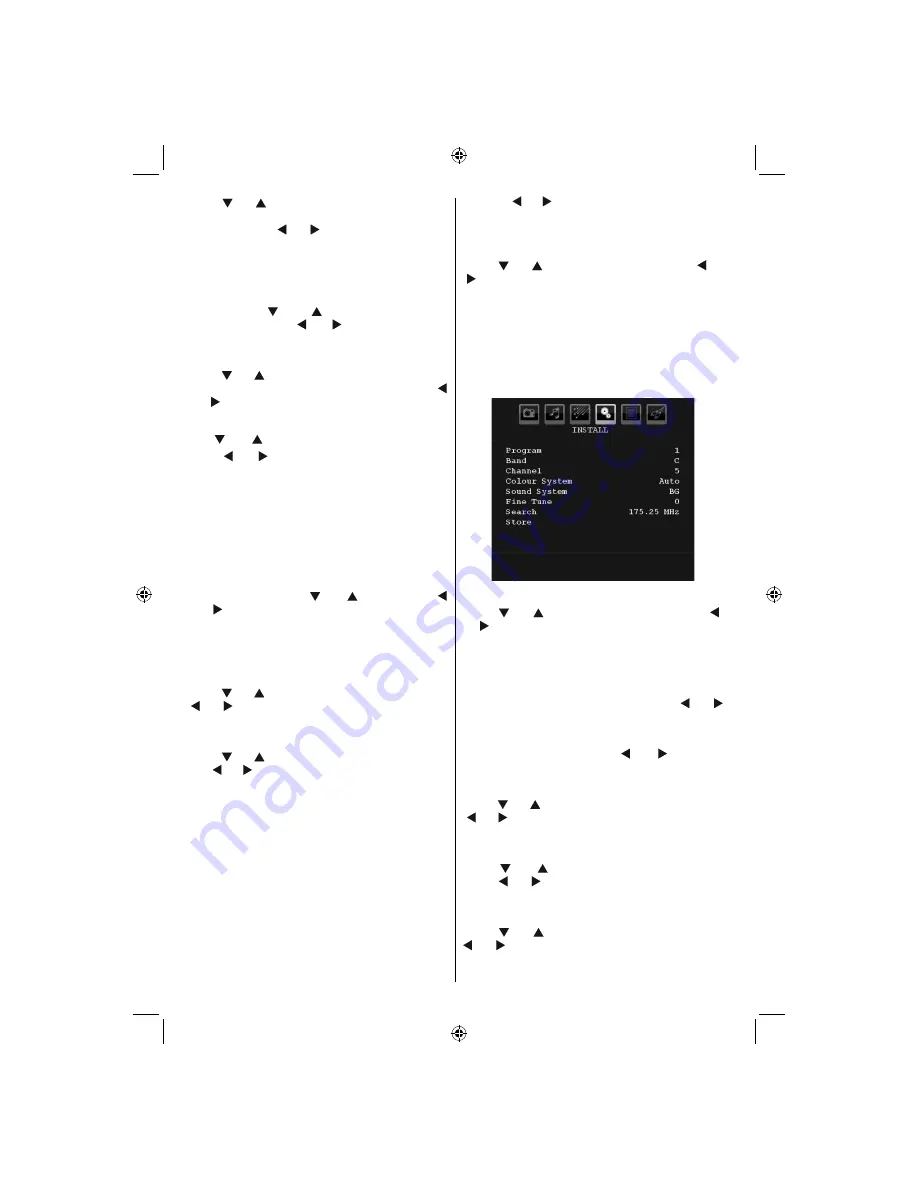
Install Menu
Program
Press “ ” or “ ” button to select Program. Use “ ”
or “ ” button to select the program number. You can
also enter a number using the numeric buttons on the
remote control. There are 200 programme storage
between 0 and 199.
Band
Band can be selected either C or S. Press “ ” or “
” button to set Band.
Channel
Channel can be changed by “ ” or “ ” button or
numeric buttons.
Colour System
Press “ ” or “ ” button to select Colour System. Use
“ ” or “ ” button to change the colour system to PAL,
PAL 60, SECAM or AUTO.
Sound System
Press “ ” or “ ” button to select Sound System.
Press “ ” or “ ” button to change the sound system
to BG,DK, I, L or L’.
Fine Tune
Press “ ” or “ ” button to select Fine Tune. Press “
” or “ ” button to adjust the tuning.
01_MB45M_[GB]_5110UK_IDTV_SILVER8_26905W_10073317_50190400.indd 22
01_MB45M_[GB]_5110UK_IDTV_SILVER8_26905W_10073317_50190400.indd 22
11.05.2011 17:56:16
11.05.2011 17:56:16
Summary of Contents for FIN26FLD905HU
Page 1: ...FIN26FLD905HU colour television owner s manual...
Page 33: ...50190400...


