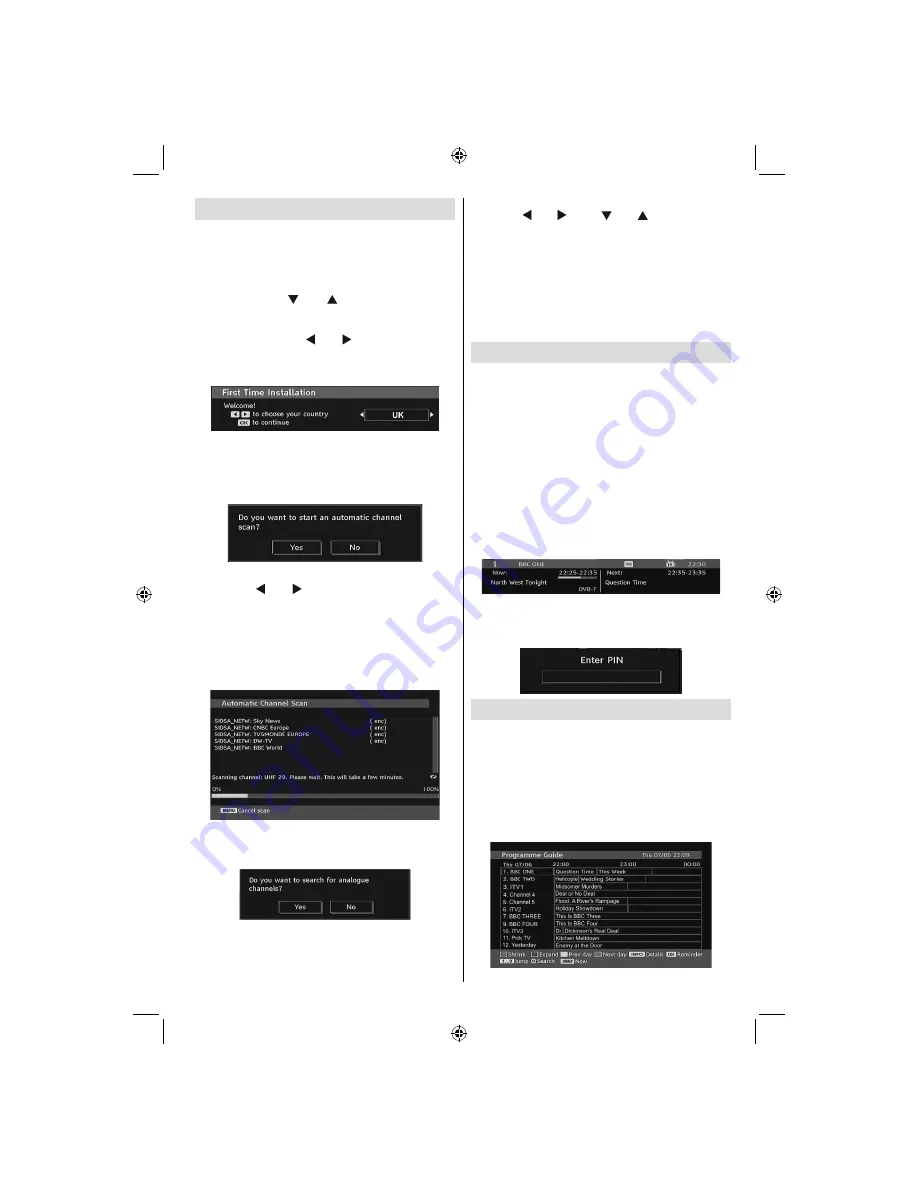
background image

English   

- 11 -


    Initial Settings 

 When the TV is turned on for the 

fi

 rst time, the menu 

for the language selection appears on the screen. The 
message “Welcome please select your language!” 
is displayed in all language options sequentially in 
the OSD.
By pressing the “ ” or “ ” buttons highlight the 
language you want to set and press OK button. After 
then, “First time installation” OSD will appear on the 
screen. By pressing “ ” or “ ” buttons, select the 
country you want to set and press OK button (* for 
EU countries).

Note

: Country selection OSD will not be available for UK.

Press OK button on the remote control to continue 
and the following message will be displayed on the 
screen:


   • To select the “Yes” or “No” option, highlight the item 

by using “ ” or “ ” buttons and press the “

OK

” 

button. 

 The IDTV will automatically tune to the UHF or 
VHF(*) (* for EU countries) transmission channels, 
searching for digital terrestrial TV broadcasts and 
displaying the names of channels found. This 
process will take about a few minutes.


 After Automatic Search is completed, the following 
message asking for analogue channel search appears 
on the screen:  


 To search for analogue channels, select “Yes”.  TV 
switches to the analogue TV mode. The menu is 
displayed to search for analogue channels.   

 Select your Country, Language and Text language 
by using “ ” or “ ” and “ ” or “ ” buttons. Press 

OK

 or 

RED

 button to continue. To cancel, press 

the 

BLUE

 button.

For more information on this process, see “Install 
Menu” section. 


Note

 : For proper functioning of digital teletext in DTV mode, 

you should set country as UK in analogue AUTO PROGRAM  
(for UK broadcasts only).
Do not turn off the TV while initializing 

fi

 rst time installation. 

 General Operation

Press the 

“SOURCE”

 button on the remote control 

and select DTV/USB to switch the TV set to digital 
terrestrial television broadcasting.    

 Information Banner 

 • Whenever you change channel, using the 

P- / P+


button or the numeric buttons, the TV displays 
the broadcast picture along with an information 
banner at the bottom of the screen (available only 
in DTV mode). This will remain on the screen for 
a few seconds.  

 • The information banner can also be displayed at 

any time while watching TV by pressing the “

INFO

” 

button on the remote control: 


     If the selected channel is locked, you must enter the 
correct four numeric code to view the channel. “Enter 
PIN” will be displayed on the screen in such a case: 


Electronic Programme Guide (EPG)

  • Some, but not all, channels send information 

about the current and next events. Press  EPG  
button to view the EPG menu. EPG appears on 
the screen. It is able to get Information of the 
channel - programs weekly by means of 7-DAY-
EPG. All programs of channels are displayed. On 
the bottom of the screen; info bar, showing all the 
available commands, will be displayed.


01_MB45M_[GB]_5110UK_IDTV_SILVER8_26905W_10073317_50190400.indd   11

01_MB45M_[GB]_5110UK_IDTV_SILVER8_26905W_10073317_50190400.indd   11

11.05.2011   17:56:07

11.05.2011   17:56:07

Summary of Contents for FIN26FLD905HU

Page 1: ...FIN26FLD905HU colour television owner s manual...

Page 2: ...Disposal 3 Information for Users in European Union Countries 3 Disconnecting the Device 3 Headphone Volume 3 Installation 3 LCD Screen 3 Warning 3 Connection to a Television Distribution System Cable...

Page 3: ...e TV please read this manual thoroughly Please keep this manual in a safe place for future references Preparation For ventilation leave a free space of at least 10 cm all around the set To prevent any...

Page 4: ...r house Moisture and Water Do not use this device in a humid and damp place avoid the bathroom the sink in the kitchen and near the washing machine Do not expose this device to rain or water as this m...

Page 5: ...you do not use However it is highly recommended to activate Power Save Mode setting to reduce your annual power consumption Please helps us to save environment by following these steps Repair Informa...

Page 6: ...e 15 Return Exit in DTV mode Index page in 16 TXT mode No function 17 No function 18 No function 19 Picture mode selection 20 Electronic programme guide in DTV mode 21 Sleep timer 22 Menu on off 23 OK...

Page 7: ...to an antenna or a cable 4 Note that if you use a decoder or a media recorder you should connect the aerial cable through the device to the television with an appropriate antenna cable as shown in th...

Page 8: ...ternal devices 5 Connect the audio cable between the AUDIO INPUTS on the TV and the AUDIO OUTPUT jacks on your device Also to enable PC YPbPr sound connection in such a case use an appropriate audio c...

Page 9: ...e physical dam age to the USB player and especially the USB device itself SIDE VIEW USB MEMORY USB Memory Connection Plug your USB device to the USB input of the TV Connecting the LCD TV to a PC For d...

Page 10: ...V Possible connections are shown below Note that cables shown in the illustration are not supplied For connecting a camcorder connect to the VIDEO IN socket and the AUDIO SOCKETS For selecting the rel...

Page 11: ...the Buttons on the TV Volume Setting Press button to decrease volume or button to increase volume so a volume level scale slider will be displayed on the screen Programme Selection Press P CH button...

Page 12: ...s the BLUE button For more information on this process see Install Menu section Note For proper functioning of digital teletext in DTV mode you should set country as UK in analogue AUTO PROGRAM for UK...

Page 13: ...message appears on the screen press the OK button When the button is pressed the TV returns to television broadcasting With digital terrestrial broadcasting DVB T in addition to digital teletext broa...

Page 14: ...Then the message below appears on the screen Press or button to highlight the desired option If OK button is pressed while Yes is highlighted the highlighted channel is deleted Selecting No cancels th...

Page 15: ...Operations part Timers To display timers window activate the item from the main menu To add a timer press the YELLOW button on the remote control Then Add Timer window appears Channel or keys will na...

Page 16: ...to select Hard of Hearing and then press or button to set this setting as On or Off If the broadcaster enables any special signal concerning the audio you can set this setting as On to receive such s...

Page 17: ...to highlight the Time Zone Setting Time Zone Setting is set using or buttons It can be set to AUTO or MANUAL WhenAUTO is selected Current Time and Time Zone options will not be available to be set If...

Page 18: ...ress OK and Language Settings submenu will be displayed on the screen Use or buttons to highlight the menu item that will be adjusted and then press or button to set Notes System Language determines t...

Page 19: ...user can use this item to load default settings which were loaded to the receiver at the factory To install factory settings highlight First Time Installation menu item and press OK button then you wi...

Page 20: ...le using the numeric buttons OK views the selected picture in full screen Play Slideshow Green button starts the slideshow with all pictures in the folder Slideshow Options Pause Yellow button Pause t...

Page 21: ...picture is noisy use Noise Reduction setting to reduce the noise amount Press or button to select Noise Reduction Press or to choose from one of these options Low Medium High or Off Game Mode optional...

Page 22: ...sound to obtain fixed output level between programmes For instance volume level of advertisements tend to be louder than programmes Press or button to select AVL Press or button to set the AVL as On...

Page 23: ...en ratio correctly This item might be inactive in some resolutions Note If you connect an HDMI device and switch the TV to HDMI mode this feature will be visible except for 1080i 1080P resolution Full...

Page 24: ...ion is done automatically Name To change the name of a programme select the programme and press the RED button The first letter of the selected name will be highlighted Press or button to change that...

Page 25: ...screen image to ensure best results H Horizontal Position This item shifts the image horizontally to right hand side or left hand side of the screen Select H Position item by using or button Use or bu...

Page 26: ...spect ratio of the screen is adjusted by the information provided by the selected source if available The format being displayed in AUTO mode is completely independent of WSS information which could b...

Page 27: ...ing off the TV for a while To avoid this do not leave the screen in still picture for extended periods No Power If your TV system has no power please check the main power cable and connection to the m...

Page 28: ...75 37 5 VESA 4 800 600 56 35 2 VESA 5 800 600 60 37 9 VESA 6 800 600 70 43 8 7 800 600 72 48 1 VESA 8 800 600 75 46 9 VESA 9 832 624 75 49 7 MAC 10 1024 768 60 48 4 VESA 11 1024 768 70 56 5 VESA 12 1...

Page 29: ...720P 60Hz O 1080I 50Hz O 1080I 60Hz O 1080P 24Hz O 1080P 25Hz O 1080P 30HZ O 1080P 50HZ O 1080P 60HZ O X Not Available O Available Note In some cases a signal on the LCD TV may not be displayed prope...

Page 30: ...e 64K 320Kbps Photo jpg Baseline JPEG WxH 8902x8902 up to 77Mega pixel Support format 444 440 422 420 Grayscale Progressive JPEG Up to 4 Mega pixel Support format 444 440 422 420 Grayscale External Su...

Page 31: ...ereo AUDIO OUTPUT POWER WRMS 10 THD 2 x 6 POWER CONSUMPTION W 100 W max 1 W Standby PANEL 26 wide display DIMENSIONS mm DxLxH With foot 164 75 x 649 40 x 477 60 Weight Kg 8 45 DxLxH Without foot 89 70...

Page 32: ...o the terminal which is marked with the letter N or coloured Black The wire which is coloured brown or red must be connected to the terminal which is marked with the letter L or coloured Red For conti...

Page 33: ...50190400...

Reviews: