Finlux 55F9076-T Owner'S Manual Download Page 3

English

   - 2 -

Environmental Information 

This television is designed to consume less energy 

to help save the environment. To reduce energy 

consumption, you should take the following steps:
You can use the Power Save Mode setting, located 

in the Picture menu. If you set the Power Save Mode 

as 

Eco

, the TV will switch to energy-saving mode 

and the luminance level of TV set will be decreased 

to the optimum level. Note that some picture settings 

will be unavailable to be changed when the TV is in 

Power Save Mode. 
If 

Picture Off

 is selected, “Screen will be off in 

15 seconds.” message will be displayed. Select 

PROCEED

 and press 

OK

 to continue. The screen 

will be off immediately.
When the TV is not in use, please switch off or 

disconnect the TV from the mains plug. This will also 

reduce energy consumption. 

Standby Notifications

1) If the TV does not receive any input signal (e.g.

from an aerial or HDMI source) for 5 minutes, the TV 

will go into standby. When you next switch-on, the 

following message will be displayed: 

“TV switched to 

stand-by mode automatically because there was 

no signal for a long time.” 

Press 

OK

 to continue.

2) If the TV has been left on and not been operated

for a while, the TV will go into standby. When you next 

switch-on, the following message will be displayed. 

“TV switched to stand-by mode automatically 

because no operation was made for a long time.” 

Press 

OK

 to continue.

Features

3D Viewing: This product supports the viewing

of 3D content from devices such as a High 

Definition  Satellite  Receiver  or  Blu-ray  Player  via 

HDMI, PC,YPBPR, USB inputs or via an available 

broadcast.

Remote controlled colour LCD TV.

Fully integrated digital/cable TV (DVB-T2/C)

DVB T2.

HDMI inputs are for connecting a device that has

a HDMI socket.

USB input.

Programme recording.

Programme timeshifting.

OSD menu system.

Scart socket for external devices (such as DVD

Players, PVR, video games, etc.)

Stereo sound system.

Teletext.

Headphone connection.

Automatic programming system.

Manual tuning.

Automatic power down after up to six hours.

Sleep timer.

Child lock.

Automatic sound mute when no transmission.

NTSC playback.

AVL (Automatic Volume Limiting).

PLL (Frequency Search).

PC input.

• Plug&Play for Windows 98, ME, 2000, XP, Vista,

Windows 7.

Game Mode (Optional).

Ethernet (LAN) for Internet connectivity and service

802.11n WIFI Support via USB dongle

DLNA

Accessories Included

Remote Control

Batteries: 2 x AAA

Instruction Book

Quick Start Guide
Side AV Connection Cable

3D Glasses x8

Nero Media Home CD

Mini scart adapter cable

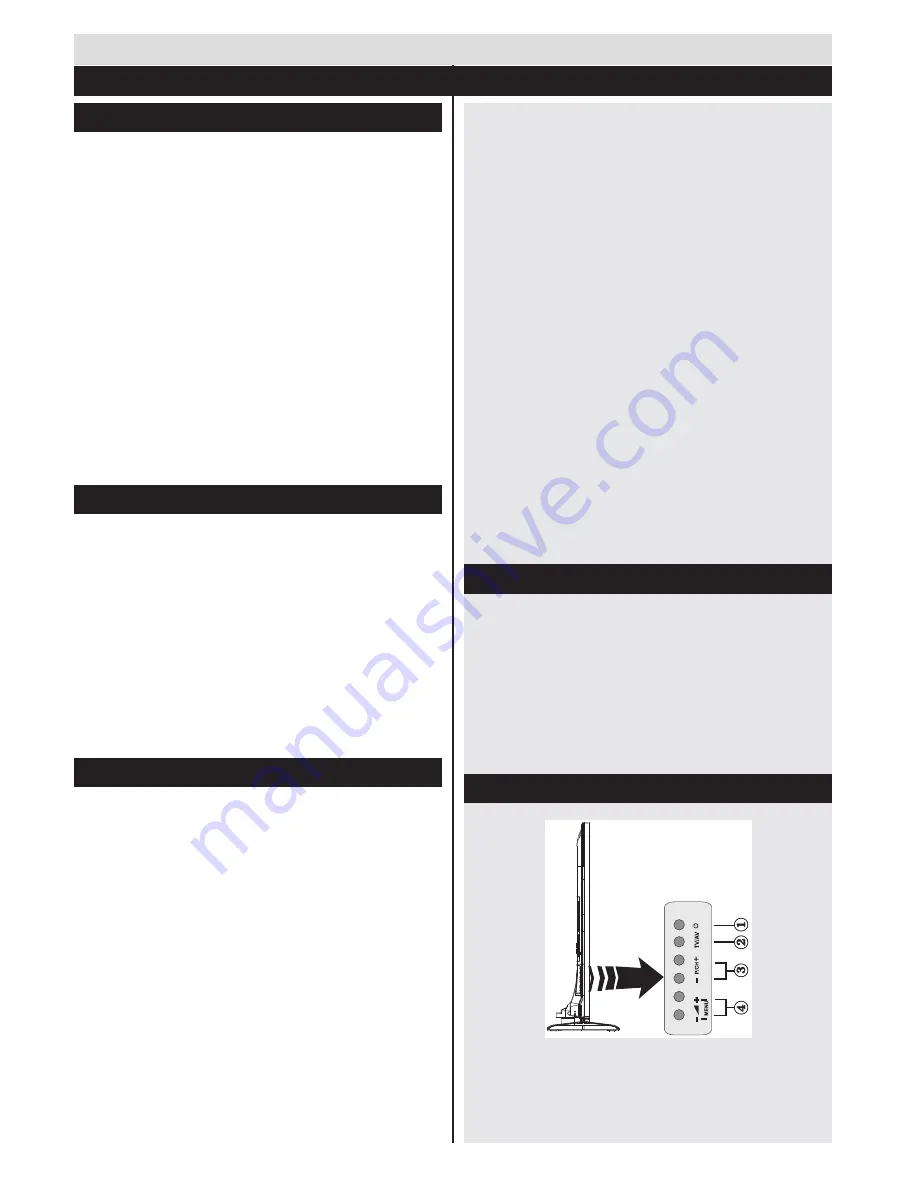
TV Control Buttons & Operation

1.

Standby On/Off button

2.

TV/AV button

3.

Programme Up/Down buttons

4.

Volume Up/Down buttons

Getting Started

Notifications & Features & Accessories

Summary of Contents for 55F9076-T

Page 1: ......

Page 2: ...active pixels may appear on the screen as a blue green or red point Please note that this does not affect the performance of your product Take care not to scratch the screen with or other hard objects...

Page 3: ...e following message will be displayed TV switched to stand by mode automatically because no operation was made for a long time Press OK to continue Features 3D Viewing This product supports the viewin...

Page 4: ...mperature before you connect the set to the mains Plug the power cable to the mains socket outlet Antenna Cable Connection Connect the aerial or cable TV plug toAERIAL INPUT ANT TV or satellite lead t...

Page 5: ...isplayed on the digital teletext screen When the TXT button is pressed again the TV returns to television broadcast Specification TV Broadcasting PAL B G D K K Receiving Channels VHF BAND I III UHF BA...

Page 6: ...ia browser mode Timeshift recording 35 Media browser 36 Picture mode selection Changes picture mode in media browser video mode 37 Standby button 38 Function LED Getting Started Remote Control 1 NOTE...

Page 7: ...Insert or remove the CI module only when the TV is SWITCHED OFF You should refer to the module instruction manual for details of the settings Each USB input of your TV supports devices up to 500mA Con...

Page 8: ...u can select frequency ranges from this screen Enter the frequency range manually by using the numeric buttons Note Searching duration will change depending on the selected search step Media Playback...

Page 9: ...Note You can not switch broadcasts or view the Media Browser during the recording mode While recording a programme or during the timeshifting a warning message appears on the screen if your USB device...

Page 10: ...ollowing chapters for details of the listed features FollowMe TV With your tablet you can stream the current broadcast from your smart TV using the FollowMe TV feature Install the appropriate applicat...

Page 11: ...he Noise Reduction setting to reduce the amount of noise Advanced Settings Dyanmic Contrast You can change the Dynamic Contrast ratio to desired value Colour Temp Sets the desired colour tone Picture...

Page 12: ...al amplifier to your TV using the headphone jack you can select this option as Lineout If you have connected headphones to the TV set this option as Headphone Surround Sound optional Surround sound mo...

Page 13: ...smartphone or tablet pc If you have a DLNA compatible smartphone or tablet pc and the appropriate software is installed you can share play photos on your TV See instructions of your sharing software f...

Page 14: ...e Channel List Record Delete Record Timer After you have selected a programme in the EPG menu press the OK button Select the Record option and press the OK button After this operation a recording will...

Page 15: ...possible that some viewers may experience a seizure or epilepsy when exposed to certain conditions including flashing lights or images in TV or video games Sometimes certain symptoms can occur in uns...

Page 16: ...on mode is turned off 2D Only If content is 3D but you want to watch it in 2D you can switch to 2D only mode There are 2 options LEFT and RIGHT to select which side of the content you want to watch in...

Page 17: ...connection Ensure that Nero Media Home software is installed to your PC for DLNA function See Nero Media Home Installation section Connect your PC to your modem router This can be a wired or wireless...

Page 18: ...environment The WirelessLANadaptorshouldbeconnecteddirectly to the TV s USB port USB hubs are not supported You can plug your wifi dongle into the supplied dock In cases where network quality is poor...

Page 19: ...your modem Distruption during playback or slow reactions You could try the following in such a case Keep at least three meters distance from microwave ovens mobile telephones bluetooth devices or any...

Page 20: ...ge channels using P P buttons Current HDMI content will be displayed on the PIP window if you switch to portal mode while watching HDMI source Use the or or to navigate between the items on Portal scr...

Page 21: ...earch keywords by clicking the search button in the address dialog box or another way to navigate to pages is by clicking on links on web pages and these will take you to the appropriate pages When yo...

Page 22: ...en is displayed Software Upgrade YourTV is capable of finding and updating automatically via the Aerial Cable Satellite signal or over the Internet Software upgrade search via user interface Simply na...

Page 23: ...progress bar informs you of the progress of the installation process 10 Installation finishes The Help us to Enhance Nero Software screen is displayed In order to offer a better service Nero is collec...

Page 24: ...splay Modes The following table is an illustration of some of the typical video display modes Your TV may not support all resolutions Your TV supports up to 1920x1200 Index Resolution Frequency 1 640x...

Page 25: ...MPEG1 2 Layer 3 AAC HEAAC AC3 EAC3 LPCM ADPCM H 264 1080Px2 25fps 1080P 50fpsOther 1080P 30fps50Mbit sec avi MPEG1 2 4 Xvid H 264 VC1 WMV3 Sorenson H 263 Motion JPEG MPEG1 2 Layer 1 2 3 AAC HEAAC AC3...

Page 26: ...reen or green and yellow The wire which is coloured blue or black must be connected to the terminal which is marked with the letter N or coloured Black The wire which is coloured brown or red must be...

Page 27: ...76 T E Energy efficiency class A F Visible screen size diagonal approx inch cm 55 inches 140 cm G On mode average power consumption Watt 112 H Annual energy consumption kWh annum 163 I Standby power c...

Page 28: ......

Reviews: