background image

English

   - 10 -

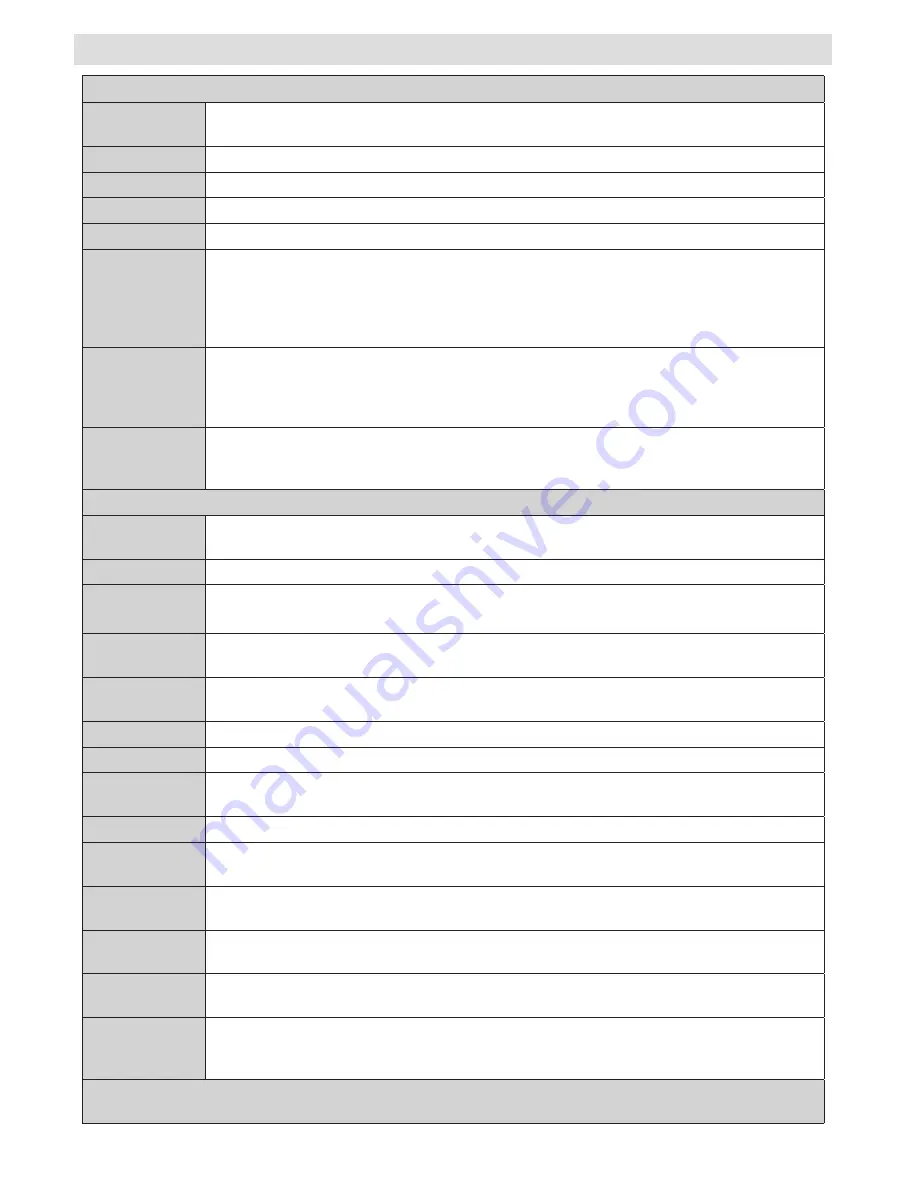
Picture Menu Contents

Mode

You can change the picture mode to suit your preference or requirements. The Picture mode 

can be set to one of these options: 

Cinema

Game

Sport

Dynamic 

and 

Natural

Contrast

Sets the lightness and darkness values of the screen.

Brightness

Sets the brightness value for the screen.

Sharpness

Sets the sharpness value for the objects displayed on the screen.

Colour

Sets the colour value, adjusting the colors.

Power Save 

Mode

To set the Power Save Mode as Eco, Picture Off and Disabled. See the section, “Environmental 

Information” in this manual for further information on the Power Save Mode. If Picture Off is 

selected, “Screen will be off in 15 seconds” message will be displayed on the screen. Select 

PROCEED and press OK to continue. The screen will be off in 15 seconds. If you disable Power 

Save Mode, Picture mode will be automatically set to Dynamic.

Backlight 

(optional)

This setting controls the backlight level and it can be set to 

Auto

Maximum

Minimum

 or 

Eco Mode

The Backlight function will be inactive if the Power Save 

Mode is set to On. The Backlight cannot be activated in VGA, Media Browser 

mode or while the picture mode is set to Game. 

Noise 

Reduction

If the broadcast signal is weak and the picture is noisy, use the 

Noise Reduction

 setting to 

reduce the amount of noise. Noise Reduction can be set to one of these options: 

Low

Medium

High

 or 

Off

.

Advanced Settings

Dynamic 

Contrast

You can change the contrast rate by using the dynamic contrast function. Dynamic contrast 

can be set to one of these options: 

Low

Medium

High

 or 

Off.

Colour Temp

Sets the desired colour tone.

Picture Zoom

Sets the picture size to Auto,16:9, Subtitle,14:9, 14:9 Zoom, 4:3 or Cinema.
Auto (Only available in Scart mode with SCART PIN8 high voltage/low voltage switching).

HDMI True 

Black

While watching from a HDMI source, this feature will be visible in the Picture Settings 

menu. You can use this feature to enhance the blackness in the picture. 

Film Mode

Films are recorded at a different number of frames per second to normal television programmes. 

Turn this feature on when you are watching films to see the fast motion scenes clearly.

Skin Tone

Adjust the desired skin tone.

Colour Shift

Adjust the desired colour tone.

RGB Gain

Press 

OK

 button to edit RGB gain. You can configure the colour temperature values using 

the RGB Gain feature.

Reset

Resets the picture settings to factory default settings.

Autoposition 

(in PC mode)

Automatically optimizes the display. Press 

OK

 to optimize.

H Position     

(in PC mode)

This item shifts the image horizontally to the right hand side or left hand side of the screen.

V Position      

(in PC mode)

This item shifts the image vertically towards the top or bottom of the screen.

Dot Clock                

(in PC mode)

Dot Clock adjustments correct the interference that appear as vertical banding in dot intensive 

presentations like spreadsheets or paragraphs or text in smaller fonts.

Phase (in PC 

mode)

Depending on the resolution and scan frequency that you input to the TV set, you may see 

a hazy or noisy picture on the screen. In such a case you can use this item to get a clear 

picture by using trial and error.

While in VGA (PC) mode, some items in Picture menu will be unavailable. Instead, VGA mode settings will be 

added to the Picture Settings while in PC mode.

Menu Features and Functions

Summary of Contents for 32f502

Page 1: ......

Page 2: ...Menu 9 Changing Image Size Picture Formats 9 Using the Channel List 9 Menu Features and Functions 10 Electronic Programme Guide EPG 13 Recording a Programme 13 Timeshift Recording 14 Instant Recordin...

Page 3: ...securely attached to the wall in accordance with the installation instructions Screen Occasionally a few non active pixels may appear on the screen as a fixed blue green or red point Please note that...

Page 4: ...is used to receive and display TV programmmes The different connection options expand the reception and display sources possible various external devices This device is only suitable for operation in...

Page 5: ...he menu system section of this manual Press the TV AV button in the control panel on the TV to switch between AV modes Operation with the Remote Control Press the MENU button on your remote control to...

Page 6: ...l in TXT mode 27 Programme up down 28 Mute 29 Previous programme Now in EPG mode 30 Numeric buttons 31 AV Source TV NOTE The Remote Control range is approximately 7m 23ft Using My button 1 Press MYBUT...

Page 7: ...scart socket When using the wall mounting kit optional we recommend that you plug all your cables into the back of the TV before mounting on the wall Insert or remove the CI module only when the TV i...

Page 8: ...er is active The LED can also blink when you switch on the TV from standby mode First Time Installation When turned on for the first time the language selection menu appears The message Welcome please...

Page 9: ...s may not be compatible with this TV The TV supports FAT32 and NTFS disk formatting but recording will not be available with NTFS formatted disks Note While formatting a USB hard disk that has 1TB Ter...

Page 10: ...You can shift the screen up or down by using or buttons while in 14 9 Zoom Cinema or Subtitle Using the Channel List The TV sorts all stored stations in the Channel List You can edit this channel list...

Page 11: ...um High or Off Colour Temp Sets the desired colour tone Picture Zoom Sets the picture size to Auto 16 9 Subtitle 14 9 14 9 Zoom 4 3 or Cinema Auto Only available in Scart mode with SCART PIN8 high vol...

Page 12: ...headphones to the TV set this option as Headphone Dynamic Bass Enables or disables the Dynamic Bass Surround Sound optional Surround sound mode can be changed as On or Off Digital Out Sets digital aud...

Page 13: ...the broadcaster Audio Description Audio description refers to an additional narration track for blind and visually impaired viewers of visual media including television and movies You can use this fe...

Page 14: ...mer option The timer will be cancelled Note It is not possible to record two channels at the same time Recording a Programme IMPORTANT When using a new USB hard disk drive it is recommended that you f...

Page 15: ...s Library Slow Forward If you press PAUSE button while watching recorded programmes the slow forward feature will be available You can use button to slow forward Pressing button consecutively will cha...

Page 16: ...Do not spray cleaner directly onto the surface of the product This may result in discoloration and cracks and may cause the screen display to peel off Do not let water come into contact with the prod...

Page 17: ...85Hz 36 1360x768 60Hz 37 1400x1050 60Hz 38 1400x1050 75Hz 39 1400x1050 85Hz 40 1440x900 60Hz 41 1440x900 75Hz 42 1600x1200 60Hz 43 1680x1050 60Hz 44 1920x1080 60Hz 45 1920x1200 60Hz Appendix B AV and...

Page 18: ...HEAAC AC3 EAC3 LPCM ADPCM H 264 1080Px2 25fps 1080P 50fps Other 1080P 30fps 50Mbit sec RMVB RM rv30 rv40 LBR cook AAC HEAAC 1080P 30fps 50Mbit sec avi MPEG1 2 4 Xvid H 264 VC1 WMV3 Sorenson H 263 Moti...

Page 19: ...on the Sky remote control blinks twice 4 Key in 065 The light on the Sky remote control should blink twice 5 Press the STANDBY button on your Sky remote control If your TV switches off press SELECT Th...

Page 20: ...ual provided The product must be used solely for domestic purposes The guarantee will be invalid if the product is re sold or has been damaged by inexpert repair notice On site service is limited to V...

Page 21: ...r and tear This includes but is not limited to parts D This Warranty does not cover any Finlux branded consumer product installed in a moveable dwelling Note that the performance of the product may be...

Page 22: ......

Reviews: