background image

26

Welcome Check-In

09:00

01.01.09

Setting

Setting 

Shift

Att. Rule
Company name

1

2

3

5

6

Option 

Edit

To Dept.

To Personal

MENU

 Press & Hold


 Press Once

OK

 Press Once

OK

 Press Once

Select preset working 

shift by pressing  

OK

 Press Once

 Press  Once

OK

 Press Once

Select Department by 

pressing 

OK

 Press Once

OK

 Press once to  


 confirm

ESC

 Press 4 times to    


return to the main

 menu. 

7

4

Shift

Name Shift


09:00

Morning 

16:00


16:00

Night 

23:00

Dept Mng 

Production
RD

Sales

Dept to

Sales

ESC OK

8

Option 

Edit

To Dept.

To Personal

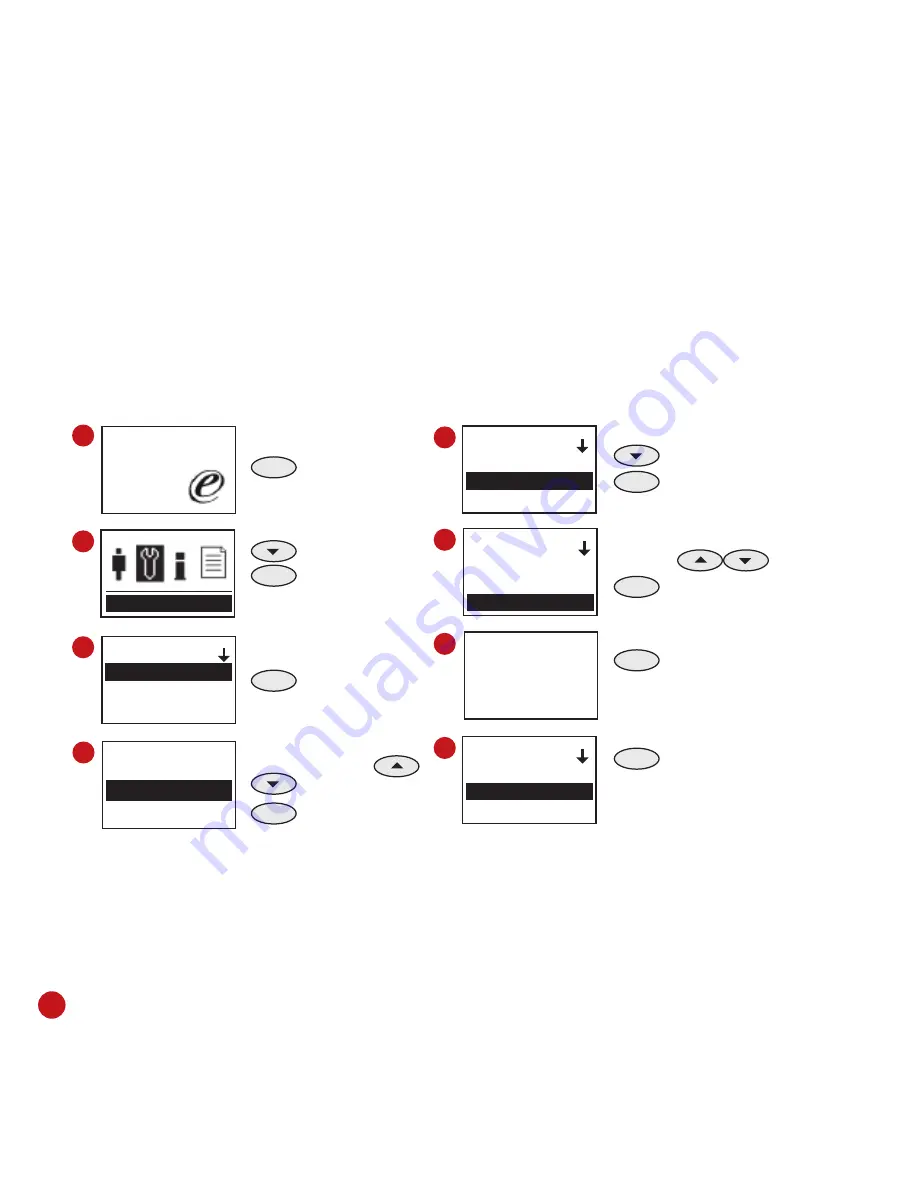
TO ASSIGN WORKING SHIFT TO DEPARTMENT

Assignment of working shift to department is suitable for a company where the staff 

are divided into several departments and all users are working according to different 

working shifts. Assignment of the preset working shift to each department is a must. It is 

possible for few departments to run on the same working shift and  in some company, 

there is a requirement where each department is running on different working shifts. 

Therefore, configuration of each working shift for each department is necessary to en-

sure correct reporting.

Repeat the steps above to assign working shift to other departments.

Summary of Contents for TA100 DIY SERIES

Page 1: ...TA100 DIY SERIES FINGERPRINT TIME ATTENDANCE SYSTEM USER GUIDE ...

Page 2: ...ument is subject to change without prior notice DISCLAIMER No person should rely on the contents of this publication without first obtaining advice from a qualified professional person The company expressly disclaims all and any liability and respon sibility to any reader or user of this book in respect of anything and of the consequences of anything done by any such person in reliance whether who...

Page 3: ...ITIAL SET UP OF THE FINGERPRINT READER Date Time Adjustment Enrollment Enrollment of Administrator Enrollment of Normal User Fingerprint Verification 1 To many 1 n fingerprint matching 1 To 1 1 1 fingerprint matching Enrollment of Password Password Verification Deleting Users 3 DEFINITION OF COMPANY AND 18 21 DEPARTMENT TO INSERT NAME OF COMPANY TO INSERT NAME OF DEPARTMENT TO ASSIGN USERS INTO DE...

Page 4: ...TION OF ATTENDANCE RULES 5 DATA TRACKING AND REPORT 30 39 PREPARATION ATTENDANCE TRACKING EXCUSES TRACKING TO GENERATE AND SAVE REPORT USB PEN DRIVE MANAGEMENT To download upload users Skip this if only 1 unit of TA100 DIY was installed To download upload attendance data Skip if only one unit of TA100 DIY was installed 6 MISCELLANEOUS 40 44 CONFIGURATION OF SCHEDULED BELLS OTHER OPTIONS TO VIEW IN...

Page 5: ...re managed from the reader itself The attend ance report in HTML format will be generated into USB flash disk directly from the fingerprint reader with only a few presses on the keypad Reader installation can be performed easily minus installation cost or the need for network cable extension The simplified FingerTec TA100 DIY works efficiently in providing vital attendance reports including inform...

Page 6: ...Attendance FP template capacity 800 Transaction log 30000 Connections USB TCP IP Only applicable if the TA100 DIY was upgraded to TA100 series and worked with FingerTec TCMS V2 software Subnet mask Gateway Available Scheduled bell 25 schedule everyday per week Sensor Optical sensor with silicon coating ...

Page 7: ...PACKAGE ITEM TA100 DIY Fingerprint Reader DC 5V Power Adapter Screwdriver USB Extension USB Flash Disk OPTIONAL MATERIALS PROVIDED ITEM TA100 DIY Quick Start Guide User Manual Video Guide Sample of Enrollment Form ...

Page 8: ...ition of attendance status Definition of attendance status can be done using keypads Users can define their clock ing status before fingerprint or password verification is done Definition of the clocking status is very important for the system to allocate the time a user verified into the cor responding clocking slots Improper clocking definitions could affect the work time over time and short tim...

Page 9: ...ECK OUT To define check out or break time before overtime OK OT IN To define check in for overtime NOTE If a user had to work for an OT a user must follow these steps 1 Press Scroll Down button and verify a fingerprint or a password 2 Wait for a minute Press OK button and verify a fingerprint or a password Specific button is assigned for a specific clocking status Please view the diagram given bel...

Page 10: ...rint or password NOTE Before attempting to do fingerprint or password verification please make sure that your clocking status is CORRECT MENU Press Hold Press Once OK Press Once Press twice OK Press Once The F is represented by numeric keypad no 3 3 Press once The standard verification procedures are shown below Follow the given steps CARE FULLY to avoid any wrongly inputted data for a user T9 INP...

Page 11: ...s once to select 0 Press once to delete any wrong character inserted OK Press once after finished inserting the characters OK Press once to save settings ESC Press twice to return to the main menu POWER SUPPLY CONNECTION 1 Connect DC 5V power adapter to the reader 2 Turn on the power supply 3 Press the power button to switch on or shutdown the reader DC 5V POWER ADAPTER TA100 DIY READER POWER BUTT...

Page 12: ... recommended to enroll password Password enrollment is also suitable for visitors and temporary workers FINGERPRINT AND PASSWORD ENROLLMENT Under this option a user can enroll both fingerprint and password at the same time The user can either use fingerprint or password to report attendance or to gain ac cess USING THE FINGERPRINT READER This chapter will guide on how to use the reader fingerprint...

Page 13: ...lightly moist to enable the sensor to read the minutiae points on the fingerprint PLACE THE CENTER POINTS OF YOUR FINGER AT THE CENTER OF THE SENSOR The center points of a finger is an area where there is a swirl and the center points must be properly placed on the sensor during enrollment DON T PRESS HARD AT THE SENSOR JUST PLACE YOUR FINGER ON THE SENSOR The sensor is reading minutiae points of ...

Page 14: ...once to save settings ESC Press 3 times to return to main menu Settings Settings Company Name Other Options Auto Test 1 2 3 Other Options Date Time Fmt DD MM YY Comm Opt YYYY MM DD 24H 2008 10 12 21 46 28 ESC OK 4 5 INITIAL SET UP OF THE FINGERPRINT READER DATE TIME ADJUSTMENT When first installing the fingerprint reader it is important to set the correct date time Follow the steps below to access...

Page 15: ...r ID by pressing numeric keypad Example 000001 OK Press once to confirm Press twice OK Press Once ENROLLMENT To assist in fingerprint enrollment we have designed a form for the administrator to use to keep track of the enrollment detail or you can design your own form to suit to your company s requirements ENROLLMENT OF ADMINISTRATOR When the fingerprint reader is switched on a display on the scre...

Page 16: ...t templates Read page 9 for tips on fingerprint scanning technique OK Press once to enroll backup Fingerprint Repeat the same steps as above Press 4 times OK Press Once Press to select Admin OK Press once to confirm Press 5 times OK Press Once Input the names of Admin istrator Input the names of company Please refer to page 6 for T9 input method Please ignore this step if name was not required in ...

Page 17: ...er Shift NO Pwd Privi user Admin Accredit User ESC OK New User Name Finger 2 Dept NO Place fingerprint center point properly at the sensor Place finger 3 times in order for the reader to capture the fingerprint templates Read page 9 for tips on fingerprint scanning technique OK Press once to enroll backup fingerprint Repeat the same steps as above Press 4 times OK Press Once Press to select Admin ...

Page 18: ...ewing User Dept Mng Input Mary OK ESC Input the names of Administrator Please refer to page 6 for T9 input method OK Press once to save the name ESC Press Once OK Press once to save settings ESC Press twice to return to the main menu Please ignore this step if name was not required in the report If it was mandatory please continue Repeat the above steps to enroll more users into the reader FINGERP...

Page 19: ... User Dept Mng 1 2 3 4 5 6 New User AC No Name Finger New User 000000003 ESC OK New User Dept NO Shift NO Pwd MENU Press Hold OK Press Once OK Press Once OK Press once to assign user ID Enter user ID by pressing numeric keypad Example 000003 OK Press once to confirm Press 5 time OK Press Once Insert password via the keypad The maximum length for the password is 8 digit OK Press once to confirm Re ...

Page 20: ...nce to save the name OK Press Once OK Press once to save settings ESC Press twice to return to the main menu Please ignore this step if name was not required in the report If it was mandatory please continue Enter user ID Example 000003 OK Press Once confirm Enter password Example 12345678 OK Press Once confirm 1 2 1 1 FP Match 000000003 ESC OK Pwd Affirm Pwd 3 4 Verify Helen 000000003 Verified Pw...

Page 21: ... cancel operation ESC Press 3 time to return to main menu User Mng User Mng New User Viewing User Dept Mng 1 2 3 Viewing User FingerTec 000000003 4 Option Reassign to Dep Newly Add Delete User 5 Del Fingerprint 000001111 0 ESC OK 6 7 8 Del User 000001111 ESC OK Del User Delete ESC OK NOTE Remember to select the correct user ID for deletion DELETING USERS You can delete the user from the system if ...

Page 22: ...ve settings ESC Press twice to return to the main menu Company Name Save ESC OK Save Setting Shift Att Rule Company name 7 3 DEFINITION OF COMPANY AND DEPARTMENT The names of company and departments must be defined correctly because these name inserts will be printed on the reports Any false definition would cause wrong information on the reports TO INSERT NAME OF COMPANY All enrolled users in one...

Page 23: ... 3 time to return to main menu User Mng User Mng New User Viewing User Dept Mng 1 2 3 Dept Mng QC 0 RD 0 SALE 0 4 Input OK ESC 6 Input Production OK ESC 7 8 9 QC 0 Viewing User Revise name Shift Dept Mng Save ESC OK Save QC 0 Viewing User Revise name Shift 5 1 0 Dept Mng Production 0 RD 0 SALE 0 TO INSERT NAME OF DEPARTMENT Define the departments in your company for example administration workshop...

Page 24: ... RD 0 Sales 0 7 8 9 Edit Name John Finger 2 Dept Product Edit 000000001 ESC OK Save Option Examine Edit View Logs 5 10 Option Examine Edit View Logs TO ASSIGN USERS INTO DEPARTMENT By default all enrolled users are not assigned to any departments Users must be as signed into their corresponding departments if any once the department definition proc ess is done If users were not assigned into any d...

Page 25: ... User Mng User Mng New User Viewing User Dept Mng 1 2 3 Viewing User John Mary Helen 4 Option View Logs Shift Reassign to Dept 5 Dept Mng Production 1 RD 0 Sales 0 6 7 Option View Logs Shift Reassign to Dept TO SHIFT USERS INTO DIFFERENT DEPARTMENT Users can be shifted into different department to enable them to can carry out specific jobs For example a user can be shifted from Production departme...

Page 26: ...0 DIY calculates attendance according to the preset working shifts and attend ance rules Configuration of the working shifts and attendance rules must be done correctly to ensure accurate attendance calculations There are a total of 10 working shifts ready for configuration Follow the sequence below Step 1 to configure working shift Step 2 to assign working shift to each user department or all use...

Page 27: ... 00 Off time 00 00 New Shift Name Morning On time 09 00 Off time 00 00 New Shift Name Morning On time 09 00 Off time 15 00 Shift New Shift Welcome Check In 09 00 01 01 09 Setting Setting Shift Att Rule Company name 1 2 3 4 MENU Press Hold Press Once OK Press Once OK Press Once Select working shift by pressing OK Press Once Shift Name 09 00 Morning 15 00 Repeat the above steps to configure more wor...

Page 28: ...e Morning On time 09 00 Off time 15 00 Edit Name Morning On time 09 00 Off time 16 00 Option Edit To Dept To Personal TO ASSIGN WORKING SHIFT The configured working shift must be assigned to individual users or department or all users Without assigning working shift prior to use TA100 DIY cannot calculate the attend ance data for users Assignment of preset working shift can be done either to All u...

Page 29: ... Shift Name Shift 09 00 Morning 16 00 16 00 Night 23 00 Apply to All Whole ESC OK Option To Dept To Personal To All TO ASSIGN WORKING SHIFTS TO ALL USERS Choose All Users in situation where all users in your company were working according to the same working shift meaning that the attendance data of all users will be calculated based on the same working shift If there were a few departments runnin...

Page 30: ... OK 8 Option Edit To Dept To Personal TO ASSIGN WORKING SHIFT TO DEPARTMENT Assignment of working shift to department is suitable for a company where the staff are divided into several departments and all users are working according to different working shifts Assignment of the preset working shift to each department is a must It is possible for few departments to run on the same working shift and...

Page 31: ...confirm ESC Press 4 times to return to the main menu 7 4 Shift Name Shift 09 00 Morning 16 00 16 00 Night 23 00 Viewing User John Mary Helen Apply to 0003 Helen ESC OK 8 Option Edit To Dept To Personal TO ASSIGN WORKING SHIFTS TO INDIVIDUAL USERS Assignment of working shift to individual user is suitable for employees whose working times were different from the other staff or departments for examp...

Page 32: ...Press once to save settings ESC Press 4 times to return to the main menu 8 9 Shift Save ESC OKT 4 Viewing User John Mary Helen 5 Option Edit View Logs Shift 10 Option Edit View Logs Shift Shift Name Shift 09 00 Morning 16 00 16 00 Night 23 00 Shift Shift Night TO SHIFT USERS INTO DIFFERENT WORKING SHIFT Changing of users from one shift to another is possible with TA100 DIY For example a production...

Page 33: ...CE RULES The attendance rules are applied to all working shifts in the same TA100 DIY reader You can configure the following attendance rules to affect the attendance data calculations ATTENDANCE RULES DEFAULT VALUE FUNCTIONS Late Time 5 Do not deduct user s working time if he she was late within less than 5 minutes from the actual IN time Maximum 60 minutes Early Time 5 Do not deduct user s worki...

Page 34: ...e OK Press Once 4 Att Tracking 000000002 ESC OK Setting Time Ter Start 01 00 End 00 00 Export 5 6 7 Setting Time Ter Start 01 01 End 01 11 Export Setting Time Ter Start 01 01 End 01 11 Export 5 DATA TRACKING AND REPORT PREPARATION ATTENDANCE TRACKING TA100 DIY allows administrator to track user s clocking activities with raw clocking data for fast checking but not for attendance viewing You may us...

Page 35: ...ct User ID by pressing OK Press Once Press twice OK Press Once All clocking activities of the user for the specific date range are displayed on screen ESC Press 4 times to return to the main menu To understand the information display 0000000002 user ID 2009 1 date in yyyy m format 2009 January 1 2 Total 2 pages of date and now 1st page is viewing 02 day of the month 2nd of January 09 15 the attend...

Page 36: ...k If the clocking time is displayed but ended with E it means the user left work earlier ESC Press 3 times to return to the main menu 4 Att Tracking 000000002 ESC OK 5 00000002 2009 1 07 A A 06 07 50L 16 00 05 08 50 16 00 04 09 05L 15 45E 03 A A 02 A A 01 A A EXCUSES TRACKING Under some circumstances the clocking data will be considered as exceptions such as late in early out wrong clocking status...

Page 37: ...ing activities of users for each day The data will be arranged and displayed by date and time STAFF MOVEMENT ANALYSIS Staff Movement Analysis is to show users clocking data by terminals Ignore this report if you only installed one terminal Installation of multiple terminals to capture clocking activi ties enables you to download clocking data from each terminal and upload them into a master termin...

Page 38: ...e to confirm Press Once OK Press Once OK Press Once OK Press Once ESC Press 4 times to return to the main menu 4 6 7 8 Filtering Data All Whole Dept Personal Setting Time Ter Start 01 01 End 00 00 Export 5 Setting Time Ter Start 01 01 End 01 31 Export Setting Time Ter Start 01 01 End 01 31 Export Copy Data Suc Report Time Card ESC OK 9 Report Exp to U disk ESC OK 10 Setting Time Ter Start 01 01 En...

Page 39: ...ort by pressing keypad For example 31st January OK Press once to confirm Press Once OK Press Once OK Press Once OK Press Once ESC Press 4 times to return to the main menu 4 7 8 9 Filtering Data All Whole Dept Personal 5 Setting Time Ter Start 01 01 End 01 31 Export Setting Time Ter Start 01 01 End 01 31 Export Copy Data Suc Report Time Card ESC OK 10 Report Exp to U disk ESC OK 11 Setting Time Ter...

Page 40: ...ad For example 31st January OK Press once to confirm Press Once OK Press Once OK Press Once OK Press Once ESC Press 4 times to return to the main menu 4 7 8 9 Filtering Data All Whole Dept Personal 5 Setting Time Ter Start 01 01 End 01 31 Export Setting Time Ter Start 01 01 End 01 31 Export Copy Data Suc Report Time Card ESC OK 10 Report Exp to U disk ESC OK 11 Setting Time Ter Start 01 01 End 01 ...

Page 41: ...The USB pen drive or flash disk is an important tool for TA100 DIY You can download up load users between all TA100 DIY by using USB pen drive You can download and upload attendance data into a TA100 DIY to centralize the attendance data TO DOWNLOAD UPLOAD USERS Skip this if only 1 unit of TA100DIY was installed You can enroll all users into a TA100 DIY and download their fingerprints or passwords...

Page 42: ...o TA100 DIY follow steps TO DOWNLOAD UPLOAD ATTENDANCE DATA Skip if only one unit of TA100DIY was instal If multiple TA100 DIY terminals were installed in a same working environment users can re port attendance at any terminals Under this scenario the attendance data in each terminal might not be complete and this could affect the quality of the reports It is advisable to download attendance data ...

Page 43: ...5 Welcome Check In 09 00 01 01 09 Report Report DwnLoad User UpLoad User UpLoad Attlog 1 2 3 Plug USB pen drive to the terminal MENU Press Hold Press 3 times OK Press Once Press 6 times OK Press Once Wait until process is completed OK Press Once ESC Press twice to return to the main menu Unplug the USB pen drive 4 Copy Data Suc ESC OK Report DwnLoad User UpLoad User UpLoad Attlog 5 NOTE You must s...

Page 44: ...OK Press Once OK Press Once 7 4 MON No 1 N No 2 N No 3 N 8 Shutdown Set Sch Fun ESC OK Other Option Date Time Fmt YY MM DD Power Mng Scheduled Bell SUN MON TUE 6 MISCELLANEOUS CONFIGURATION OF SCHEDULED BELLS TA100 DIY is integrated with a scheduled bell function The TA100 DIY can be configured to ring and alert users during specific time period for example during lunch and after lunch to resume w...

Page 45: ...Once ESC Press Once OK Press Once ESC Press 3 times to return to the main menu 16 12 17 Other Option Date Time Fmt YY MM DD Power Mng Scheduled Bell SUN MON TUE Power Mng Idle Min 0 Bell Delay 30 Scheduled Bell 13 Power Mng Idle Min 0 Bell Delay 30 Scheduled Bell MON No 1 08 00 No 2 N No 3 N MON 08 00 No 2 N No 3 N Power Mng Save ESC OK Save Repeat the above steps to configure more schedules Pleas...

Page 46: ...nfigure idle action SLP to go into sleep mode OFF to turn off reader Idle Min To configure time interval for reader to become idle Bell Delay To configure the time period to ring bell siren Scheduled Bell To configure schedules for bell siren ringing Lock Power To lock power button to avoid shutting off of a reader accidentally or intentionally by unauthorized person Comm Opt IP addr To configure ...

Page 47: ...Fill Zero To fill the empty space of user ID by number 0 to satisfy the preset user ID length Example length of user ID is 9 digits Input user ID 1888 System will fill number 0 to the ID to become 000001888 Language To select the display and greeting language of the reader Del AttLogs To delete all attendance logs stored in reader Clear All User To delete all enrolled users in the reader Clear All...

Page 48: ... in reader FP Cnt To show total of fingerprint templates in reader Att Log To show total of attendance logs in reader Admin Cnt To show total of administrator enrolled in reader Pwd Usr To show total of password users in reader S Logs For testing purpose Free Space Info To show total memory available in reader Dev Info FPCnt 100 8 To show total of fingerprint supported by reader 800 AttLog 10k 3 T...

Page 49: ... come with any software CD and does not communicate with PC If you feel that the features of TA100 DIY is no longer suffice to support your company s requirements and wish to upgrade to FingerTec software TCMS V2 the TA100 DIY could be changed to adopt the software with an upgrade of the firmware and you can connect the reader to PC via LAN CAT 5 cable Once the upgrade process is done all features...

Page 50: ...cat 5E cable should be plugged here to connect to a network switch hub A crossover RJ45 cable is for direct connection to a PC s network port NOTE TCP IP is only applicable if the TA100 DIY was upgraded to TA100 series and worked with FingerTec TCMS V2 software 1 Connect DC 5V power adapter to the reader 2 Turn on the power supply 3 Press the power button to switch on or shutdown the reader ...

Page 51: ...IP address is 192 168 1 201 this is a legal and available IP address in many LAN environment If the host IP address is 192 168 1 X and it is in the same network region then this IP can be used directly If not please make sure that you have changed the IP address accordingly 2 Setup of Ethernet Access Menu select Options Comm Opt Ethernet select Yes to enable Ethernet function 3 Turn the power off ...

Page 52: ...INT 2 PIN TX 1 3 RX TX 2 6 RX RX 3 1 TX RX 6 2 TX Ethernet 10 100Base T Straight Thru Cable This cable will work with both 10Base T and 100Base TX and is used to connect a network interface card to a hub or network outlet These cables are sometimes called whips CONNECTOR PIN CABLE COLOR CONNECTOR TX 1 White Orange 1 TX TX 2 Orange 2 TX RX 3 White Green 3 RX 4 Blue 4 5 White Blue 5 RX 6 Green 6 RX ...

Page 53: ...s if I downloaded the data A The transaction logs will remain in the reader until you perform manual dele tion Q Can I use TA100 DIY as a door access system A FingerTec TA100 DIY is a time attendance system only which does not have access control function Q How many siren schedules are in TA100 DIY A TA100 DIY is not equipped with siren schedule feature Q How many languages are available in Finger...

Page 54: ...of the reader A The power off button is used as OT Out as well Simply press hold the button on the keypad for a few seconds to shut down the reader Q Can I use any USB Flash Disk to download generate attendance report A Any USB Flash Disk with version 2 0 can be used to download generate at tendance report from TA100 DIY Q Would the reader provide any indication about the reader memory s status A ...

Page 55: ...51 Daily Attendance Listing Electronic Time Card APPENDIX SAMPLE REPORT ...

Page 56: ...52 APPENDIX SAMPLE REPORT Staff Movement Analysis ...

Reviews: