background image

12

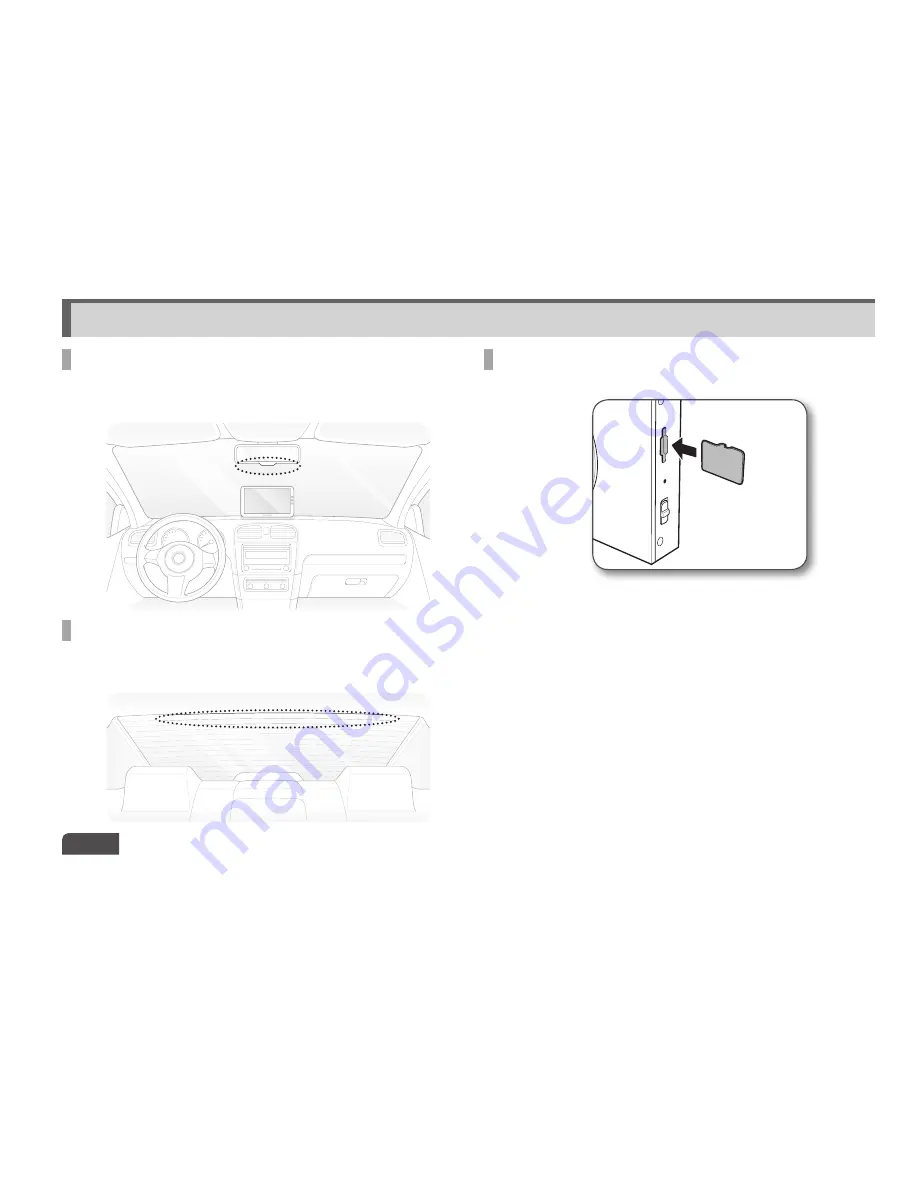
  Selecting the installation location for a front camera


You are recommended to install the product on the front 
windshield, to the left or right of the room mirror.

  Selecting the installation location for a rear camera


You are recommended to install it at the top of the rear 
window of the car.

  Inserting  the micro SDHC card

Note

Ensure that the place of installation does not obstruct the driver's view.

Selecting the installation location for a front camera
Selecting the installation location for a rear camera
Inserting the micro SDHC card

Installation

Summary of Contents for Fine Vu sq 200

Page 1: ......

Page 2: ...All trade names and trademarks are the properties of FINEDIGITAL Inc Copyright 2015 All Rights Reserved UM SQ 200 EN100 Note This equipment has been tested and found to comply with the limits for a C...

Page 3: ...ng the installation location for a rear camera 12 Inserting the micro SDHC card 12 Installation Front 13 Installation Rear 14 Using the product Display configuration 15 Switch to LiveView Driving mode...

Page 4: ...ilure to do so may result in fire or product failure Ensure that you install the product in a position where it won t obstruct your view Failure to do so can cause a car accident Plug in USB and video...

Page 5: ...ature theLCDmonitor maytakelongertimetobelitonoritscolormaynotbethesameas usualforamoment Thisisnotamalfunction Thesystemwilloperate normallywhenthetemperatureisnormal CAUTION Breaching the following...

Page 6: ...Speedy booting Front rear live display Emergency video audio recording buttons on the live display System setting without connecting to PC Super capacitor used When the power is suddenly down due to...

Page 7: ...duct are subject to change without notice in order to improve its performance Components and names Components Front Double sided tape for the installation of the front mount Front camera Continuous po...

Page 8: ...ject to change without notice in order to improve its performance Components Rear Components PC connection Rear camera Rear camera cable USB SD card reader Optional micro SDHC card adapter micro SDHC...

Page 9: ...SQ 200 User Manual 9 Accessories Note All accessories are available from the store where you purchased the product USB SD card reader GPS...

Page 10: ...SDHC card and micro SDHC card Mount connection area This is where the mounting bracket is combined Front camera lens Record videos from the front Rear connection port This port is used for connecting...

Page 11: ...ted rear connection cable may cause damage to the system Part names Rear camera Attachment type holder Fix the camera location Security LED Check operation of the Dash Camera Rear connection port This...

Page 12: ...front windshield to the left or right of the room mirror Selectingtheinstallationlocationforarearcamera You are recommended to install it at the top of the rear window of the car Inserting the micro S...

Page 13: ...e mount 1 3 Plug the continuous power cable into its socket 2 Install the mounting bracket in the vehicle using the double sided tape Connect the continuous power cable to a fuse box Make sure to cons...

Page 14: ...the rear camera cable Connect the rear camera cable to the front camera 5 Install the mount on the rear windshield of the vehicle using the double sided tape 1 2 Connect the rear camera cable to the...

Page 15: ...off Live view You can choose the one among Front Rear PIP Standby view for the system booting display Switch to Live View Driving mode Front view Rear view Dual view Standby view Touching any area oth...

Page 16: ...d From 10 seconds before the event to 20 seconds after the event a total of 30 seconds video is recorded in the event folder of the memory card Emergency Recording If you press the Emergency Recording...

Page 17: ...2 mimutes Recorded video file will be stored in the parking folder of the memory card Motion Detection Recording If the Dash Camera detects a moving object in Parking mode recording starts 10 seconds...

Page 18: ...Main Menu page If you go to the Main Menu page in the Normal Recording mode video recording will pause It is dangerous to operate Main Menu while driving Always stop the car before you do it In the Ma...

Page 19: ...era settings Memory You can change or format memory settings Info You can view the current settings Play You can check recorded videos Live view Goes back to the shooting mode where you can view video...

Page 20: ...lly Available intervals for Time Lapse video range are 2x 3x 5x Resolution You can change the Driving mode resolution settings Time Lapse You can change the frame and Time Lapse settings Brightness Yo...

Page 21: ...can adjust the sharpness of images Brightness You can adjust the brightness of videos Night Brightness You can adjust the brightness of videos at night Location of Installation Rear You can adjust set...

Page 22: ...deos recorded in Driving and Event modes are set to 50 50 Format the micro SDHC Card Formats the memory card that is activated You can configure the memory space by dividing the videos recorded in Dri...

Page 23: ...recording motion Emergency recording From 10 seconds before to 50 seconds after an emergency up to 1 minute in total camcorder Format Free Smart FMS Smart FMS is a FINEDIGITAL s File Management System...

Page 24: ...g You can change the time settings Sensitivity Youcanconfigurethesensitivityfornormal event parkingeventandparkingmotion Low voltage block You can change a cut off voltage and timer settings Display Y...

Page 25: ...rn off settings Rear LED You can configure Rear LED Front LED You can configure Front LED Beginning screen You can configure the beginning screen Menu button You can configure Menu button Touch calibr...

Page 26: ...rm speed 40km h 60km h 80km h 100km h When the lane departure is detected a warning sound will occur LDWS Red When the vehicle leaves the lane Note LDWS functions can be used only when GPS is connecte...

Page 27: ...tton to view the next 3 video clips Press this button to jump 9 video clips You can store chosen images to a separate folder Press this button to skip 5 seconds Press this button to jump to the next p...

Page 28: ...USB cable 2 After booting is complete the Dash Camera switches to USB mode and is executed as a removable disk 4 You can view or play the recorded videos saved in each folder Note Each folder contains...

Page 29: ...e folders containing videos will appear 2 When you connect the micro SDHC card to a PC it is executed as a removable disk 4 You can view or play the recorded videos saved in each folder Note Each fold...

Page 30: ...an play the recorded video in your FINEVu player on a PC as follows Rear camera Voice recording status Front camera Product setting information and car speed Recorded date time Recorded date time Acce...

Page 31: ...isk It is recommended that you format the memory card prior to the firmware upgrade 4 Unzip the downloaded firmware and copy it to the root directory of the memory card 5 Insert the micro SDHC card in...

Page 32: ...rformance before storing the Dash Camera Cleaning If there is a foreign object on the lens wipe it down with a soft cloth To obtain high quality video do not touch the lens with your hands or allow it...

Page 33: ...t to the minimum level If there is still no sound after adjusting the volume request after sales service The LCD does not turn on Check if the Dash Camera has booted properly If you can hear the voice...

Page 34: ...vigation device but it is not working Video recording can not be done using the power from the USB port in the navigation system But it is recognized as a removable USB disk Nothing is recorded in the...

Page 35: ...econds after an event 30 seconds in total up to 2 minutes Emergency recording Video recording starts ends 10 seconds before 50 seconds after an emergency is detected Manual stop function Parking recor...

Page 36: ...ensor 3 Axis Acceleration Sensor 2 g 2 g Input power DC 12V 3A Batteries Super capacitor If external power is cut off it will supply stable power to save video Power consumption 5W 2ch Operating Stora...

Page 37: ...tall it 1 This is the main screen where your video recording is played 2 This is the sub screen to magnify and play selected sections of your video recording 3 This is the screen that shows the list o...

Page 38: ...s in the control bar you can check them while moving across the video screen Playing and viewing recorded videos Recommended PC specifications for FINEVu player Minimum specifications Recommended spec...

Page 39: ...without warranty condition or other liability even though the defect or loss is caused by negligence or other fault Damage resulting from use accident or normal wear and tear is not covered by this or...

Page 40: ......

Reviews: