background image

ALP Aluminum - English

Fabrication guide

1. 


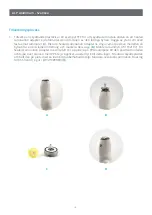
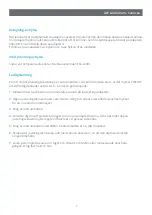
Manufacture a protective cup of TFC, or similar, in order to protect the distal end from being defor-

med by the pressure from the Sealed Lamination Adapter. Roughen the surface of the protective 

cup with a sanding paper in order for the resin to bond properly (

A

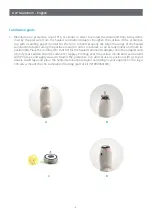
). Align the wings of the Sealed 

Lamination Adapter along the positive mould in order to achieve a correct alignment and mark its 

position (

B

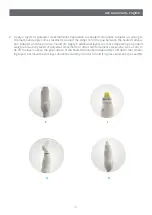
). Place the dummy (731162107) for the Sealed Lamination Adapter onto the adapter with 

a bit of grease added onto the surface (

C

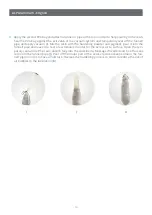
). Apply a PVA bag over the positive mould and seal the joint 

with PVA tape and apply vacuum. Mount the protective cup and secure its position with a strip of 

double sided tape and place the Sealed Lamination Adapter according to your alignment. If using a 

CSS valve, mount the CSS Lamination Housing (part of kit 721000089) (

D

).

A

B

C

D

- 8 -

Summary of Contents for ALP Aluminum

Page 1: ...ALP Aluminum Product Manual ...

Page 2: ...Real Technology Real People ...

Page 3: ...enska 4 7 Tillverknings process 4 6 Avtagning av hylsa 7 Inför provning av hylsa 7 Färdigställning 7 English 8 11 Fabrication guide 8 10 Removal of socket 11 Before patient fitting 11 Delivery of prosthesis 11 ...

Page 4: ...ngar emot positiva modellen så hylsan får en bra initiell inriktning och markera dess läge B Montera dummyn 731162107 för Sealed Lamination Adapter med lite fett C Applicera en PVA isolerpåse till den positiva modellen och tejpa över skarven med PVC tejp Applicera undertryck till detta lager Montera skyddsplattan och håll den på plats med en liten bit dubbelhäftande tejp Montera eventuell Laminati...

Page 5: ...cera ytterligare 6 lager strumpa eller fler beroende på patientens vikt över gipsen och ha lika mycket kvar ovan Sealed Lamination Adapter Använd ett snöre för att vira av lagren ovan greppkanten på Sealed Lamination Adapter G Vik ned kvarvarande lager så att snöret hålls ned och vrid det sista lagren ovanför dummyn så den hålls säkert på plats och tätar instrumentet ordentligt H F G E ALP Aluminu...

Page 6: ...rylplasten igenom röret monterat i PVA folien och låt detta stå i några minuter så att eventuella luftbubblor kan stiga till ytan Öppna upp avsnörningen och låt un dertrycket dra ned acrylplasten igenom och in i polyesterstrumpan för att ge en mättad laminering massera vid behov J Se till att strumpan är mättad och snöra av överskottet ovanför laminerings dummyn Häll av det mesta av överskottet me...

Page 7: ...ycket VIKTIGT att vid färdigställandet av ALU ALP protesen göra följande 1 Markera med tuschpenna instrumentets position på lamineringsadaptern 2 Öppna justeringsskruvarna ett varv Det är viktigt att alla skruvar alltid lossas lika mycket för att inte ändra inriktningen 3 Drag åt centrumbulten 4 Försäkra dig om att plattan inte ligger an mot justeringsskruvarna Om så är fallet öppna justeringsskru...

Page 8: ...pter along the positive mould in order to achieve a correct alignment and mark its position B Place the dummy 731162107 for the Sealed Lamination Adapter onto the adapter with a bit of grease added onto the surface C Apply a PVA bag over the positive mould and seal the joint with PVA tape and apply vacuum Mount the protective cup and secure its position with a strip of double sided tape and place ...

Page 9: ...and the positive mould F Apply 6 additional layers or more depending on patient weight and activity level of polyester stockinette or other reinforcement stockinette Use a cord to tie off the layers above the grip surface of the Sealed Lamination Adapter G Fold down the remain ing layers but leave the last layer above the dummy in order to hold it in place and keep the seal H E F G ALP Aluminum En...

Page 10: ...ng powder and pigment pour it into the funnel pipe and leave it to rest a few minutes in order for the excess air to surface Open the tem porary seal and let the resin absorb fully into the stockinette Massage if needed and tie off excess resin into the funnel pipe J Pour off the major part of the excess resin but keep some in the fun nel pipe in order to have a fluid lock Oversee the hardening pr...

Page 11: ...ng a prosthesis with an ALU ALP adapter you need to 1 Mark the position of the instrument with a marker onto the lamination adapter 2 Open the angle adjustment screws one full turn it is important to open all screws with the same amount in order not to change the alignment 3 Tighten the centre bolt 4 Make sure that there is no contact between the flat surface and the angle adjustment screws If tha...

Page 12: ...Kung Hans väg 2 192 68 Sollentuna Sweden Phone 46 0 8 505 332 00 Fax 46 0 8 505 332 05 E mail fillauer fillauer eu www fillauer eu ...

Reviews: