background image


10 


For steps 5 -7 we recommend you turn the bicycle up-side down and 
balance the bike on the handlebars and the seat. 
 

5.


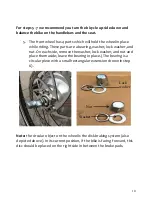
The front wheel has 4 parts which will hold the wheel in place 
while riding. These parts are a bearing, washer, lock washer, and 
nut. On each side, remove the washer, lock washer, and nut and 
place them aside; leave the bearing in place. (The bearing is a 
circular piece with a small rectangular extension shown in step 
6).


Note:

 the circular object on the wheel is the disk braking system (also 

depicted above). In its current position, if the bike is facing forward, this 
disc should be placed on the right side in between the brake pads.   


Washer 

Nut 

Lock 
washer 

Summary of Contents for Bonfire

Page 1: ...Bicycle Owner s Manual THIS MANUAL CONTAINS IMPORTANT SAFETY PERFORMANCE AND MAINTENANCE INFORMATION READ THE MANUAL BEFORE TAKING YOUR FIRST RIDE ON YOUR NEW ELECTRIC BICYCLE AND KEEP THE MANUAL HAN...

Page 2: ...er various states have differing laws about riding them on the road These regulations may include but are not limited to being at least 16 years of age and or having a valid drivers license If you hav...

Page 3: ..._______________ My motor serial number _________________________________________ My dealer and _______________________________________________ Date of purchase ________________________________________...

Page 4: ...ing conditions Assembly Pg 7 14 Handlebars Pedals Gear alignment Registration Instructions for Use Pg 15 20 Switching ON OFF LCD display screen Clearing the Trim Time and Distance Pedal assist Throttl...

Page 5: ...tric bicycle may cause you to lose control of the e bike Before riding in fast or more difficult situations learn the function and performance of all the mechanisms of your bike by riding at slower sp...

Page 6: ...2...

Page 7: ...od working order Taking off As the bike starts accelerate slowly do not try to get to your maximum speed right away because doing so could damage the electric components If applied the hand brake will...

Page 8: ...y decreases the bar will go down one by one If the bar goes out completely you can still pedal your e bike just like a regular bike Be sure to charge your battery when you get to an electrical outlet...

Page 9: ...nt to the operation of bicycles and electric bicycles KEEP both hands on the handlebars at all times and do not hang objects from the handlebars RIDE predictably and in a straight line Never ride agai...

Page 10: ...ure to brake earlier because it will take a longer distance to come to a full stop Ride at a slower speed and try to be more visible Low visibility Even though your bicycle comes with headlights rear...

Page 11: ...f you do not have experience assembling a bicycle Improper assembly can lead to broken pieces malfunctioning components and serious injury These step by step instructions cover the majority of assembl...

Page 12: ...t 2 Use the Phillips head screwdriver and remove the fork lock from the frame The lock is located on the frame where the handlebars will later be placed When this lock is removed the fork will not be...

Page 13: ...en the top bolt until it is securely in place 4 The handlebars are currently positioned at a 90 degree angle bring the handlebars to a straight position perpendicular to the ground Locate the two4mm b...

Page 14: ...washer and nut On each side remove the washer lock washer and nut and place them aside leave the bearing in place The bearing is a circular piece with a small rectangular extension shown in step 6 No...

Page 15: ...pull the fork apart slightly if you cannot get the wheel to fit properly with constant easy pressure A proper connection is shown below 7 Place the washer over the bolt followed by the lock washer and...

Page 16: ...f the error code 24 appears briefly then disappears the connection is complete On the side there is a small Phillips head screw use this to attach the cable to the fork and secure it in place 9 Locate...

Page 17: ...m Allen wrench to hold the fender in place 11 Locate the pedals Each pedal will be marked with a distinctive L and R which represents the left and right pedal respectively Place the left pedal on the...

Page 18: ...nders may also need adjustment from the wheel If you find the fender is rubbing against a wheel loosen the Phillips head screw and extend the rod further this screw is shown in the image under step 10...

Page 19: ...battery To turn the system on go to the LCD screen hold down the MODE for 2 seconds To turn off hold MODE for an additional 2 seconds When the e bike is parked for more than 10 minutes the display wi...

Page 20: ...d of 3 7 MPH 6 KmPH NOTE This function can only be used while pushing walking the electric bike by hand Please do not use this function while riding Backlight On Off Hold UP for 2 seconds to turn on t...

Page 21: ...on to select and clear 6 Now press and hold the M button to back out of the following menu Pedal assistance Your pedal assist will start once you start to pedal and stop once you stop peddling You are...

Page 22: ...e to fully charge the battery before the first use The range in distance on a full charge is approximately 20 30 miles depending on your weight class and terrain Higher weight classes and uneven surfa...

Page 23: ...cycle This is especially helpful if your bike is not parked near an electrical outlet Because specifications of the charger may change in the process of production please read the charger manual in de...

Page 24: ...RECAUTIONS while charging ALWAYS use the charger according to the instructions DO NOT use any charger other than the one that came with your e bike If you need a replacement please contact Customer Se...

Page 25: ...ould be passing the chain off smoothly without any noise For a step by step guide with pictures to properly align the gears reference the subsection gears within the Assembly section If your gears are...

Page 26: ...handlebar turn the stem binder bolt to loosen and align with the front wheel Be sure to tighten it when it is straight to keep it in place Loose or damaged grips should also always be properly in plac...

Page 27: ...se a steady direct stream of water from a hose Use a wet cloth instead to avoid short circuiting any electric components Your electric bike has a durable finish and does not need to be waxed Simply cl...

Page 28: ...rging of the battery pack or use of any charger not supplied by Fifield e Bicycles Incorporated Labor charges for part replacement or changeover This warranty is void in its entirety by any modificati...

Page 29: ...Welcome to the family...

Reviews: