14
MAIN BURNER
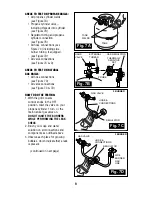
USING THE STANDARD PUSH BUTTON OR
ROTARY IGNITOR (Figure 11A)
1. Open the lid before lighting.
2. Turn off all of the burner control knobs and
close the gas supply valve.
3. Open the gas supply valve and wait 5 seconds.
4. Push in and turn a single main burner control
knob to ‘HIGH’. All other control knobs should be in the "OFF" position.
5. Depending on which ignitor you have, turn or depress the ignitor; repeat if
necessary.
6. If the burner does not light immediately (within four seconds), turn burner control
knob off and wait 5 minutes to clear the gas.
7. Repeat steps 1 to 6. If burner still fails to light, refer to
Troubleshooting Guide
to
determine cause and solution, or try the Match Lighting Procedure on page 15.
USING THE ELECTRONIC IGNITOR
(For grills with this feature, reference
Figure 11B)
1. Read instructions before lighting.
2. Open lid during lighting.
3. Turn off all burners and close tank valve.
4. Open tank valve, wait 5 seconds.
5. Turn required burner knob to “HI”.
6. Push and hold ignitor button.
7. You should hear a “clicking sound” indicating
your electronic ignition is activated.
8. If the burner does not light immediately (within four seconds), turn burner control
knob off and wait 5 minutes to clear the gas.
9. Repeat steps 1 to 8. If burner still fails to light, refer to
Troubleshooting Guide
to
determine cause and solution, or try the Match Lighting Procedure on page 15.
USING THE AUTO IGNITOR
(For grills with this feature, reference Figure 11C)
1. Read instructions before lighting.
2. Open lid during lighting.
3. Turn off all burners and close tank valve.
4. Open tank valve, wait 5 seconds.
5. Turn required burner knob to “ ”.
6. You should hear a “clicking sound” indicating
your electronic ignition is activated.
7. If the burner does not light immediately (within
four seconds), turn burner control knob off and wait 5 minutes to clear the gas.
8. Repeat steps 1 to 7. If burner still fails to light, refer to
Troubleshooting Guide
to
determine cause and solution, or try the Match Lighting Procedure on page 15.
9. After grill lights, turn knob to desired cooking position.
1.
4.
5.
5.
Fig. 11A
4.


