background image

Page 19

Connect the other end of the calibration cable to the USB-C socket 
on the top side of the TalentumTT

2

.

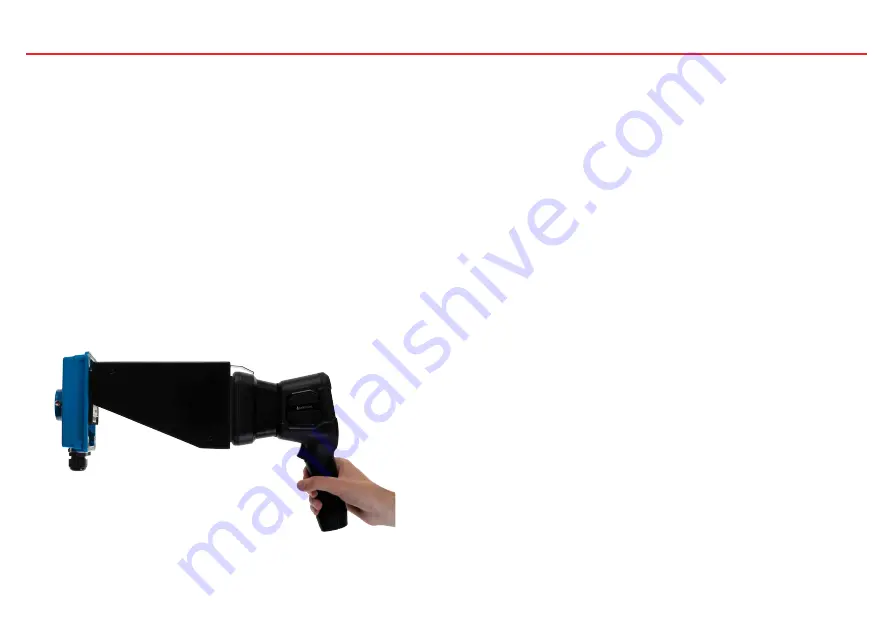
A Shroud is needed during the calibration procedure to prevent 
ambient light from influencing the test. Place the Shroud provided 
over the front of the 

TalentumTT

2

The large end fits over the front 

of the 

TalentumTT

2

, and the small end fits over the Flame Detector 

window

.

Holding the Shroud in place to cover the Flame Detector window, 
select 

Recalibrate Talentum

 from the 

Main Menu

 and press 

OK

Summary of Contents for TalentumTT2

Page 1: ...Page 1 User Guide EN Document No 0044 117 01 www ffeuk com...

Page 2: ...6 Maintaining the TalentumTT2 7 Introducing the TalentumTT2 8 Testing a Talentum Flame Detector Setting up a Talentum Flame Detector Test Testing an IR2 or IR3 Talentum Testing a UV IR Talentum 9 Reca...

Page 3: ...real fire not the sun or artificial light Broad spectrum test UV visible near IR Mid IR frequencies Flickering multi spectral output Solar spectrum profile not present in the output Flame Detector Re...

Page 4: ...tery Performance Operational Environment Operating Temperature 10 C to 55 C Hazardous Ex Areas Not suitable for use in hazardous areas IP Rating IP54 Recycle raw materials instead of disposing of them...

Page 5: ...within a safe location to perform the test Testing of a Flame Detector should only be conducted where it is safe to do so and by personnel with appropriate training and equipment Ultraviolet radiatio...

Page 6: ...6579 IR3 Flame Detector Intrinsically safe IS 16519 IR3 Flame Detector Flameproof Exd 16509 IR3 Flame Detector Stainless Steel 16549 IR3 Flame Detector Stainless steel flameproof Exd 16591 UV IR2 Flam...

Page 7: ...ied Any USB A standard charging port such as a USB mains charger Not Supplied USB data and charging cable Supplied A Fast Charge capable USB A standard charging port such as a Fast Charge USB mains ch...

Page 8: ...ting the other end to a Fast Charge capable USB socket The LED next to the USB C connector will be solid green while the TalentumTT2 is charging turns off when charging is complete and will flash if t...

Page 9: ...soiling before use discontinue use if the item is more than cosmetically damaged or soiled Check the USB cable for damage before use replace with Fast Charge and data transfer compatible USB A male t...

Page 10: ...CD screen and seven control buttons as illustrated below 7 Introducing the TalentumTT2 Power Button OK Button Direction Buttons Up Down Left Right Getting to know your TalentumTT2 Back Button Trigger...

Page 11: ...ery will be checked before taking you to the main screen The main screen will allow you to select either a IR test a UV IR test or to recalibrate your Talentum Flame Detector Pressing the Up or Down A...

Page 12: ...th bring up the main menu Menu Select Torch Info Main Menu Power on count Test count Recal count SBR cal 2134499004 v 0 7 6 2022 04 07 12 30 47 2 1 0 50 1 Selecting Torch Info will bring up a screen s...

Page 13: ...Power button It will turn itself off when it has finished a test or recalibration if the user is inactive in a menu for 30 seconds or if the TalentumTT2 has encountered an error condition Switching of...

Page 14: ...etector s line of sight taking care to point the unit emitter towards the Detector s sensors Some adjustments may be required to find the ideal position and distance for a specific Detector Note Ultra...

Page 15: ...m Aim torch at Talentum within 2 8m Do not aim at eyes Press the Trigger button to start the test or Back to cancel When the test starts the screen will change to show The number on the bottom row wil...

Page 16: ...r that there is a range of distances between the TalentumTT2 and Flame Detector where it should trigger for example try reducing the distance between the TalentumTT2 and the Flame Detector If you are...

Page 17: ...hat the TalentumTT2 is pointed away from people during this procedure The first two screens are modified to warn about the presence of UV C light Testing a UV IR Talentum Warming up WARNING UV light C...

Page 18: ...a Flame Detector Remove the front cover of the Talentum Flame Detector by loosening the four bolts with a 5mm Allen key Carefully peel back the sticker surrounding the DIL switches by using a small f...

Page 19: ...procedure to prevent ambient light from influencing the test Place the Shroud provided over the front of the TalentumTT2 The large end fits over the front of the TalentumTT2 and the small end fits ov...

Page 20: ...le to test Torch and Talenum Confirm The following confirmation screen will be shown Press the Trigger button to start calibration or the Back button to cancel The Talentum TT2 should connect to the F...

Page 21: ...edure and the TalentumTT2 display indicates what it is doing throughout This process takes approximately one minute to complete The following sequence of screens should be displayed Calibrating Readin...

Page 22: ...s a list of the possible error messages along with more detail on their meaning Shroud not fitted Check the shroud Check that the Shroud is fitted to the TalentumTT2 and the Flame Detector correctly U...

Page 23: ...te Talentum The Flame Detector is of a type that has only a single IR sensor calibration requires at least two IR sensors or does not have a recognised part number Unknown unit type The TalentumTT2 do...

Page 24: ...ly high The Flame Detector should be returned for servicing Unit overheating The temperature in the TalentumTT2 is too high Recalibration will be abandoned for safety Allow the TalentumTT2 to cool dow...

Page 25: ...ion operations which have been carried out To retrieve the data logs first before powering the TalentumTT2 attach a USB cable to connect the USB C port of the TalentumTT2 to the USB port of a computer...

Page 26: ...n supporting documentation and that the name of the author not be used in advertising or publicity pertaining to distribution of the software without specific written prior permission The author discl...

Reviews: