
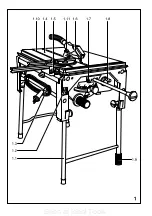


16
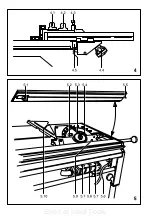
Press spindle stop (5.2 - behind saw blade) and
rotate saw shaft with hexagon key until button (5.2)
catches and locks the saw shaft.
Attention:
the saw blade locking screw has a left-
hand thread.
Release locking screw by turning firmly to the right
and remove clamping flange and saw blade. Insert
new saw blade.
Attention:
Pay attention to the direction of rotation
(cutting edge of saw teeth in direction of rotation
(5.4))! Screw saw blade and flange to saw shaft
with locking screw.
Close the cover (5.10) and replace the upper
protective hood again.
Warning
: Make sure that the cover (5.10) engages
in the clips (5.9) when closing.
Return hexagon key to holder and replace table inlay
in table.
First insert the inlay into the front of the table frame
with protruding spring steel sheet (5.5).
Insert inlay and screw tight with claw and rotary
knob.
13 Maintenance and service
13.1 Removing dust accumulations
General accumulations of dust are to be sucked
off with a dust extractor from time to time.
We especially recommend:
a)
cleaning the gears behind the rotary knob
(2.3)
b)
leaning the two guide rods after tilting the saw
onto one side.
13.2 Cleaning the filter (only CS 70 EB)
If the cut-out cycles of the temperature monitoring
system in accordance with section 6.4 become
shorter with no extreme overload, the air intake filter
(3.2) should be cleaned.
Release rotary knob (3.1), remove filter insert and
remove dust by tapping on the front or vacuuming
the surface of the filter. Replace filter.
Exchange any damaged filter with a new filter
cartridge (order no. 447 995).
13.3 Inspection and servicing
The device is fitted with special motor brushes with
an automatic cut-out.
When the brushes become worn the power supply
is shut off automatically and the tool comes to a
standstill.
If this occurs, the machine should be returned to a
Festool customer service workshop or specialised
workshop to change the brushes.
The specialised workshop can order repair
instructions from Festool under the order
no. 450 157 to carry out the following simple
repairs: change brushes, change the belt, replace
the electronics, clean the scraper on the guides,
change the mains cable, replace the motor, replace
the switch.
Any maintenance and repair work requiring an
opening of the drive unit and electrical system may
only be carried out by a Festool customer service
workshop or specialised workshop.
14 Range of accessories
14.1 Extension table
The CS 70 VB extension table (order no. 488 060)
can be fitted to the basic table of the PRECISIO for
safe and precise sawing to width (with stop) up to
a cutting width of 680 mm.
14.2 Extension table
The extension table CS 70 VL (order no. 488 061)
is available for fitting to the basic table for safe
sawing of longer workpieces.
14.3 Linear stop
The linear stop CS 70 LA (order no. 488 062) is
indispensable for safe and precise linear cuts.
14.4 Switch cover
If the switch cover CS 70 SA order no. 488 065) is
fitted, the machine can be protected against
unauthorised use with a padlock.
14.5 Transportation rollers
Transportation rollers CS 70 TR (order no. 488 064)
can be fitted to the foldaway legs of the saw to
enable simple and easy transportation.
14.6 Sliding platform
The sliding platform CS 70 ST (order no. 488 059)
can be fitted to the PRECISIO when sawing boards
up to a cutting length of 920 mm.
The sliding platform CS 70 ST 650 (order no.
490 312) can be fitted to the PRECISIO when
sawing boards up to a cutting length of 650 mm.
14.7 Saw blades
HM Ø 225 x 2.5 x Ø 30
Universal HW / 32
Order no. 488 288
Fine-tooth HW / 48
Order no. 488 289
Panther HW / 18
Order no. 488 290
Special HW / 68
Order no. 488 291
Seen at Ideal Tools.
Summary of Contents for Precisio CS 70 E
Page 2: ...Seen at Ideal Tools ...
Page 3: ...Seen at Ideal Tools ...
Page 4: ...Seen at Ideal Tools ...
Page 5: ...Seen at Ideal Tools ...


