


15
9.5 Moving the mitre fence
According to regulations, a higher or a lower
workpiece guide face must be available as a stop
depending on the workpiece.
Release the rotary knob (4.1) to remove the guide
ruler and replace in the guide groove after rotating
by 90° (fig. 4). The aluminium section has been
dimensioned so that both a high guide face and
the lower guide face required for flatter
workpieces is available.
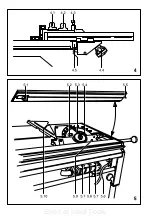
9.6 Fence ruler
The fence ruleris set off on one side by 8 mm.
The cross fence can be moved up to the saw cut to
support the workpiece with this guide rail without
the upper protective hood having to be removed.
9.7 Linear stop
The fence ruler is set parallel to the saw cut for line-
ar cuts. Use the slide stick (6.1) to push through
narrow workpieces.
To enable the fence to be aligned according to the
scale on the front edge of the table, the zeroes of
the two scales on the left and right are set to the left
and right cutting edge of the saw blade in the works
(7.1).
10 Dust extraction
The PRECISIO has a fitted dust extractor set (Or-
der No. 488 292; included with the CS 70 EB) and
has been tested in accordance with EN 1093-8.
A wood dust concentration of 2 mg/m
3
is reliably
maintained in the proximity of the tool provided a
dust extractor with the following features is
connected:
dust extractor in accordance with EN 60335-2-
69, dust class M;
connection adapter Ø 50 mm;
volume flow of at least 142 m
3
/h;
vacuum approx. 3,000 Pa.
Note:
The Festool dust extractors CTM 22 E
CTM 55 E meet these requirements.
10.1 Fitting the dust extractor set
Connect suction hose Ø 27 mm (3.7) to the upper
protective hood. Plug the hose holder (3.6) into
the clamping rail of the saw table to guide the
suction hose.
Connect suction hose Ø 36 mm (3.3) to the lower
protective hood.
Join both suction hoses with a Y-piece (3.4) and
connect to a dust extractor with a Ø 50 mm
connection.
10.2 General remarks
If dust chips block the suction channel of the lower
protective hood, open the flap (5.6) by a gap of
approx. 8 mm by releasing the rotary knob (5.8)
and remove the blockage.
In the event of serious blockages, or if saw sections
jam, the seals (5.7) can be released with the
enclosed hexagon key so that the flap (5.6) can be
fully opened.
The hexagon key is fastened on the saw blade cover
directly above the flap (5.6).
Attention:
disconnect the plug from the mains
before unscrewing the seals.
Once the blockage has been removed reclose the
flap with the seals.
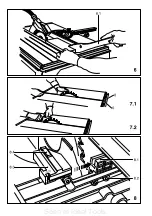
11 Concealed cuts
As already described in section 4, the height of the
riving knife can be locked in two positions without
tools.
Remove the upper protective cover for concealed
cuts and bring the riving knife into its lower locked
position by pressing down firmly (7.1).
When carrying out concealed cuts make sure of a
good workpiece guidance by pressing the
workpiece firmly onto the table.
Select the sequence of cuts so that sides of the
workpiece which have already been cut are not on
the side facing the fence.
Return the riving knife into its upper position (7.2)
and replace the protective cover on completion of
any concealed cuts.
12 Changing the saw blade
Unplug from the mains before changing the saw
blade.
Only use saw blades with the following dimensions:
Outer diameter
220 - 226 mm
Bore diameter
30 mm
Core thickness of blade
1.8 mm
Width of cut
2-2.5 mm
Lock the saw in its foremost position (setting up
position) and set to maximum slant and depth of
cut.
Release insert clamp with rotary knob (5.1), push
claw forwards.
Raise rear of table inlay (1.4) from below and
remove from table from the front.
Remove the protective hood and swing the cover
(5.10) back.
Remove hexagon key (5.3) from holder and insert
into saw blade locking screw.
Seen at Ideal Tools.
Summary of Contents for Precisio CS 70 E
Page 2: ...Seen at Ideal Tools ...
Page 3: ...Seen at Ideal Tools ...
Page 4: ...Seen at Ideal Tools ...
Page 5: ...Seen at Ideal Tools ...


