4.2
Product design
1
2
3
4
5
6
7
8
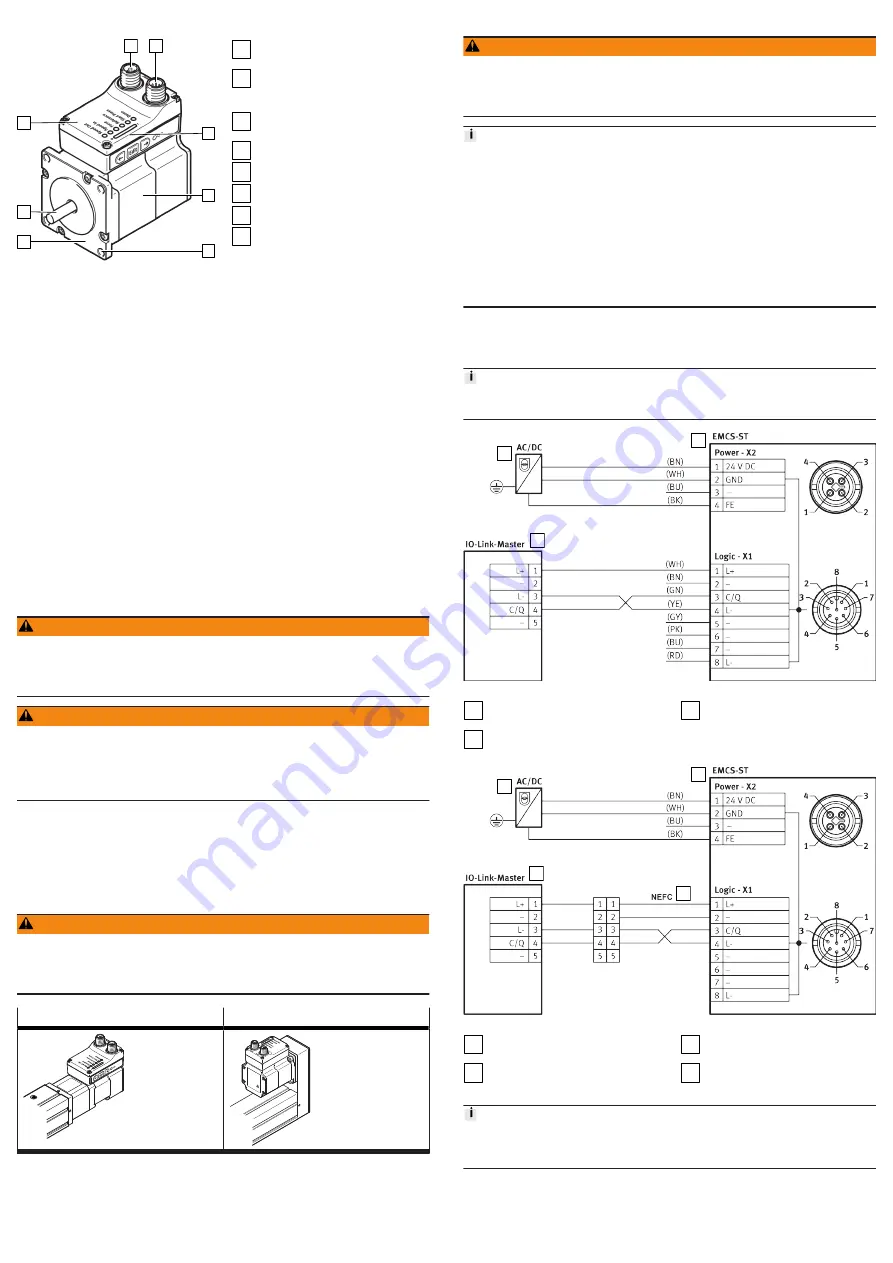
Fig. 2: Product design EMCS-ST
(example EMCS-ST-57 -...)
1
Connection for load voltage
supply [Power]
2
Connection of logic power supply
and digital inputs/outputs (DIO)
or IO-Link (LK) [Logic]
3
Display and operating compo-
nents (HMI)
4
Stepper motor
5
Mounting holes
6
Motor flange
7
Motor shaft
8
Controller housing
5
Transport
Transport and storage conditions
–
Store and transport the product in its original packaging.
–
Store product in a cool, dry, shaded and corrosion protected environment.
–
Store product in areas where it is not exposed to oils, greases and degreasing
vapours.
–
Keep storage times short.
6
Replacement
Replace integrated drive EMCS
1. Save the application parameters to the IO-Link master
2. Remove the defective integrated drive EMCS
3. Mount the new integrated drive EMCS
4. Connect the integrated drive EMCS
5. Commission the drive system
6. Update the parameter set
7. Update the firmware (optional)
è
"Integrated drive EMCS" instruction
manual
7
Disassembly
WARNING
Unexpected movement of components.
Injury due to impacts or crushing.
• Before working on the product, switch off the control and secure it to prevent it
from being switched back on accidentally.
WARNING
Risk of Injury due to Unexpected Movement of Components
For vertical or slanted mounting position: when power is off, moving parts can
travel or fall uncontrolled into the lower end position.
• Bring moving parts of the product into a safe end position or secure them
against falling.
Dismantling the integrated drive EMCS
1. Allow the product to cool down to room temperature.
2. Disconnect electrical installations on the EMCS.
3. Remove EMCS from the mounting kit
4. Observe transport information
8
Assembly
WARNING
Risk of injury due to unexpected movement of components.
The drive can move freely in the voltage-free state. This can cause unexpected
movements of the connected mechanics and crush parts of the body.
• Bring moving parts of the mechanical system into a safe position.
Axial kit EAMM-A
Parallel kit EAMM-U
Tab. 4: Overview of motor mountings (example electric cylinder unit EPCS-BS)
Only loosen screws or threaded pins that are described in the directions in the
instruction manuals.
1. Fasten motor mounting kit, observe instruction manual
2. Fasten the motor without tension.
Connect motor cables only on completion of mounting.
9
Installation
WARNING
Risk of injury due to electric shock.
• For the electrical power supply with extra-low voltages, use only PELV circuits
that guarantee a reinforced isolation from the mains network.
• Observe IEC 60204-1/EN 60204-1.
Damage to the device due to non-approved potentials at the pins
• Power connection:
• Do not connect pin 3
• Logic connection:
• Only after connection of the reference potentials GND/L– [Pin 4/8] can 24V
levels be applied to digital outputs DO1/DO2 [Pin 2/3] or the IO-Link
communication signal C/Q [Pin 3].
• The digital outputs DO1/DO2 [Pin 2/3] and the IO-Link communication
signal C/Q [Pin 3] must be disconnected 100 ms before the power
supply connections GND/L– [Pin 4/8] and 24 V DC/L + [Pin 1], e.g. by
the interposition of relay contacts.
•
Connect the cables to the [Logic] and [Power] connections of the integrated
drive EMCS-ST.
Wiring diagram: IO-Link operation, port class A (with and without NEFC adapter)
Current consumption of IO-Link power supply [Logic]
An input current at pin 1 (L+) of 100 ... 150 mA is required for operation.
1
2
3
Fig. 3: Wiring diagram: IO-Link operation
1
PELV fixed power supply for the
load voltage supply
2
Integrated drive EMCS-ST
3
IO-Link master with IO-Link inter-
face
1
2
3
4
Fig. 4: Wiring diagram: IO-Link operation with adapter
1
PELV fixed power supply for load
voltage supply
2
Integrated drive EMCS-ST
3
IO-Link master with IO-Link inter-
face
4
Adapter NEFC
Core colours of Festo cables:
BK = black, BN = brown, BU = blue, GN = green, GY = grey, PK = pink,
WH = white, YE = yellow
Connection [Logic]: IO-Link (LK), port class A
IO-Link data is exchanged with the IO-Link master via the [Logic] connection and
the logic part of the device is supplied with electrical voltage.


