Operation
36
© Festo Didactic CP Factory / CP Lab ° application module drilling
2.
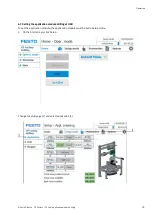
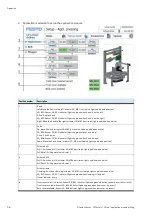
Application is selected to set up the application module
Position number
Description
1
X axis
Left: Move the X axis to the left (actuator VN_MB1 is activated, lights up blue when active)
VN_BG1: Sensor VN_BG1 indicator (lights up green when X-axis is on the left)
X-Axis: Display X-axis
VN_BG2: Sensor VN_BG2 indicator (lights up green when X-axis is on the right)
Right: Move the X axis to the right (actuator VN_MB2 is activated, lights up blue when active)
2
Z axis
On: move Z axis up (actuator VN_MB5 is activated, lights up blue when active)
VN_BG5: Sensor VN_BG5 indicator (lights up green when Z axis is up)
Z-axis: Z axis display
VN_BG6: Sensor VN_BG6 indicator (lights up green when Z axis is down)
Down: Move the Z axis down (actuator VN_MB6 is activated, lights up blue when active)
3
Activate drill 1
Drill 1: Switch on drill 1 (actuator VN_MB3 is activated, lights up blue when active)
DrillDrive1: Drilling machine indicator 1
4
Activate drill 2
Drill 2: Switch on drill 2 (actuator VN_MB4 is activated, lights up blue when active)
DrillDrive2: Drilling machine indicator 2
5
Activate clamp
Clamping: Switch on clamping (actuator VN_MB7 is activated, lights up blue when active)
VN_BG7: Sensor VN_BG7 indicator (lights up green when clamping is clamped)
Clamp: indicator clamp
6
Front cover correctly inserted: Sensor VN_BG3 indicator (lights up green when front panel is inserted correctly)
Front cover available: Sensor VN_BG4 indicator (lights up green when front cover is present)
Back cover available: Sensor VN_BG8 indicator (lights up green when rear cover is present)

