background image

FERROLI F30

20

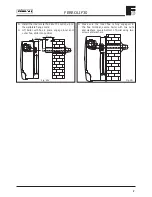
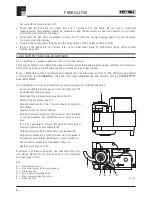
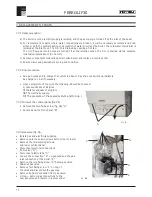
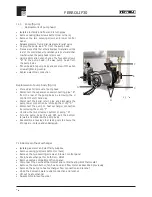
Fig. 21h

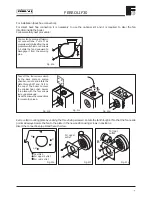
Fix  with  the  screws  (b).  Refi t  wiring  connections  to  fan  and  air  pressure  switch  tubes  ensuring  correct 
orientation.  I.E.  red  tube  to  air  pressure  switch  connection  with  red  dot  (+)  and  clear  tube  to  air  pressure 
switch connection with no paint marking (-).
Fit the fan into the boiler rotating the front to engage with the pin a. Secure with the screws b.

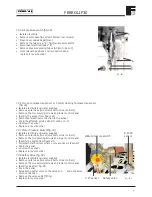
Rear

b

b

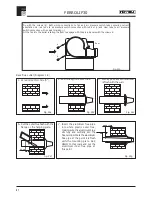
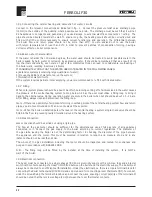
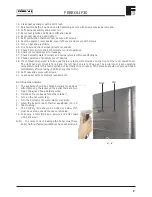
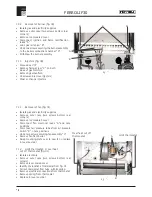
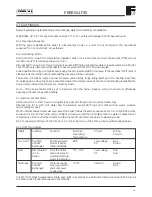
Back fl ue outlet (Diagram 1-9)

Fig. 22a

Fig. 22b

Fig. 22c

1.

 Core drill 127mm hole (5").

2.

 Push through the outer fl ue.

3.  

Gently pull back until wall seal 
is fl ush with the wall.

6.

Cut the outer fl ue fl ush with the 
fl ange on the hanging plate.

80 mm

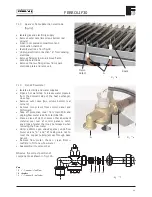
7.

 Insert  the  aluminium  fl ue  pipe 

into  white  plastic  outer  flue, 
making sure the aluminium pipe 
sits  fully  and  centrally  into  the 
fl ue terminal. Mark the aluminium 
fl ue pipe at the point it is fl ush 
with  the  mounting  plate.  Add 
36mm to this mark and cut the 
aluminium  inner  flue  pipe  at 
this point.

Fig. 22g

36 mm

80 mm

Fig. 22f

Summary of Contents for Domina 102

Page 1: ...r Wall Mounted Combination Gas Fired Boiler for Central Heating and Domestic Hot Water Production Fan Assisted Room Sealed Compartment Electronic Flame Ignition and Control 3544016 0 07 2001 INSTALLATION SERVICING AND USER INSTRUCTIONS G C NO 47 267 24 ...

Page 2: ...enclosed in your customer information pack This record must be completed and left with the end user All CORGI Registered Installers carry a CORGI ID card and have a registration number Both should be recorded in your central heating log book You can check the installer s CORGI registration by calling CORGI on 01256 372300 Ferroli is a member of the Benchmark initiative and fully supports the aims ...

Page 3: ...circuit set to open at 3 bar Built in Expansion vessel Variable speed pump Central heating flow temperature adjustment thermostat Domestic hot water flow temperature adjustment thermostat Central heating limit thermostat Overheat safety thermostat Electronic control unit for automatic flame ignition and control Central heating low water pressure cut off switch Domestic hot water flow temperature s...

Page 4: ...d are produced as standard to function with natural gas or liquid petrolium gas converted Key 1 3 4 central heating flow outlet 2 1 2 domestic hot water flow outlet 3 1 2 gas inlet 4 1 2 domestic hot water inlet 5 3 4 central heating return inlet 363 75 15 430 760 15 692 460 36 155 95 54 60 2 5 3 1 60 189 175 1 3 5 2 Top view 4 4 202 150 Ø80 Ø80 Ø80 120 120 70 Bottom view ...

Page 5: ...tic hot water heat input Gross Boiler water contents Domestic hot water circuit contents kW kW kW kW kW Litres Litres Ferroli F30 30 0 12 7 33 1 14 5 30 0 1 5 0 8 MODEL Connections Expansion vessel Max working pressure central heating circuit Max working pressure hot water circuit 1 2 3 4 5 Capacity Pre pressurising value Ø Ø Ø Ø Ø Litres bar bar b Ferroli F30 3 4 1 2 1 2 1 2 3 4 10 1 3 6 MODEL Ma...

Page 6: ... 0 5 1 2 3 4 6 bar 98 63 157 145 C C 62 IN OUT MIN GRUNDFOS FERROLI 114 34 20 21 90 50 16 28 32 26 19 49 132 5 56 27 91 10 8 7 84 85 44 136 14 42 9 11 36 OUT IN MIN AIR IN AIR IN FLUE OUT C H OUT D H W OUT GAS IN D H W IN C H IN 42 Domestic hot water flow temperature sensor 43 Air pressure switch 44 Gas valve 49 Safety overheat thermostat 50 Central heating flow limit thermostat 56 Expansion vesse...

Page 7: ...eat output to the central heating water simply adjust the main burner via the electronic control board fig 4 5 and see paragraph 5 04 page 24 The diagrams indicate the variation in heat output to the water as burner working pressure is varied Adjusting boiler output to the actual requirements of the central heating system will minimise boiler cycling thus saving fuel varying the output has virtual...

Page 8: ... INITIAL SYSTEM PRESSURE bar TOTAL WATER CONTENT of SYSTEM 3 0 0 5 1 0 1 5 1 0 1 5 2 0 1 5 2 0 2 0 EXPANSION VESSEL VOLUME litres LITRES 25 3 5 6 5 13 7 4 7 10 3 8 3 50 7 0 12 9 27 5 9 5 20 6 16 5 75 10 5 19 4 41 3 14 2 30 9 24 8 100 14 0 25 9 55 1 19 0 41 2 33 1 125 17 5 32 4 68 9 23 7 51 5 41 3 150 21 0 38 8 82 6 28 5 61 8 49 6 175 24 5 45 3 96 4 33 2 72 1 57 9 200 28 0 51 8 110 2 38 0 82 4 66 2...

Page 9: ...ch the boiler is installed does not require a purpose provided vent when using the standard concentric flue Flue System The boiler allows the flue outlet to be taken from the rear of the boiler from either side or vertically A standard flue length of 0 75 metres is provided Alternative lengths of two or three metres can be supplied equivalent to wall thicknesses of up to 565 1815 and 2815mm for re...

Page 10: ...between the boiler s central heating system and the mains water supply The use of mains water to charge and pressurise the system directly is conditional upon the Local Water Byelaws Again any such connection must be disconnected after use A typical temporary filling loop is shown in fig 9 Domestic Hot Water Always fit a scale reducer in hard water areas 18 clarke degrees or over A 15mm copper con...

Page 11: ...sions Terminal position kW input expressed in net Balanced flues room sealed Open flues Natural draught Natural draught Fanned draught Fanned draught Aa 300 mm 600 mm 1500 mm 2000 mm 300 mm Not allowed 300 mm Ba 300 mm 300 mm 300 mm 600 mm 300 mm Not allowed 300 mm Ca 300 mm 400 mm 600 mm 600 mm 300 mm Not allowed 300 mm D 300 mm 75 mm Not allowed 75 mm E 300 mm 200 mm Not allowed 200 mm F 600 mm ...

Page 12: ...e wall using an antitheft nut on the right side and a standard nut M8 on the left side Mount the boiler on the wall bracket and fix using an antitheft nut on the left side and a standard nut M8 on the right side Using a core drill cut a 118mm diameter hole for the flue 1 CH flow 22 mm 2 Safety Valve 15 mm 3 Domestic hot water outlet 15 mm 4 Gas supply 22 mm 5 Domestic hot water inlet 15 mm 6 CH re...

Page 13: ...ipes up to 1m long one bend use the 52 mm restrictor for flue lengths over 1 metre use no restrictor With 2 pipe system Calculate the total flow resistance of the air and flue pipes in metres cap 3 04 2 utilise the table shown below to choose the more suitable restrictor for the flow resistance calculated RESTRICTOR FOR TWO PIPE SYSTEM ON FERROLI F30 Total flow resistance of flue system Use restri...

Page 14: ...03 1 Vertical concentric connection 1KWMA31Y D S L 125 70 50 30 95 80 80 3 mm m Ø60 Ø80 70 min between 10 e 60 mm 190 270 Fig 15 A vertical connector can be supplied for vertical discharge with concentric pipes The simple mounting and use of double lip gaskets at the joints makes this an extremely easy and safe option Fig 14 Concentric Vertical Connector 3 03 2 Horizontal concentric connection L S...

Page 15: ...0 mm fig 16 Between 10 60mm 3 03 3 Maximum concentric flue length First table below shows the maximum flue lengths available for boilers with concentric systems For correct calculation remember to include the reduction for bends on second table Please refer to 3 02 for use of restrictor Maximum flue lenght permissible 100 mm concentric 125 mm concentric Vertical Horizontal Vertical Horizontal Ferr...

Page 16: ...sulated with non combustible insulating material to prevent condensation The flue pipe should be supported at intervals of not more than 1 8m and the support should be preferably below a joint 3 04 2 Two pipe flue system To determine the maximum length of flue and air pipe permissible The calculation is based on a standard reference resistance of 1 metre of 80 mm horizontal air intake pipe For eve...

Page 17: ...rminal Ø 80 mm Outlet flue air inlet for concentric system Ø 100 60 mm Pipe fitting for outlet flue Ø 80 mm Outlet flue air inlet for connection with split end Ø 80 mm 1 1 1 2 1 2 2 2 1 5 2 5 REDUCTION 5 2 4 AIR FLUE Vertical Horizontal Vertical Horizontal REDUCTION 12 A c c e s s o r i e s Ø 8 0 A c c e s s o r i e s Ø 8 0 Spigot and socket reduction Ø 100 80 mm 0 3 04 2 continued Tab 1 Pipes and...

Page 18: ...e 7 6 3 2 5 1 13 m 13 m Fig 19 Example of wall inlet outlet 2 pipe application Example of roof inlet outlet Example of direct roof flue outlet and wall air inlet 3 04 3 Example of other installation with two pipe systems Fig 20a Fig 20b Fig 20c REF N OF PIECES DESCRIPTION LENGTH OR REDUCTION 1 1 Air bend 80 mm R D 0 75 1 5 m 2 13 Horizontal air pipe 13 0 m 3 1 Air wall terminal 2 0 m 5 1 Flue bend...

Page 19: ...our screws which fix the back plate on sealed chamber remove and rotate the plate through 90 and fit it to the top of the boiler to cover the original flue outlet Secure it in place with the four screws removed previously Fix with 4 screws the connections for concentric pipe A Remove fan mounting plate by undoing the three fixing screws d Rotate the fan through 90 so that the fan nozzle points sid...

Page 20: ... Rear b b Back flue outlet Diagram 1 9 Fig 22a Fig 22b Fig 22c 1 Core drill 127mm hole 5 2 Push through the outer flue 3 Gently pull back until wall seal is flush with the wall 6 Cut the outer flue flush with the flange on the hanging plate 80 mm 7 Insert the aluminium flue pipe into white plastic outer flue making sure the aluminium pipe sits fully and centrally into the flueterminal Markthealumi...

Page 21: ...te flange mark 9 Lift boiler with flue in place engage inner and outer flue slide into position 9 Make sure the inner flue is fully engaged in the flue terminal secure boiler with two nuts and washers sevure bottom of boiler using two screws and washers 80 mm 36 mm Fig 22h Fig 22i ...

Page 22: ...loop to bring it back to the original value During operation water pressure in the boiler when hot should be about 1 5 2 bars After filling always close and disconnect the filling loop Note If there is a possibility of air pockets forming in certain points of the central heating system flow and return pipes you are recommended to fit an air vent valve at these points Note When the boiler is instal...

Page 23: ...ntial air pressure switch fig 2 part 43 The differential air pressure switch is a safety device which allows the main burner to ignite only after having verified that the fan is working correctly If the difference in pressure between the flue gas discharge pipe and the air intake pipe is not at least equal to the minimum pressure switch calibration value the pressure switch contacts do not close a...

Page 24: ...circuit board Remove the connector link from the 2 wires located behind the clock position Connect these to terminal 3 and 5 of the clock Replace everything in reverse order Please refer to page 43 of User manual for use of time clock Fig 22a X6 X1 X2 X3 X4 1 2 1 2 1 3 1 2 3 4 5 6 7 8 9 10 1 2 3 4 5 6 7 8 9 10 11 12 13 2 1 X5 X12 1 2 1 2 3 4 5 6 7 8 9 X10 X8 X7 MF03F JP02 JP01 JP03 Nat LPG X11 CLO...

Page 25: ...leting the start up procedure correctly the burners fail to ignite and the boiler shut down warning lights up wait about 15 seconds then rotate the knob 98 fig 2 against spring pressure to the RESET position and release it The reset electronic control unit will repeat the start up cycle Note In central heating mode after resetting the boiler will go into it 2 minute delay before starting up again ...

Page 26: ...ssure adjust minimum pressure by potentiometer P5 Adjust potentiometre P3 at maximum anticlockwise Adjust max pressure by rotating screw E clockwise to increase pressure and anticlockwise to reduce pressure Reconnect the pressure compensation tube F Replace protective cap C Maximum Minimum possible gas pressures are now set Range Rating the central heating is not necessary see paragraph 5 04 IN OU...

Page 27: ...flow t by varying pump flow head The thermal head t the difference in temperature between the delivery water and return water in the central heating circuit must be less than 20 c This is obtained by varying pump flow rate and head using the multi speed variator or switch on the pump itself Increasing the pump speed reduces t and vice versa The minimum differential must not be less than 11 C 5 08 ...

Page 28: ...rners lift slightly and pull forward 4 Carry out preliminary electrical checks at boiler junction box This is located in the centre of the boiler at the bottom and can be accessed be the removal of a single screw Any faults found must be rectified before proceeding 5 If electrical checks prove O K replace cover and secure with screw 6 Attach a manometer to the boiler gas inlet test point turn on e...

Page 29: ...erature before this test is carried out normally 10 15 minutes CO CO2 ratio should not exceed 0 0040 Immediately after servicing 0 0080 at any other time 30 Refit case and secure with screws 31 Leave boiler set to customers requirements 6 04 Flue Gas Analysis 1 The appliance should be checked visually for obvious defects 2 After removing the jacket on the boiler there are two test point one for fl...

Page 30: ...out 1 bar and vent boiler and radiators Re charge to 1 bar if necessary Upon completion of the work the following Should be checked I Gas soundness of all joints II Water soundness of all joints III The electricity supply IV The pressure of the sealed system and top up where necessary 7 03 To lower the control panel fig 26 Remove the two fixing screw fig 26 A Rotate down the front panel B A B 7 04...

Page 31: ...ion to the sensor Drain the affected service either D H W or C H Unscrew the sensor Replace in reverse order 7 07 Water Pressure Switch fig 29 Isolate electricity and water supplies Remove outer case two screws bottom rear corners Remove the two securing screws and lower control panel Identify the switch from figure 29 Disconnect electrical connections note positions to the switch Drain the boiler...

Page 32: ...tricity supplies Remove outer case two screws bottom rear corners Remove room sealed cover Disconnect fan electrical leads A and note positions Disconnect air pressure tubes from air pressure switch B note positions Undo two screws securing fan assembly C Remove fan from boiler Swap mounting plate over to new fan replace in reverse order 7 12 Limit thermostat or overheat cut off thermostat fig 31 ...

Page 33: ...p Remove outer case two screws bottom rear corners Remove two screws from control panel and tilt forward Take off protective cover from main PCB and unplug flow meter lead from terminal X6 Place a piece of cloth or some other absorbent material over rear of control panel to catch any drops of water that may be released when removing the flow meter Using a 24mm open ended spanner undo flow meter un...

Page 34: ...ump body by removing the U clip from the left hand side Disconnect the boiler return pipe and disengage the pump lower connection by removing the U clip C Disconnect the pump to heat exchanger connection by removing the U clip F Unscrew the two screws on bottom of pump D Turn the pump body through 90 pull the bottom forward and withdraw the pump body Reassemble in reverse order taking care to ensu...

Page 35: ...he boiler thermostat is set to maximum than the burner pressure will go to maximum effectively bypassing the auto range rating facility Domestic Hot Water Mode External Call for D H W Flow meter registers at least 2 5 litres min flow to the hot water taps Internal Call for D H W Hot water flow temperature sensor 88 C high limit stat and low water pressure switch calling for heat If both internal a...

Page 36: ...uspect the flow meter has not operated Boiler will not light for C H If the boiler works for D H W but not for heating the fault is most likely to be external controls i e clocks or room thermostats Integral clock if fitted or C H sensor If the heating demand light is on the fault is most likely the C H sensor If this light is not on suspect either a clock or room thermostat not calling To overrid...

Page 37: ...l C H output and maximum D H W temperature both are adjustable by the controls on the facia and because the boiler features automatic range rating no adjustments need to be made Electro mechanical relays control pump operation and put switched live to the ignition PCB demand relay they have transparent plastic covers so that their contacts can be seen moving 8 08 Air pressure switch Operating at 2...

Page 38: ... bar Check water pressure switch wiring connection NO Does fan run at full speed NO Go to CHART 2 NO YES Does CH Pump run If the boiler temperature is less than 5 C frost protection is activated Disconnect CH flowtemp sensor Has fan speed stopped Check and if necessary replace main board NO YES YES Check and if necessary replace water pressure switch Chek the following carefully before starting Ga...

Page 39: ... main board Check and if necessary replace limit thermostat Go to chart 4 Chart 3 Check Central Heating operation Wait 2 minutes DHW taps closed Put CH temperature selector to maximum Ensure external controls are calling for heat Is LED4 flashing Does C H pump run YES YES Go to chart 4 Is relay RY101 switch on Check and if necessary replace main board NO Is LED4 flashing Check and if is necessary ...

Page 40: ...switch YES Differential air pressure across the air pressure switch is greater than 180 Pascal Go to chart 5 YES NO Check and clean fan Check flue and air intake are correct and clean Check Venturi and air pressure switch tubes are clean Check restrictor is correct Chart 5 Check D H W and C H modulation Does burner flame modulate Normal operation carry out YES NO Boiler operated on central heating...

Page 41: ...heck electrodes and leads for damage and correct connection Check and if necessary replace P C B Adjust with P4 ignition burner pressure Check and if necessary clean burner Check and if necessary clean injectors Check and if necessary clean flame electrode Check right position of spark electrode Check wires Check gas supply is live and purged Check and if necessary replace gas valve NO YES Check a...

Page 42: ...ature adjustment P3 Central heating flow output adjustment P4 Ignition gas pressure adjustment P5 Minimum adjustment pressure 9 ELECTRICAL AND FUNCTIONAL SCHEME 9 01 Main components layout on electronic boards temp Ohm 10 C 20 kOhm 25 C 10 kOhm 60 C 2 5 kOhm 80 C 1 25 kOhm Temp sensor NTC 34 42 Fig 35 X6 X1 X2 X3 X4 1 2 1 2 1 3 1 2 3 4 5 6 7 8 9 10 1 2 3 4 5 6 7 8 9 10 11 12 13 2 1 X5 L1 L2 L3 L4 ...

Page 43: ...ACTS CONNECTING 230 V TO THE ROOM THERMOSTAT TERMINALS WILL IRREPARABLY DAMAGE THE ELECTRONIC BOARD 81 Ignition electrode 82 Sensor electrode 98 Off On Reset switch 114 Low water pressure switch 136 Flow meter 9 02 General wiring diagram X6 X1 X2 X3 X4 1 2 1 2 1 3 1 2 3 4 5 6 7 8 9 10 1 2 3 4 5 6 7 8 9 10 11 12 13 2 1 X5 TEST X12 1 2 1 2 3 4 5 6 7 8 9 X10 W O V R X8 X7 81 82 MF03F JP02 JP01 JP03 N...

Page 44: ...obtain hot water only from the boiler turn switch A to the on position The top green light on the left side of the control panel is illuminated power on Turn the temperature regulator B to the position Open a hot water tap green light tap symbol comes on fan starts and burner will light Indicated by flame symbol green light coming on The temperature of the hot water can be adjusted by turning the ...

Page 45: ...s Failure to observe these requirements may lead to prosecution Electrical Supply WARNING This appliance must be earthed The electrical wiring must be carried out by a competent electrician The colours of the wires in the mains lead of this appliance may not correspond with the coloured markings identifying the terminal in the plug Therefore proceed as follows The wire coloured green and yellow mu...

Page 46: ... Display 3 1 Use button and to set 2nd ON time eg 12 30 Display 4 1 Use button and to set 2nd OFF time eg 14 00 Display 5 1 Use button and to set 3rd ON time eg 16 00 Display 6 1 Use button and to set 3rd OFF time eg 23 30 Display 8 Oncompletionofprogrammingslideswitch A toAutoposition the time of day will be displayed and the central heating will switch ON and OFF according to the programme set 1...

Page 47: ......
Page 48: ...nt Staffordshire DE14 3HD Tel 08707 282 885 Fax 08707 282 886 ALL SPECIFICATIONS SUBJECT TO CHANGE Please note to avoid incurring unnecessary expense in the event of a boiler shut down check this in not caused by lack of electricity supply gas supply or low water pressure before calling our Customer Service Helpline Should you require help with any difficulties call our Technical Service Helpline ...

Reviews: