Not for
Reproduction
5
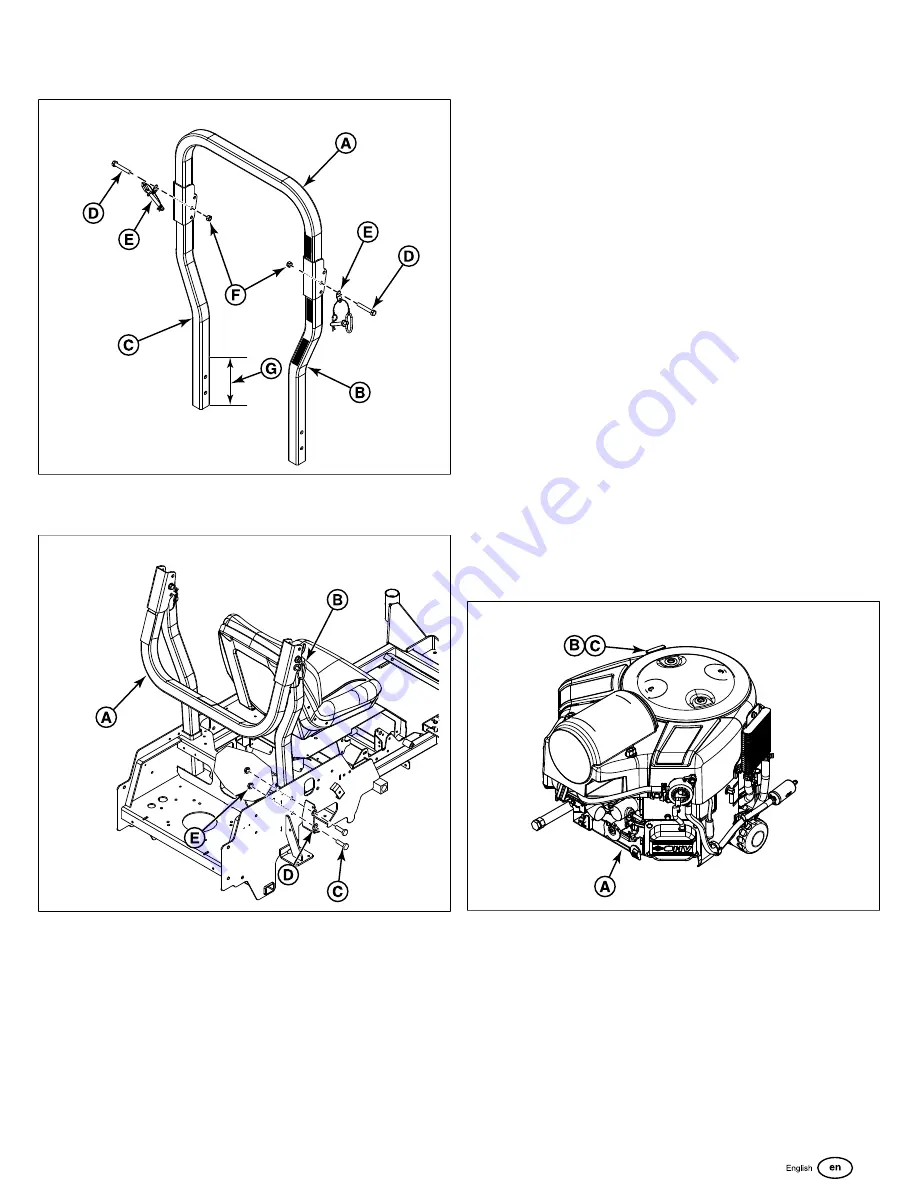
rear of the machine, the upright tube, and then loosely
install the 1/2 side lock nut (F).
6
2. Fold the roll bar to the down position (A, Figure 7) and
lock in place using the retainer pins and hair pin clips (B).
7
3. Make sure that no fuel lines, cables, or parts of the wire
harness are in the way of the roll bar pockets.
4. From the bottom of the roll bar upright tube measure up
8” (G, Figure 6) and mark the distance with a marking tool
or a piece of tape. Repeat for other upright tube.
5. Install the roll bar into the roll bar pockets. The roll bar is
installed so that the safety decals are on the left side of
the machine (as determined from the operator’s position)
facing towards the front of the machine. When the mark
you made is even with the top of the roll bar pocket, the
holes are close to being lined up. If necessary, use a
dead blow hammer and drift pin to assist in lining up the
holes in the roll bar with the holes in the roll bar pocket.
6. It may be necessary to remove the rear tires of the zero-
turn rider to install the roll bar mounting bolts. To remove
the rear tires jack up the rear end of the zero-turn rider,
secure with jack stands, and then remove the rear tires
from the unit.
7. Loosely install the (4) 1/2” bolts (C, Figure 7), and 1/2”
washers (D), through the frame of the unit, the roll bar,
the outer frame of the unit, and loosely install the 1/2” lock
nuts (E).
8. Tighten the 1/2” hardware that secures the upright tubes
to the frame of the unit to 82 ft. lbs (108 Nm) of torque.
9. Tighten the 1/2” bolt and side lock nuts that secure the
top loop to the upright tubes. Do not over-tighten. The top
loop should pivot snugly with the retainer pins removed.
10. If the rear tires were removed from the unit re-install them
now. The lug nuts should be torqued to 90 ft. lbs. (122
Nm). Remove the jack stands from underneath the zero-
turn rider.
11. Raise the top loop to the upright position and install the
retainer pins and hair pin clips to secure the roll bar in the
raised position.
Check the Engine Oil level
This model is equipped with a Briggs & Stratton Commercial
Turf Series engine (A, Figure 8)
8
1. Use the dipstick (B) to check the engine oil level. If
necessary add engine oil through the engine oil fill (C).
Check the engine manufacturer's owner's manual for oil
recommendations.
Check / Fill Transmission Oil Level
This unit is equipped with two transmission oil tanks. One
transmission oil tank only supplies oil to one transmission.
The level of oil in both transmission tanks must be checked,
and if necessary, filled.
Oil Type:
20W-50 conventional detergent motor oil


