background image

ADS iLoft IP Kit

ADS iLoft IP Kit

ADS iLoft IP Kit

ADS iLoft IP Kit

ADS iLoft IP Kit

ADS iLoft IP Kit

ADS iLoft IP Kit

ADS iLoft IP Kit

ADS iLoft IP Kit

ADS iLoft IP Kit

Page 23

1. Connect the IP interface to the ethernet network or Internet.

The connection to these networks is by means of the interface’s LAN connector, using
network cable, whose other end is connected to the corresponding local area network
(which may contain Routers, Switchers, etc.).

2. Change the IP address of the computer you are going to use to configure the interface.

As was mentioned previously, in order for two pieces of equipment to be able to
communicate with each other, it is necessary for them to have the same type of IP
address.
In this case, the interface’s IP address has to be changed so that it is of the same type
as the network in our example: 172.30.111.xx, for example 172.30.111.34.

To be able to change it, it is vital to establish communication with the interface, which has
the IP address 192.168.1.168 assigned in the factory, and therefore, initially, it will be
necessary to change the IP address of the PC used to configure the interface, to one of
the same type as that assigned to the interface in the factory (for example 192.168.1.1),
so that they can communicate with each other, and then, once communication has been
established, change the interface’s IP address and subsequently restore the computer’s
original IP address.

To change the PC’s IP address, the PC itself is used.

Carry out the following steps:

2.1- From 

Start

, go to 

Settings

=> 

Control Panel

.

2.2- Double-click on 

Network Connections

. A screen appears, showing all the active

networks.

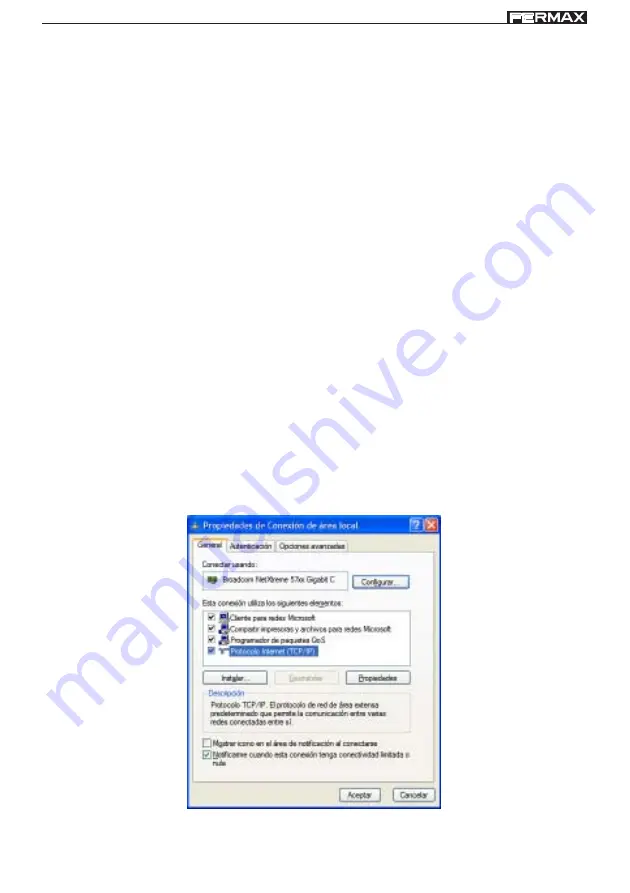
2.3- Right-click on the network icon and from the pop-up menu select the 

Properties

option. The following screen appears:

2.4- Double-click with the left-hand mouse button on 

Internet Protocol (TCP/IP)

. The

following screen appears:

Summary of Contents for iLOFT-IP CITY

Page 1: ...iLOFT IP CITY VIDEO KIT MANUAL...

Page 2: ...Page 2 ADS iLoft IP Kit ADS iLoft IP Kit ADS iLoft IP Kit ADS iLoft IP Kit ADS iLoft IP Kit ADS iLoft IP Kit ADS iLoft IP Kit ADS iLoft IP Kit ADS iLoft IP Kit ADS iLoft IP Kit...

Page 3: ...the caller and open the entrance door if you wish As a result of the IP Interface and the user application included on the CD you have remote control of all the video entry system functions from any c...

Page 4: ...DS iLoft IP Kit ADS iLoft IP Kit Cod 97410Ib V09_08 This technical document of an informative nature is published by FERMAX ELECTRONICA S A E which reserves the right to modify characteristics of the...

Page 5: ...f the Equipment 38 Wiring Diagram 14 Connection of Auxiliary Input Output Devices 16 Extensions 17 Equipment Programming iLoft Monitor ADS Programming 18 IP Interface 20 Connection via Local Network P...

Page 6: ...Page 6 ADS iLoft IP Kit ADS iLoft IP Kit ADS iLoft IP Kit ADS iLoft IP Kit ADS iLoft IP Kit ADS iLoft IP Kit ADS iLoft IP Kit ADS iLoft IP Kit ADS iLoft IP Kit ADS iLoft IP Kit...

Page 7: ...S iLoft IP Kit ADS iLoft IP Kit ADS iLoft IP Kit ADS iLoft IP Kit ADS iLoft IP Kit ADS iLoft IP Kit ADS iLoft IP Kit ADS iLoft IP Kit ADS iLoft IP Kit ADS iLoft IP Kit Page 7 Section I Installer Manua...

Page 8: ...iLoft IP Kit ADS iLoft IP Kit ADS iLoft IP Kit ADS iLoft IP Kit Disassembly DIN rail Installation Assembly Fixing with screws 1 70m 5 57 feet M A R I A L O R C A OUTDOOR PANELINSTALLATION POWER SUPPLY...

Page 9: ...tallation Assembly Fixing with screws MONITOR INSTALLATION 1 60m 5 25 feet 1 60m 5 25 feet Ct M V M V F1 T A L F2 Remove electrostatic protective tag IPINTERFACEINSTALLATION IN TE RFA Z IP AD S AD S I...

Page 10: ...Panel Connectors Video terminals coaxial V live M shield Ct camera activation 10 Vdc System connection terminals power supply 18 Vdc 12 12 Vdc output L data bus C NA NC relay contacts door opener conn...

Page 11: ...W1 N O K Monitor Conectors Video terminals coaxial V live M shield Ct camera activation 10 Vdc Connection Terminals 18 Vdc power supply L data bus F1 F2 additional functions negative output T Call But...

Page 12: ...application DI Positive digital input DI Reference digital input DO DO Dry contact of relay Ethernet network Internet connection LAN Connection to ethernet network Internet RJ45 Interface Connectors...

Page 13: ...eo signal Compound signal 1 Vpp 75 7 Mhz Humidity 0 90 TFT Flat Screen 4 Diagonal Resolution Horizontal 480 Line TV Vertical 234 Line TV Power Supply Consumption Operating temperature 18 Vdc 0 50 C 32...

Page 14: ...c 18Vdc OVERLOAD ON OUTPUT INPUT 100 240 V 1 2A 50 60 Hz 18 V 1 5 50 100 100 200 75 Ohm 75 Ohm 75 Ohm mm mm 2 5 1 5 2 2 S metros metres pies feet AWG 150 300 mm 2 15 13 D 300 600 1 50 mm 1 2 3 150 17...

Page 15: ...NC NO EXIT L M V 12 C Nc No BS S CT 18V DC JP3 JP2 PACK EXTENSION CN1 CN2 LEDS ON SLAVE MASTER LEDS OFF TARJETERO INFO MODULE CN1 DL2 CN2 JP3 JP2 COD 99034 ADS VERST RKER AMPLIFICATEUR ADS ADS AMPLIF...

Page 16: ...ugh the ADS IP application see ADS IP user application section DI input Input Normally Open N O Makes it possible to program the continous detection time until the DO output is triggered Makes it poss...

Page 17: ...00 240 V 1 2A 50 60 Hz 18 V 1 5 COAX L SW1 T A L F1F2 L 10 KOhm SW1 T A L F1F2 L L 10 KOhm Ct M V M V F1 T A L F2 Restore Default Configuraci n F brica Reset POWER LAN PRG CH INTERFAZ IP ADS ADS IP IN...

Page 18: ...DS iLoft IP Kit ADS iLoft IP Kit PROGRAMMINGTHEiLOFTMONITOR PROG PROG 1 2 sec 2 PROG 2 sec 1 3 PROG SW3 SW5 SW4 SW2 SW1 N O K 4 PROG SW3 SW5 SW4 SW2 SW1 N O K 2 sec current number and CORRECT number N...

Page 19: ...mming mode With the monitor connected press the programming button PROG for 1 second to access this you must lift up the front cover A confirmation tone will be emitted The first thing the monitor the...

Page 20: ...and another licence for the SMC user application installed on the PC SMC Proxy ID If the SMC is used with the same user licence SMC Proxy ID on different computers connected to the Internet it will on...

Page 21: ...ddress that enables the interface to communicate with the Fermax ADS intercom or video intercom installation Connection via Internet The steps necessary to configure the interface in an installation w...

Page 22: ...installation to communicate with the address shown on the IP interface is the address assigned in the factory 192 168 1 168 therefore in order for the ADS IP interface to be able to communicate with t...

Page 23: ...172 30 111 xx for example 172 30 111 34 To be able to change it it is vital to establish communication with the interface which has the IP address 192 168 1 168 assigned in the factory and therefore...

Page 24: ...by entering an IP address that is compatible with the interface s IP address i e an IP address of the same type as the address assigned to the interface in the factory for example 192 168 1 1 2 6 Clic...

Page 25: ...Password MAC address Where MAC Address is the 12 digit series of numbers and letters shown on the sticker at the back of the IP interface If the identification is correct the IP Interface configurati...

Page 26: ...that will be assigned to the ADS IP interface and which is of the same type as the IP addresses used in the network the interface is connected to Select option Direct Connection It is also necessary t...

Page 27: ...2 30 111 32 IP Address 172 30 111 34 3 5 Once you have configured the different parameters mentioned above press Save to store the data in the interface to update the information the interface automat...

Page 28: ...connection via Internet you must have user licences 11 digit numbers 2 licences are supplied with the ADS IP Interface see the Licences section at the end of the manual a licence for the ADS IP server...

Page 29: ...the server on the Internet Subsequently when starting up the user application it will be necessary to enter the user licence also supplied with the interface Enter the Internet connection parameters I...

Page 30: ...y the position of the extension pack to which the button is connected If it is installed together with one or more monitors in the same home office all the terminals must be programmed with the same A...

Page 31: ...ters shown on the sticker at the back of the IP interface If the identification is correct the IP Interface configuration screen appears 2 In the left hand part of the screen select the ADS Settings o...

Page 32: ...at the back of the interface into the PRG position 2 Then press the Call Home button pushbutton panels or enter the call code on the keypad followed by the bell key keypad panels to assign the ADS add...

Page 33: ...ing screen appears The screen shows the only user currently existing and with permission to access both applications Adding users To add a new user click on Add The user form then appears asking for t...

Page 34: ...er user privileges The activated options are the screens that the user can see when he she starts a session in the configuration application Activate Deactivate the options you want and click on Save...

Page 35: ...ws you to communicate with the entry panel see the caller and open the entrance door if you wish As a result of the IP Interface and the user application included on the CD you have remote control of...

Page 36: ...nd the secondary camera if there is one F1 and F2 Buttons for Additional Functions assigned by the installer Audio Activation Hanging up and Configuration adjustment Button menu When a call is receive...

Page 37: ...d with the street panel the monitor will automatically go off after 30 seconds Manual Activation of the Monitor Auto start With the monitor on standby press this button for 1 second to switch the moni...

Page 38: ...ou can select the brightness contrast level or colour setting When you come to the last option an error tone is emitted and it returns to the first one press the button to select brightness and contra...

Page 39: ...iLoft IP Kit ADS iLoft IP Kit ADS iLoft IP Kit ADS iLoft IP Kit Page 39 Go into configuration mode 2 sec Call Volume Settings Melody Selection and call cancellation HIGH Volume LOW Volume CALL TONE Se...

Page 40: ...video from outdoor panels We recommend using headphones to avoid audio feedback Reception of calls from ADS call centre Calls to ADS call centre Door opening of main and secondary panels Automatic swi...

Page 41: ...pplication When the application is started up for the first time the identification screen appears IP Enter the IP address previously assigned to the ADS IP interface Username Enter the username by de...

Page 42: ...nglish Once you have entered the application you can change the language so the next time the application is started up the screen will be shown in the selected language Video capture Image capture ph...

Page 43: ...f there is one in the installation press the button Auto start From the application it is possible to establish communication with the outdoor panels without having to receive a call Press the button...

Page 44: ...information and mode of image recording System Configuration Screen Language Application language selection Server Time Date Shows the date and time stored in the ADS IP interface Password Makes it p...

Page 45: ...the date and time of the option selected on the interface Password To change the user password enter the current password in the Old Password field and enter the new password in the New Password field...

Page 46: ...from the DO button in the main screen or automatically when the DI is triggered if the Trigger DO option is selected Mode Makes it possible to activate or deactivate the output by selecting the corres...

Page 47: ...olution levels Bit Rate The higher the bit rate the better the quality images sec The higher the number of images sec the better the image quality Quality Selectable from 1 to 30 1 maximum quality 30...

Page 48: ...connection via internet you must have user licences To obtain your licences it is necessary to register your product at www fermax com 1 Go to the Fermax website www fermax com 2 Use the search to lo...

Page 49: ...ADS iLoft IP Kit ADS iLoft IP Kit ADS iLoft IP Kit ADS iLoft IP Kit ADS iLoft IP Kit ADS iLoft IP Kit ADS iLoft IP Kit ADS iLoft IP Kit ADS iLoft IP Kit ADS iLoft IP Kit Page 49...

Reviews: