background image

6

EN

CDA1168  Charger adapter
CDA1170  Quick charger
CDA1172   Quick charger

The batteries of the FX-POWER 20V battery 
platform are interchangeable with all the FERM 
FX-POWER battery platform tools.

Vibration level

The vibration emission level stated in this 
instruction manual has been measured in 
accordance with a standardised test given in 
EN 60745; it may be used to compare one tool 
with another and as a preliminary assessment of 
exposure to vibration when using the tool for the 
applications mentioned:
-   using the tool for different applications, or with 

different or poorly maintainted accessories, 
may significantly increase the exposure level

-   the times when the tool is switched off or when 

it is running but not actually doing the job, may 
significantly reduce the exposure level.

Protect yourself against the effects of vibration by 
maintaining the tool and its accessories, keeping 
your hands warm, and organizing your work 
patterns.

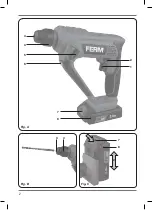
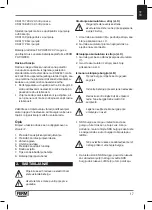
Description

The numbers in the text refer to the diagrams on 
page 2.

1.   On/off  switch
2.   Left/right rotation switch 
3.   Chuck
4.   Locking  sleeve
5.   Function selection switch
6.   Work  light
7.   Battery unlock button
8.   Battery (not included)

3. ASSEMBLY

 Before any work on the power tool, 
remove the battery.

 The battery must be charged before first 
use.

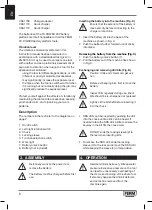
Inserting the battery into the machine (Fig. C)

 Ensure that the exterior of the battery is 
clean and dry before connecting to the 
charger or machine.

1.   Insert the battery (8) into the base of the 

machine as shown in Fig. C.

2.   Push the battery further forward until it clicks 

into place.

Removing the battery from the machine (Fig. C)

1.   Push the battery unlock button (7).
2.   Pull the battery out of the machine like shown 

in Fig. C.

Exchanging and removing drill bits (Fig. B)

 Caution: drills and chisels can get very 
hot.

 Before exchanging bits, first remove the 
battery.

 Inspect bits regularly during use. Blunt 
bits should be re-sharpened or replaced.

 Lightly oil the bit shaft before inserting it 
into the chuck.

•   SDS drills can be inserted by pushing the drill 

into the chuck until a click can be heard. If 
needed rotate the SDS drill a little to ensure the 
keyway in the bit fits the chuck well.

 DO NOT slide the locking sleeve (4) to 
the rear when inserting bits.

•   To remove the SDS drill, slide the locking 

sleeve (4) to the rear and remove the SDS drill 
while keeping the sleeve (4) in this position.

4.   OPERATION

 Hammer drills require very little operator 
pressure. Excessive pressure on the tool 
can lead to unnecessary overheating of 
the motor, and burning of the driven tool. 
It also may happen the drill bit deforms 
and cannot be removed from the 
machine again.

Summary of Contents for HDM1052

Page 1: ...ABLE BATTERY PLATFORM WWW FERM COM Original instructions 03 Tradu o do manual original 08 Prevedeno s izvornih uputa 14 19 26 Orijinal talimatlar n evirisi 30 EN PT HR RU AR TR 20V CORDLESS ROTARY HAM...

Page 2: ...2 Fig C Fig B Fig A 2 1 4 3 3 4 6 5 7 8 7 8 1 2...

Page 3: ...standards in the European directives GENERAL POWER TOOL SAFETY WARNINGS WARNING Read all safety warnings and all instructions Failure to follow the warnings and instructions may result in electric sh...

Page 4: ...nd control of the tool in unexpected situations tool Keep cord away from heat oil sharp edges or moving parts Damaged or entangled cords increase the risk of electric shock e When operating a power to...

Page 5: ...fied range may damage the battery and increase the risk of fire 6 Service a Have your power tool serviced by a qualified repair person using only identical replacement parts This will ensure that the...

Page 6: ...tool remove the battery The battery must be charged before first use Inserting the battery into the machine Fig C Ensure that the exterior of the battery is clean and dry before connecting to the char...

Page 7: ...ll damage the synthetic components ENVIRONMENT Faulty and or discarded electrical or electronic apparatus have to be collected at the appropriate recycling locations Only for EC countries Do not dispo...

Page 8: ...ra anti poeira N o elimine o produto em recipientes n o adequados O produto est em conformidade com as normas de seguran a aplic veis nas directivas europeias AVISOS GERAIS DE SEGURAN A SOBRE A FERRAM...

Page 9: ...a poss vel faz lo antes de efectuar quaisquer ajustes substituir acess rios ou guardar ferramentas el ctricas Estas medidas de seguran a preventivas reduzem b Evite o contacto do corpo com superf cies...

Page 10: ...m carregador adequado para um tipo de bateria pode causar um inc ndio se for utilizado com outra bateria b Utilize apenas ferramentas el ctricas que tenham pilhas especificamente concebidas A utiliza...

Page 11: ...s FX POWER 20 V A utiliza o de quaisquer outras baterias podem causar ferimentos graves ou danos na ferramenta CDA1167 I es de l tio 20 V 2 Ah CDA1168 I es de l tio 20 V 4 Ah O seguinte carregador pod...

Page 12: ...e traseira e retire a broca SDS mantendo a manga 4 nesta posi o 4 FUNCIONAMENTO Os martelos perfuradores requerem uma press o m nima por parte do operador O excesso de press o na ferramenta pode dar o...

Page 13: ...a FERM s o desenvolvidos de acordo com os padr es de qualidade mais elevados e n o apresentam quaisquer defeitos em termos de materiais e m o de obra em rela o ao per odo estipulado por lei cujo in ci...

Page 14: ...SNA UPOZORENJA ZA ELEKTRI NE ALATE UPOZORENJE Pro itajte sva sigurnosna upozorenja i upute Nepo tivanje upozorenja i uputa mo e rezultirati strujnim udarom po arom i ili ozbiljnim ozljedama Upozorenja...

Page 15: ...lju kontrolu elektri nog alata u neo ekivanim situacijama f Pravilno se obucite Ne nosite iroku odje u ili nakit Kosu odje u i rukavice uvijek dr ite podalje od pokretnih dijelova Pokretni dijelovi mo...

Page 16: ...tura 130 C mo e se zamijeniti temperaturom 265 F g Slijedite sve upute za punjenje i nemojte puniti bateriju ili alat izvan temperaturnog raspona navedenog u uputama Nepravilno punjenje ili punjenje p...

Page 17: ...na glava 4 U vrsna navlaka 5 Prekida za odabir funkcije 6 Radno svjetlo 7 Tipka za osloba anje baterije 8 Baterija nije isporu ena 3 SASTAVLJANJE Prije bilo kakvih radova na elektri nom alatu uklonite...

Page 18: ...a uvijek isklju ite stroj i odspojite akumulator iz stroja Redovito istite ku i te stroja mekom krpom po mogu nosti nakon svake uporabe Osigurajte se da otvori za ventilaciju ne sadr e pra inu i prlja...

Page 19: ...ne e ni u kojem slu aju biti odgovoran ni za kakve slu ajne ili posljedi ne tete Pravni lijekovi dobavlja a bit e ograni eni na popravak ili zamjenu neispravnih ure aja ili dijelova Proizvod i korisni...

Page 20: ...20 RU 1 a b c 2 a b c d e...

Page 21: ...21 RU f 3 a b c d e f g h 4 a b c d...

Page 22: ...22 RU e f g h 5 a b c d e f 130 C 130 C 265 F g 6 O b...

Page 23: ...23 RU a b c 2 HDM1052 20 0 900 0 5000 10 8 16 1 2 LPA 88 A K 3 A LWA 99 A K 3 A ah HD 8 9 2 K 1 5 2 FX POWER 20V CDA1167 20 2 CDA1168 20 4 CDA1169 CDA1170 CDA1172 FX POWER 20V FERM FX POWER EN62841...

Page 24: ...24 RU 2 1 2 3 4 5 6 7 8 3 p 1 8 2 p 1 7 2 SDS SDS 4 SDS 4 SDS 4 4 1 1 1 2 2...

Page 25: ...25 RU 5 5 5 5 C 2012 19 EC FERM FERM...

Page 26: ...26 AR FERM HDM1052 Ferm Ferm 1...

Page 27: ...27 AR 1 a b c 2 a b c d e f RCD 3 a b c d e f g h 4 a b c d e f g...

Page 28: ...a b c d e f 031 031 562 g 6 a b 2 HDM1052 20 0 900 0 5000 10 8 16 1 2 3 K 88 Lpa 3 K 99 Lwa 2 1 5 K 2 8 9 ah HD FX POWER 20V 2 20 CDA1167 4 20 CDA1168 CDA1169 CDA1170 CDA1172 FX POWER 20V FERM FX POWE...

Page 29: ...29 AR 2 1 2 3 4 5 6 7 8 3 8 1 2 7 1 2 SDS SDS 4 4 SDS 4 SDS 4 1 1 1 2 2 5 5 5...

Page 30: ...y llar boyunca kullanmaktan zevk al rs n z 1 GUVENL K TAL MATLARI Ekteki g venlik uyar lar n ilave g venlik uyar lar n ve talimatlar okuyun G venlik uyar lar n ve talimatlar izlememek elektrik arpmas...

Page 31: ...t r r e Bir elektrikli aleti d mekanlarda kullan rken d mekan kullan m na uygun bir uzatma kablosu kullan n D mekan kullan m na uygun ir kablo kullan ld nda elektrik arpmas riski azal r f Elektrikli a...

Page 32: ...Tutamaklar ve tutma yerlerini kuru temiz ve ya dan ar nd r lm ekilde muhafaza edin Kaygan tutamaklar ve tutma yerleri beklenmedik durumlarda aletin g venli ekilde ta nmas na ve kontrol edilmesine izi...

Page 33: ...r CDA1167 20V 2Ah Lityum yon CDA1168 20V 4Ah Lityum yon Bu bataryalar arj etmek i in a a daki arj aleti kullan labilir CDA1169 arj aleti adapt r CDA1170 H zl arj aleti CDA1172 H zl arj aleti FX POWER...

Page 34: ...Kapama anahtar ekil A A ma Kapama anahtar na 1 basarak makineyi a n A ma Kapama anahtar n 1 b rak rken makine a lacakt r D n h z A ma Kapama 1 anahtar na daha dibe veya daha az dibe bast rarak s rekli...

Page 35: ...erhangi bir ar za meydana gelmesi durumunda do rudan FERM sat c n za ileti im kurun Takip eden durumlar bu garanti kapsam d ndad r Yetkisiz servis merkezleri taraf ndan yap lan veya yap lmaya te ebb s...

Page 36: ...36 TR...

Page 37: ...37...

Page 38: ...38 Exploded view...

Page 39: ...s HR Izjavljujemo pod vlastitom odgovorno u da je strojem ukladan sa slijede im standardima ili standardiziranim dokumentima i u skladu sa odredbama uskla eno s Direktivom 2011 65 EU europskog parlame...

Page 40: ...WWW FERM COM 2021 FERM 2109 14...

Reviews: