7
EN
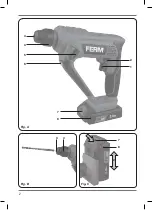
The On/Off switch (fig. A)
• Switch the machine on by pressing the On/Off
switch (1). When releasing the On/Off switch
(1) the machine will turn off.
• The rotation-speed can be continuously
adjusted by pressing the On/Off switch (1)
deeper or less deep.
Switching the direction of rotation (fig. A)
• Direction of rotation counter-clockwise: shift
left/right switch (2) to “
”.
• Direction of rotation clockwise: shift left/right
switch (2) to “
”.
Function selection switch (fig. A)
In order to avoid damage to the machine,
adjusting the function selection switch
(5) shall only be done when machine is
not running.
• Set the function selection switch (5) to “
” for
drilling.
• Set the function selection switch (5) to “
” for
hammer drilling.
User tips
• For large holes, for instance in very hard
concrete, start using a smaller bit for pilot
drilling first, then drill to nominal size.
• Hold the machine firmly with 2 hands. Be
aware the drill can jam and because of that
machine might suddenly turn (especially when
drilling deep holes).
• Do not apply a lot of pressure on the machine,
let the machine do the work.
5. MAINTENANCE
Before cleaning and maintenance, always
switch off the machine and remove the
battery pack from the machine.
Clean the machine casings regularly with a soft
cloth, preferably after each use. Make sure that
the ventilation openings are free of dust and
dirt. Remove very persistent dirt using a soft
cloth moistened with soapsuds. Do not use any
solvents such as gasoline, alcohol, ammonia,
etc. Chemicals such as these will damage the
synthetic components.
ENVIRONMENT
Faulty and/or discarded electrical or
electronic apparatus have to be
collected at the appropriate recycling
locations.
Only for EC countries
Do not dispose of power tools into domestic
waste. According to the European Guideline
2012/19/EC for Waste Electrical and Electronic
Equipment and its implementation into national
right, power tools that are no longer usable must
be collected separately and disposed of in an
environmentally friendly way.
WARRANTY
FERM products are developed to the highest
quality standards and are guaranteed free of
defects in both materials and workmanship for the
period lawfully stipulated starting from the date
of original purchase. Should the product develop
any failure during this period due to defective
material and/or workmanship then contact your
FERM dealer directly.
The following circumstances are excluded from
this guarantee:
• Repairs and or alterations have been made
or attempted to the machine by unauthorized
service centers.
• Normal wear and tear.
• The tool has been abused, misused or
improperly maintained.
• Non-original spare parts have been used
This constitutes the sole warranty made by
company either expressed or implied. There are no
other warranties expressed or implied which extend
beyond the face hereof, herein, including the
implied warranties of merchantability and fitness
for a particular purpose. In no event shall FERM be
liable for any incidental or consequential damages.
The dealers remedies shall be limited to repair or
replacement of nonconforming units or parts.
The product and the user manual are subject
to change. Specifications can be changed
without further notice.
Summary of Contents for HDM1052
Page 2: ...2 Fig C Fig B Fig A 2 1 4 3 3 4 6 5 7 8 7 8 1 2...
Page 20: ...20 RU 1 a b c 2 a b c d e...
Page 21: ...21 RU f 3 a b c d e f g h 4 a b c d...
Page 22: ...22 RU e f g h 5 a b c d e f 130 C 130 C 265 F g 6 O b...
Page 24: ...24 RU 2 1 2 3 4 5 6 7 8 3 p 1 8 2 p 1 7 2 SDS SDS 4 SDS 4 SDS 4 4 1 1 1 2 2...
Page 25: ...25 RU 5 5 5 5 C 2012 19 EC FERM FERM...
Page 26: ...26 AR FERM HDM1052 Ferm Ferm 1...
Page 27: ...27 AR 1 a b c 2 a b c d e f RCD 3 a b c d e f g h 4 a b c d e f g...
Page 29: ...29 AR 2 1 2 3 4 5 6 7 8 3 8 1 2 7 1 2 SDS SDS 4 4 SDS 4 SDS 4 1 1 1 2 2 5 5 5...
Page 36: ...36 TR...
Page 37: ...37...
Page 38: ...38 Exploded view...
Page 40: ...WWW FERM COM 2021 FERM 2109 14...


