background image

ENG 


 8  

5.- FIRE up the firewood or the kindling. 
6.- Shut the door when the firewood is burning. The model always must work with the door closed 
7.- When the combustion stabilizes, control the fire using the primary air vents. 
8.- Follow the instructions below on regulating the fire. 
 

IV - REGULATION OF THE FIRE 


In order to control the fire and avoid the escape of smoke, it is essential to keep the combustion chamber closed. Only open the chamber to add more wood. 


Remember that the appliance and its exterior will be very hot during the combustion process. Do not touch any surfaces close to it. 


Keep inflammable materials at least 150 cm away from the fire. 


PRIMARY AND SECONDARY AIR INTAKES 


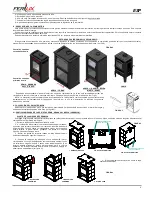
The stove has got two air intakes: primary and secondary. The primary air intake controls the combustion. If closed, there will be a slow and economical fire; if opened there 

will be quick and high calorific fire. (See figure 1). 


Secondary  air  intake:  it  reduces  pollution  levels  and  also  creates  a  draft  of  air  close  to  the  glass,  helping  to  keep  it 

clean. Move it to the left to close it, or to the right to open it. (See figure 2). 
 

NOTE:  It  is  very  important  to  use  suitable  gloves  or  a  hook  to  manipulate  the  controls  of  air  intake,  primary  or 

secondary, because the surface will be very hot during the combustion process. 


V - POSITIONING THE WOOD HOLDER 


Install the wood holder. This is a removable piece. Insert the piece into the firebox and fit it in the notches placed in the 

base (see figure 3). 

 
VI - PECULIAR TO STOVES DENIA, GRANADA & NERJA (CERÁMICA) 


FITTING THE PIECES OF CERAMIC 


In  case  you  need  to  remove  the  pieces  of  ceramic,  follow  the  instructions 

given below: 
 

1 - Remove the upper lid by pulling up.  


2  -  Then,  unscrew  the  screw  situated  under  this  lid,  which  hold  the  back 

panel  of  the  stove  to  the  main  body  of  the  appliance.  Do  not  unscrew 
completely,  one  and  a  half  turn  is  quite  enough.  Otherwise,  the  back  panel 
could not be supported anymore, could fall and break. 
 

3  -  Take  the  ceramic  pieces  off  pulling  them  up,  without  bending  it  and 

holding them firmly.  


4  -  When  replacing  the  ceramic  pieces  again,  let  them  slide  gently  to  the 

bottom without releasing them. Once every part is placed, screw the screws at 
the same time pushing the back panel to the front (see figure 5). 
 

5 - And finally put the top in its place. 


Primary air intake 
control


Secondary air 
intake controls  


FIGURE 2 


FIGURE 3 


TORNILLOS SUJECIÓN 
PANEL TRASERO

TORNILLOS SUJECIÓN
PANEL TRASERO

1.  TOP REMOVAL 

2.  UNSCREW THE SCREWS 

FIGURE 4 


Screws holding the back 
panel 


Screws holding the 
back panel 


DENIA – GRANADA 

VALLE – BRITO 


DURCAL – GUADIX – BELEN 

MARTA – ROSSY 

NERJA – FORNO 

LAWA 

4. REPOSITION


5. AJUSTMENT OF  
THE LID


3. EXTRACT THE  
CERÁMIC PART


FIGURE 5 


Summary of Contents for BELEN

Page 1: ...sponer f cilmente de l en cualquier momento Disponemos a continuaci n un espacio para que pueda anotar los datos del proveedor del aparato as como la fecha de compra y un registro de mantenimiento de...

Page 2: ...da de aire as como del estrangulador para el aire de combusti n para evitar su bloqueo Hay que proceder a la retirada de todos los materiales combustibles o degradables bajo la acci n de la temperatur...

Page 3: ...esidad habr que retirar este dep sito Para evitar la formaci n diaria de creosota se aconseja poner en funcionamiento de vez en cuando el hogar a fuego fuerte con la puerta del hogar cerrada a efectos...

Page 4: ...u manipulaci n se realizar con guantes adecuados o manofr a V COLOCACI N DEL SALVATRONCOS Debe colocar el salvatroncos pieza que tambi n es desmontable Para ello deber introducirlo en el interior del...

Page 5: ...e la parte delantera del hogar Lo mismo se aplica a la ropa que eventualmente se ponga a secar delante del hogar El hogar con su revestimiento no debe instalarse en un lugar donde haya mucha circulaci...

Page 6: ...ill in such a way that it cannot become obstructed All materials on or within the walls floors walls ceilings around the chimney that are combustible or could be damaged by heat must be removed if the...

Page 7: ...y every two months during very cold spells The chimney should be inspected every two months to check the creosote build up over that time and if necessary remove it To avoid daily creosote formation a...

Page 8: ...the surface will be very hot during the combustion process V POSITIONING THE WOOD HOLDER Install the wood holder This is a removable piece Insert the piece into the firebox and fit it in the notches p...

Page 9: ...t close to the fire to dry The fireplace and surround must not be installed in a place where there is heavy movement To avoid accidents tell the children that the fireplace gets very hot when is being...

Page 10: ...2 7 72 5 84 10 15 0 6 371 3 0 3 ROSSY 673 599 731 120 8 2 73 5 79 10 15 0 29 263 2 0 3 ROSSY CARENADO 735 604 731 120 8 2 73 5 100 10 15 0 29 263 2 0 3 NERJA 855 547 1161 200 15 6 75 265 285 10 15 0 4...

Page 11: ...nocidos por la Ley 7 FERLUX se reserva el derecho a modificar este manual sin preaviso 8 Para ejercitar los derechos conforme a esta Garant a Comercial el consumidor dispone de las siguientes v as de...

Page 12: ...and must present it together with the invoice purchase slip or delivery note in order to exercise his or her rights under this Commercial Warranty Fecha de compra comienzo de la garant a purchase dat...

Reviews: