background image

8. Connecting the satellite receiver

The following illustrations show cable connections for a television and other devices connected 
with the receiver. If you require any assistance in connecting individual devices, contact your 

local   technician.   Before   connecting   or   altering   cabling,   disconnect   the   receiver   from   the 
mains !!!

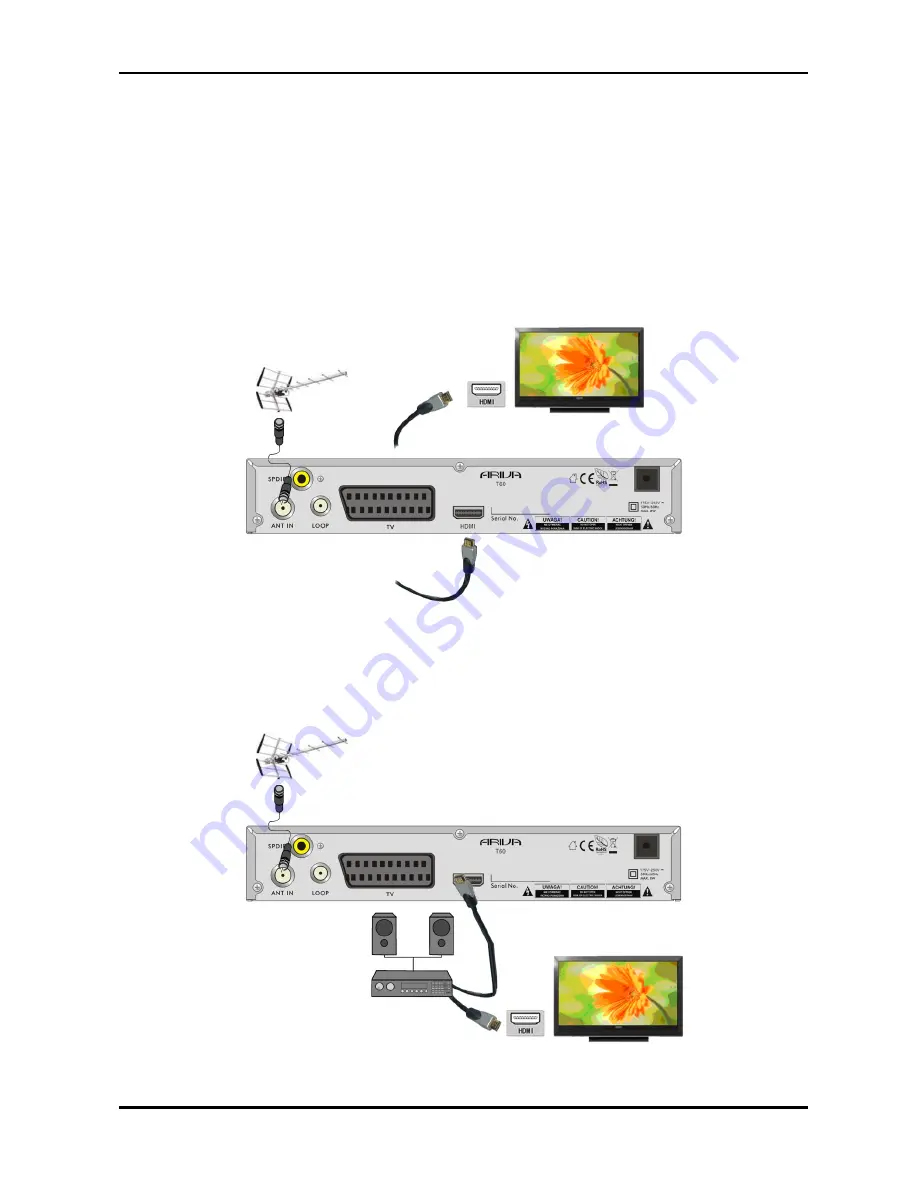
8.1 Connection by means of an HDMI cable (recommended)

1. Connect the antenna to the ANT IN socket of the receiver.
2. Connect the HDMI to the receiver out and the television in.
Connection by means of an HDMI cable allows you to obtain the highest image quality.

If you have an amplifier with an HDMI out and in, which supports sound sent over HDMI, 
connect the devices by two HDMI cables. As in the following figure: one cable to the  

amplifier, and the other from the amplifier to the television set.

11

Summary of Contents for ARIVA T60

Page 1: ...User manual ARIVA T60 English...

Page 2: ...all 2 Only disks with one basic NTFS or FAT32 partition we recommend using the NTFS format will function properly If you do not have such a format prepare the disk on your computer before connecting i...

Page 3: ...THE USER MENU 14 10 Main menu 15 11 Installation 15 11 1 Auto search 15 11 2 Manual Search 16 11 3 Language 16 11 4 Local time settings 17 Menu Installation Time Zone 17 12 TV System 18 12 1 Parental...

Page 4: ...17 6 REC recording 30 SEMI TWIN TUNER 31 17 7 PAUSE time shift 31 17 8 INFO 32 17 9 FAV favourites 32 ATTACHMENT A GLOSSARY OF TERMS 33 SPECIFICATION 34 4...

Page 5: ...ases bottles aquariums and other water containers in order to avoid damage Do not touch the mains plug with your bare hands Do not place any objects on the housing of the device This may cause overhea...

Page 6: ...Broadcasting standards Risk of electric shock do not open This notice warns the user not to open the receiver housing The housing may be opened solely by authorised service technicians CE logo The lo...

Page 7: ...of keys Common functions have been connected in one MENU The selected function is coloured Depending on the selected option various function keys are displayed red yellow green blue and white in the f...

Page 8: ...connected FAV Displays a selection of favorite channel lists VOL VOL Used to change the volume level lower higher CH CH Switches to the next or previous channel INFO Displays information about the cur...

Page 9: ...ompartment observing the indicated polarity Do not mix old and new batteries or batteries of different types Replace the battery compartment cover Slide it upwards until it locks in place 5 Front pane...

Page 10: ...y be initially determined by making a comparison with other antennas There should be no objects directly in front of the antenna for these may block the signal from reaching the bowl Once you select a...

Page 11: ...rom the mains 8 1 Connection by means of an HDMI cable recommended 1 Connect the antenna to the ANT IN socket of the receiver 2 Connect the HDMI to the receiver out and the television in Connection by...

Page 12: ...N socket of the receiver 2 Connect the television to the port in accordance with the description We recommend using shielded SCART cables 8 3 Connection of an audio system Digital sound including surr...

Page 13: ...recommend that you regularly archive data on your PC computer A large number of files with recordings may slow down cooperation with the receiver slow loading of the file list 3 Connect the memory thr...

Page 14: ...e buttons have been described for example EPG MENU OK or coloured for ease of usage Other buttons are multi functional and their operation depends on the type of device selected by the user Hereunder...

Page 15: ...SD Language choose your OSD language Antenna Power on off the antenna power Time Offset on off the automatic GMT Country Region choose your country region Time Zone manual GMT settings LCN on off the...

Page 16: ...eferred and second language options refer to audio soundtracks If a given channel supports more than one audio soundtrack the receiver will by default search for soundtracks in the selected languages...

Page 17: ...satellite recommended or you may set the time and date manually If you are using GMT you should select the correct time shift value for example 1 hour for Poland and turn on or off the summer time dep...

Page 18: ...em Resolution If you are using a SCART connection then for the majority of older television sets we recommend setting the video out to CVBS If your television supports RGB then activate this option in...

Page 19: ...not In addition you can turn on or off the password protection function for selected menu options and change the default password The default password is four zeros 000000 12 2 OSD settings In this me...

Page 20: ...other games BoxMan Snakes Gobang Jigsaw Reversi Sweeping Black Jack Ball 13 4 Information In this menu you can obtain detailed information about your software version Menu Tools Information 13 5 Fact...

Page 21: ...n external USB memory device Next select it and press start in order to commence the update Menu Tools USB upgrade 13 7 Upgrade by OTA This function is used to update receiver by OTA directly from the...

Page 22: ...play the information bar Use the Fast forward and Rewind buttons to navigate within a current recording and press the PLAY button in order to start viewing from a selected moment 15 2 Storage info Thi...

Page 23: ...at any moment by pressing the PAUSE button and resume it after a break by pressing the PLAY button Menu USB PVR Configure TimeShift 15 4 Timer settings This menu serves to programme up to 8 different...

Page 24: ...photograph tab using the EXIT button C A U T I O N Playback of some files may fail or be incorrect Copy protected content is not playable Playback may suffer temporary interruptions image freeze fast...

Page 25: ...annel lists Select a channel and press OK in order to see a preview in a small window Press the red button in order to turn on the channel movement function and then once again press OK on the selecte...

Page 26: ...TV List PIN 000000 Select a channel and press OK in order to see a preview in a small window Press the FAV button in order to switch on the add to favourite groups function A window will appear with...

Page 27: ...ame Confirm the new name by pressing OK use the virtual keyboard Once you are finished press EXIT A message will appear asking you to confirm the changes made If you fail to do it the changes made wil...

Page 28: ...names of all of them Menu Program TV List PIN 000000 FAV on the RCU choose the Fav s group choose with OK button the channel save the settings with EXIT To rename a select group of favorites and press...

Page 29: ...tton calls up the quick channel search function Enter successive letters by choosing them one by one The results list is updated after each successive letter is added Press the EXIT button in order to...

Page 30: ...vailability of subtitles and the way in which they are displayed depends on the broadcaster This function is also available when playing back a recording 17 6 REC recording This function is available...

Page 31: ...sion broadcast by pausing and then resuming it from the same point From the moment you switch on the time shift mode the Ferguson receiver will constantly record the signal from the satellite in a buf...

Page 32: ...d to the USB port the PAUSE button is used to temporarily pause the image i e freeze frame 17 8 INFO Pressing the INFO button will call up the information bar for the current channel This contains inf...

Page 33: ...transponder All of these channels comprise a single data stream which is transmitted on one frequency following modulation Monoblock a device that comprises two converters and a DiSEqC switch in a si...

Page 34: ...84 1dBm 8 75dBm QPSK 90 3dBm 8 75dBm ANT Loop Through 51MHz 858MHz full Band loop through TS Demux Demultiplexer MPEG2 ISO IEC 13818 1 Input Bit Rate Max 100Mbit s Video Decode Video Decode MPEG2 ISO...

Reviews: