3
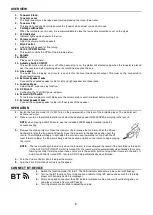
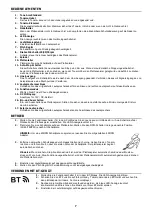
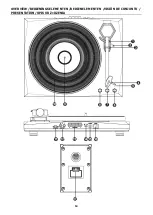
OVERVIEW
1. Tone-arm Stand
2. Tone arm Lever
The fixed tonearm can be raised and lowered pressing the raise / lower lever.
3. Tone arm Clip
This specially designed arm clip secures the tonearm while at rest or when not in use.
4.
Cartridge with needle
When the turntable is not in use, it is recommendable to place the removable protection cover on the stylus.
5. LED Indicator
Indicator lights up when power turned on.
6. Volume control
Adjust the volume for the speakers.
7. Pitch Control
Adjust the pitch speed for fine tuning.
8. 33 / 45 / 78 RPM Switch
This switch controls the RPM of the turntable platter.
9. Spindle
10. Platter
Place your record here.
11. Autostop Switch ON/OFF
This switch turns auto stop on or off. When auto stop is on, the platter will start spinning when the tonearm is placed
over the record and stop spinning when the record has reached the end.
12. Line output
The audio from a playing vinyl record is sent to this line-level coaxial audio output. This must not be connected to
phono level devices.
13. External Speaker Jacks
Connect the supplied speaker cable for left and right speaker into these jacks.
14. Function Mode
Select the BT or phono play function.
15.
DC IN port
Connecting the 12Volt/DC power adaptor.
16. Power On/Off Switch
Turns the record player on/off. Make sure the volume knob is set to minimum before turning it on.
17. External Speaker Jacks
Connect the supplied speaker cable into these jacks of the speaker.
OPERATION
1.
Switch the function mode (14) to PH. Turn on the power switch at the rear of the turntable player. The indicator will
become red colour.
2.
Place a record on the turntable platter and select the desired speed (33/45/78RPM) according to the record.
NOTE:
when playing a 45RPM record, use the included 45RPM adapter located inside the
accessories bag.
3.
Remove the stylus protector. Open the tone-arm clip to release the tone-arm. Push the lift lever
backward to raise the tone-arm and gently move the tone-arm to the desired position over the
record. The turntable will begin to spin when the arm is moved toward the record. Push the lift
lever forward to lower the tone-arm slowly onto the desired position on the record to begin playing
the record.
NOTE:
-The record will begin to spin only when the tone-arm is moved toward the record if the Auto Stop is turned on.
- If the AUTO STOP ON/OFF Switch is turned ON, the record will stop automatically when finished (For some
few vinyl records, it will stop when it does not come to the end OR it will not stop when it comes to the end.). If
Auto Stop Control is turned OFF, record will NOT stop automatically when finished.
4.
Turn the Volume Control Knob to adjust the volume.
5.
Turn the Pitch Control Knob to fine tune the speed
CONNECT BT-DEVICE
1.
Switch the function mode (14) to BT. The LED indicator will become blue colour with flashing.
2.
Turn on the BT function of your mobile phone, tablet or other BT device and search the turntable
player with its name Fenton recordplayer.
3.
After pairing and connection, the LED indicator will become blue colour without flashing and you
can play your music from your BT-device.
4.
Turn the volume control knob to adjust the volume.


