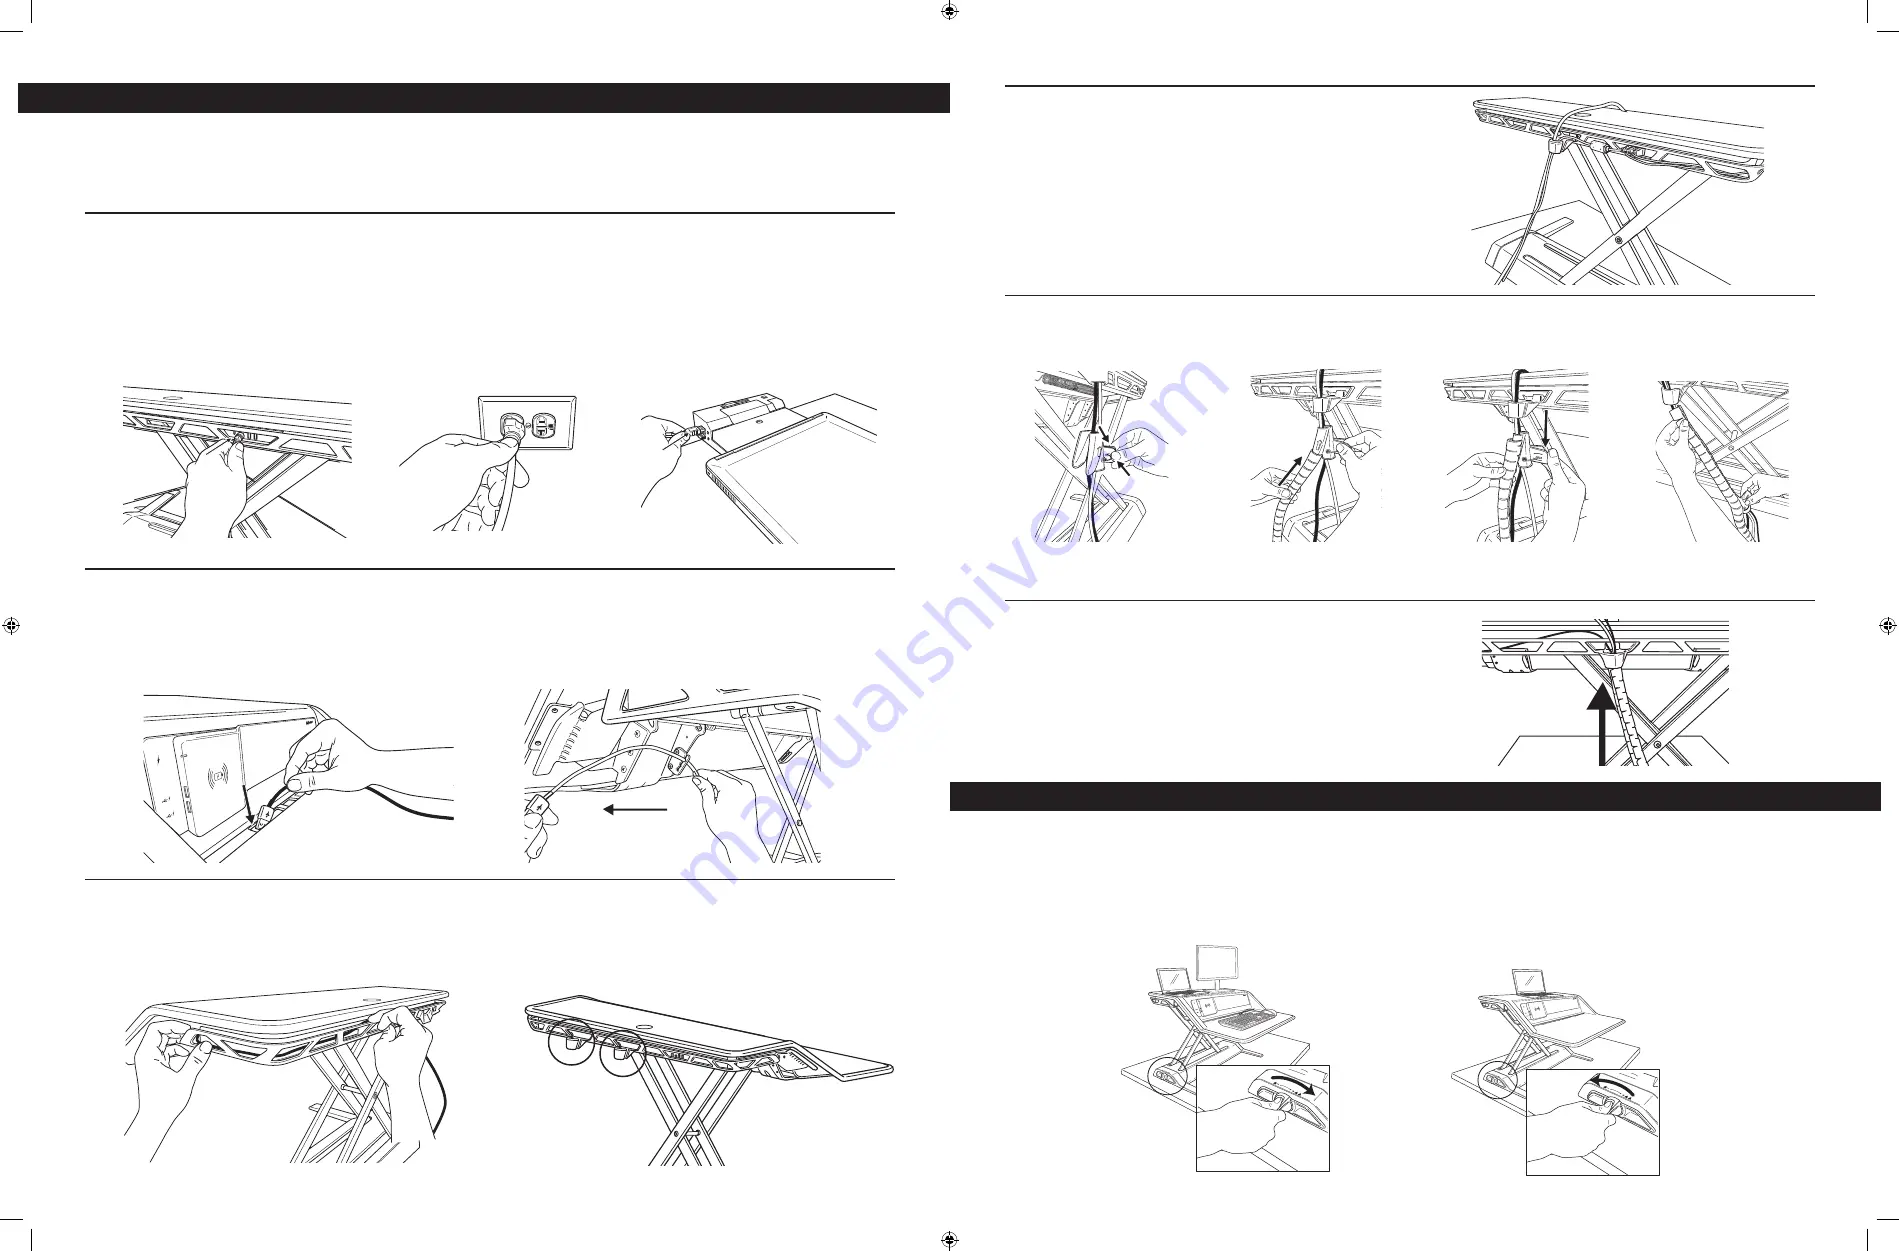
background image

14

15

PASO 4

Deslice el extremo de la abrazadera para cables dentro del conducto para 

cables con el fin de encajarlo en su sitio.

PASO 3

Junte todos los cables, incluidos los del monitor. Instale la abrazadera para cables con la herramienta proporcionada.

Empuje la abrazadera para cables hacia arriba por 

la herramienta de la abrazadera para cables. 

Tire de la herramienta de la abrazadera para cables hacia abajo, 

mientras sujeta la parte superior de la abrazadera para cables.

PASO 2C

Los puertos USB traseros están pensados para utilizarse con dispositivos de 

transferencia de datos. Conecte el ratón y el teclado en el concentrador USB 

trasero y dirija el resto de los cables por el conducto para cables.

PASO 2B

Continúe realizando el cableado alrededor de la estación de trabajo, a través del canal para cables y hasta la parte posterior. Introduzca el conducto para 

cables en 1 de los 2 lugares del canal para cables. Escoja el lugar que se adapte mejor a la configuración que tenga.

PASO 2A

Pase los cables del teclado y del ratón por la abertura de la plataforma para teclado. Asegúrese de fijar los cables con el clip en la parte inferior de la 

plataforma. El incumplimiento de estas instrucciones puede dar lugar a daños materiales o personales. 

Asegúrese de que la estación de trabajo está en su posición más alta. Siga todas las instrucciones de cableado para asegurarse de que los cables no se enganchan 

en las barras de soporte. Asegúrese de que los cables son lo suficientemente largos para poder tener una amplitud de movimientos completa (17 pulg./432 mm).

CONTROL DE CABLES

PASO 1

Configure las estaciones de carga conectando el cable de alimentación a la fuente de alimentación y la fuente de alimentación al puerto 2 trasero del 

concentrador USB. Enchufe el cable eléctrico en la toma de corriente más cercana. Para utilizar los puertos 3 y 4 del USB para su ratón y su teclado, necesitará 

enchufar el cable Tipo B/USB disponible en el puerto 1 y el extremo del USB en su equipo, estación de acoplamiento o monitor*.

 *El monitor necesita conectarse al equipo a través del cable Tipo B/USB adicional (no incluido).

AJUSTE DE TENSIÓN

La tecnología Smooth Lift Technology™ con patente en trámite hace que subir y bajar el escritorio de pie y sentado sea una tarea sencilla. Coloque los 

elementos en la estación de trabajo y súbala hasta la posición más alta. Lotus se envía en el ajuste más bajo que ayudará a compensar 10 lbs/4,5 kg. Gire 

la perilla en el sentido de las agujas del reloj para compensar los pesos más pesados, hasta 29 rotaciones completas para compensar 35 lbs/15,8 kg. Como 

guía, se necesitan 10 rotaciones completas para compensar una configuración de doble monitor. El número exacto de rotaciones dependerá de su comodidad 

personal. Una vez que haya ajustado correctamente el Lotus, deberá ser fácil subirlo y bajarlo.

LotusDX_SitStand_872353_RevD_10L_110217.indd   14-15

11/3/17   10:24 AM

Summary of Contents for Lotus DX

Page 1: ...730041 Polska 48 22 205 21 10 España Portugal 34 91 748 05 01 United Kingdom 44 0 1302 836836 Australia 1800 33 11 77 W E E E This product is classified as Electrical and Electronic Equipment Should the time come for you to dispose of this product please ensure that you do so in accordance with the European Waste of Electrical and Electronic Equipment WEEE Directive and in compliance with local la...

Page 2: ...4 5kg of weight With caution use both hands to push down slightly and engage both levers Failure to do so may result in injury or property damage Only compatible with Fellowes Monitor Arm Kit for Lotus Make sure the desk or mounting surface is level and can support the combined weight of the workstation and accessories Remove all equipment and accessories from the workstation before moving Manufac...

Page 3: ...e not pinched by the support bars Make sure the cables are long enough to accommodate the full range of motion 17 432mm CORD MANAGEMENT STEP 1 Setup the charging stations by connecting the power cord to the power supply and the power supply to the rear USB hub port 2 Plug the power cord into the nearest outlet In order to use USB ports 3 and 4 for your mouse and keyboard you will need to plug the ...

Page 4: ...n Device not compatible Flash FRANÇAIS Station de travail assis debout Lotus DX CONSIGNES DE SÉCURITÉ AVERTISSEMENT CONTENU Lire et suivre tous avertissements et instructions avant d utiliser l appareil Uniquement compatible avec le kit de bras de moniteur Fellowes pour Lotus Pour plus d informations consulter www Fellowes com Station de travail Alimentation électrique Câble USB Câble d alimentati...

Page 5: ...e Insérez le manchon pour câbles dans l un des deux emplacements situés sur la gouttière destinée aux câbles Choisissez l emplacement qui conviendra le mieux à votre configuration ÉTAPE 2A Faire passer les câbles du clavier et de la souris à travers l orifice situé sur le support de clavier Veiller à fixer les câbles à l aide de la pince située sous le support Le non respect de ces instructions po...

Page 6: ...e utilisation sur un courant ou une tension différent e de celui celle indiqué e sur le produit ou d une maintenance non autorisée pendant la période de garantie pour des éléments normalement couverts par la garantie LA DURÉE DE TOUTE GARANTIE IMPLICITE Y COMPRIS MAIS SANS S Y LIMITER TOUTE GARANTIE IMPLICITE DE QUALITÉ MARCHANDE OU D ADAPTATION À DES FINS SPÉCIFIQUES EST LIMITÉE EXPRESSÉMENT À LA...

Page 7: ...o incluye un sistema de asistencia con muelle y no debería utilizarse con un peso inferior a 10 libras 4 5 kg Con cuidado utilice ambas manos para presionar ligeramente hacia abajo y encajar ambas palancas De lo contrario se podrían producir daños materiales o lesiones Solo compatible con el kit de brazos para monitores de Fellowes para Lotus Asegúrese de que el escritorio o la superficie de monta...

Page 8: ...e cableado para asegurarse de que los cables no se enganchan en las barras de soporte Asegúrese de que los cables son lo suficientemente largos para poder tener una amplitud de movimientos completa 17 pulg 432 mm CONTROL DE CABLES PASO 1 Configure las estaciones de carga conectando el cable de alimentación a la fuente de alimentación y la fuente de alimentación al puerto 2 trasero del concentrador...

Page 9: ...che Anweisungen und Warnhinweise und beachten Sie diese Nur mit dem Fellowes Monitorarm Kit für Lotus kompatibel Weitere Informationen finden Sie auf www Fellowes com Workstation Netzteil USB Kabel Netzkabel Kabeltrichter Kabelschlauch werkzeug Klettverschluss 13 6 kg 30 Pfund 2 2 kg 5 Pfund WARNUNG QUETSCHPUNKT HALTEN SIE DIE HÄNDE WÄHREND DES BETRIEBS VON DEN SUPPORT STANGEN FERN ANDERENFALLS KA...

Page 10: ...n Wählen Sie die Position die für Ihre Konfiguration am besten geeignet ist SCHRITT 2A Führen Sie die Kabel der Tastatur und der Maus durch die Öffnung in der Tastaturablage Stellen Sie sicher dass die Kabel mit dem Clip unten an der Ablage befestigt werden Das Nichtbefolgen dieser Anweisungen kann zu Sachschäden oder Verletzungen führen Stellen Sie sicher dass die Arbeitsstation auf die höchste S...

Page 11: ...ungen außerhalb der Spezifikation oder unerlaubte Wartung während des Garantiezeitraums außerhalb der vorliegenden Garantiebedingungen zurückzuführen sind DIE DAUER ETWAIGER STILLSCHWEIGENDER GARANTIEN UNTER ANDEREM DIE DER MARKTTAUGLICHKEIT ODER EIGNUNG FÜR EINEN BESTIMMTEN ZWECK IST AUSDRÜCKLICH AUF DIE DAUER DER BEGRENZTEN GARANTIE BESCHRÄNKT SOWEIT GESETZLICH NICHT ANDERS VORGESCHRIEBEN BESTEH...

Page 12: ...usato con un peso inferiore a 10 libbre 4 5kg Con cautela impiegare entrambe le mani per spingere leggermente verso il basso e innestare entrambe le leve La mancata riuscita della procedura può causare lesioni o il danneggiamento dei prodotti Compatibile solo con il kit per braccio del monitor Fellowes per Lotus Verificare che la scrivania o la superficie di montaggio sia in piano e possa sostener...

Page 13: ...ficare che i cavi siano abbastanza lunghi da consentire il raggio di movimento completo 432 mm 17 GESTIONE DEI CAVI FASE 1 Configurare le stazioni di ricarica connettendo il cavo di alimentazione all alimentatore e l alimentatore alla porta 2 dell hub USB posteriore Collegare il cavo di alimentazione alla presa di corrente più vicina Collegare il cavo di alimentazione alla presa di corrente più vi...

Page 14: ...e NEDERLANDS Lotus DX Zit sta werkstation VEILIGHEIDSINSTRUCTIES WAARSCHUWINGEN INHOUD Lees vóór gebruik alle instructies en waarschuwingen en houd u hieraan Alleen compatibel met de Fellowes monitorarm set voor Lotus Zie www fellowes com voor meer informatie Werkstation Voeding USB kabel Stroomkabel Kabelkoker Kabelbinder gereedschap Velcro 13 6 Kg 2 2 Kg WAARSCHUWING AFKNELRISICO HOUD BEIDE HAND...

Page 15: ...naal Kies de locatie die het beste bij uw gebruikswijze past STAP 2A Leid de kabels voor muis en toetsenbord door de opening in het toetsenbordplatform Zorg ervoor dat u de kabels verankert met de clip aan de onderkant van het platform Het niet volgen van deze instructies kan schade aan de apparatuur of letsel tot gevolg hebben Zorg ervoor dat het werkstation in de hoogste stand staat Houd u aan a...

Page 16: ...n stroomsterkte of voltage anders dan vermeld op het product of ongeautoriseerd onderhoud gedurende de garantieperiode voor problemen die anders onder de garantie vallen DE DUUR VAN ALLE IMPLICIETE GARANTIES INCLUSIEF MAAR NIET BEPERKT TOT ENIGE IMPLICIETE GARANTIES VAN VERKOOPBAARHEID OF GESCHIKTHEID VOOR EEN BEPAALD DOEL BLIJFT EXPLICIET BEPERKT TOT DE DUUR VAN DEZE BEPERKTE GARANTIE TENZIJ ANDE...

Page 17: ...kt Använd båda händerna för att försiktigt trycka nedåt en aning och dra i båda spakarna Annars kan personskador eller materialskador uppstå Kompatibel endast med Fellowes skärmarmpaket för Lotus Se till att skrivbordet eller monteringsytan är jämn och kan stödja den kombinerade vikten av sitt stå arbetsstationen och tillbehören Avlägsna all utrustning och alla tillbehör från arbetsstationen innan...

Page 18: ...till att kablarna är tillräckligt långa för att rymma hela rörelseomfånget 432 mm KABELHANTERING STEG 1 Konfigurera laddningsstationerna genom att ansluta strömsladden till nätaggregatet och nätaggregatet till port 2 hos den bakre USB hubben Koppla in strömsladden i det närmaste vägguttaget Koppla in strömsladden i det närmaste vägguttaget För att använda USB portar 3 och 4 för din mus och ditt ta...

Page 19: ...mpatybilnewyłączniezzestawemramieniadomonitorafirmyFellowesdomodeluLotus Wceluuzyskaniadalszychinformacjiprosimyodwiedzić witrynę www Fellowes com Stanowisko robocze Zasilacz Przewód USB Przewód zasilania Przepust kablowy Owijka przewodu narzędzie Rzep 13 6 kg 30 lb 2 2 kg 5 lb OSTRZEŻENIE RYZYKO ZAKLESZCZENIA PODCZAS UŻYTKOWANIATRZYMAĆ RĘCE Z DALA OD WSPORNIKÓW NIEPRZESTRZEGANIETEGO ZALECENIA MOŻ...

Page 20: ...zepustkablowyw1z2miejscwkorytku kablowym Wybrać miejsce które najlepiej pasuje do danej instalacji KROK 2A Przeciągnąć kable klawiatury i myszy przez otwór w półce pod klawiaturę Pamiętać o przymocowaniu kabli zaczepem znajdującym się w dolnej części półki Niezastosowanie się do tych zaleceń może prowadzić do uszkodzenia sprzętu lub obrażeń ciała Upewnić się że stanowisko robocze jest w najwyższym...

Page 21: ...nego zastosowania niewłaściwego napięcia lub prądu oraz napraw wykonywanych poza autoryzowanym serwisem w okresie gwarancji OKRES OBOWIĄZYWANIA WSZELKICH GWARANCJI DOROZUMIANYCH W TYM MIĘDZY INNYMI DOROZUMIANYCH GWARANCJI PRZYDATNOŚCI HANDLOWEJ I PRZYDATNOŚCI DO OKREŚLONEGO CELU JEST JEDNOZNACZNIE OGRANICZONY DO OKRESU NINIEJSZEJ GWARANCJI O ILE Z PRZEPISÓW OBOWIĄZUJĄCEGO PRAWA NIEWYNIKA INACZEJ W...

Page 22: ... фунтов 4 5 кг Осторожно при помощи обеих рук слегка надавите и нажмите оба рычага Несоблюдение этих указаний может привести к травмам или повреждению изделия Совместимо только с кронштейном Fellowes Monitor Arm Kit для Lotus Удостовериться что стол или монтажная поверхность сбалансированы и способны выдержать общий вес рабочего места и принадлежностей Перед перемещением убрать с рабочего места вс...

Page 23: ... дюйма 432 мм УКЛАДКАКАБЕЛЯ ШАГ 1 Установите зарядные станции подключив шнур питания к источнику питания а источник питания к заднему порту USB разветвителя 2 Подключитешнурпитаниякближайшейрозетке Подключитешнурпитаниякближайшейрозетке ЧтобыиспользоватьUSB порты3и4длямыши и клавиатуры необходимо подключить прилагаемый кабель типа B USB к порту 1 а USB конец к компьютеру док станции или монитору М...

Page 24: ...o Lotus DX INSTRUÇÕES DE SEGURANÇA ADVERTÊNCIA ÍNDICE Leia e siga todas as instruções e avisos antes da utilização Compatível unicamente com o Kit de Braço para Monitor Fellowes para a Lotus Visite www Fellowes com para obter mais informações Estação de trabalho Fonte de alimentação Cabo USB Cabo de alimentação Funil para cabos Organizador de cabos ferramenta de instalação Velcro 13 6 Kg 30 lbs 2 ...

Page 25: ...nal para cabos para a parte traseira Introduza o funil para cabos numa das 2 localizações no canal para cabos Escolha a localização mais adequada à sua configuração PASSO 2A Encaminhe os cabos do teclado e do rato pela abertura na plataforma do teclado Certifique se de que fixa os cabos com o clipe na parte inferior da plataforma A não observância destas instruções pode resultar em danos no equipa...

Page 26: ...al utilização numa corrente ou tensão que não as especificadas no produto ou manutenção não autorizada durante o período de garantia sob condições além das cobertas pela garantia A DURAÇÃO DE QUAISQUER GARANTIAS IMPLÍCITAS INCLUINDO SEM LIMITAÇÃO QUAISQUER GARANTIAS IMPLÍCITAS DE COMERCIALIZAÇÃO OU ADEQUAÇÃO A UM DETERMINADO FIM É EXPRESSAMENTE LIMITADA À DURAÇÃO DESTA GARANTIA LIMITADA A MENOS QU...

Reviews: