OBID
®
classic-pro
Installation
ID CPR.02.VP/AB-x
FEIG ELECTRONIC GmbH
Page 24 of 36
M30800-1de-ID-B.doc
2.1 Installation on flush-mounting box
1. Select installation place:
The installation should be executed always on a surface as even as possible.
2. Connection:
3. Operation:
•
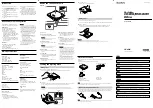
Snap connection board into bottom part of casing (see Fig 2).
•
Put the top of the casing onto its bottom part. The pin board of the Reader electronic has to
be inserted carefully into the socket board X3!
•
Function test.
4. Wall installation:
•
Remove top of the casing from its bottom part.
•
Screw bottom part of casing with snapped-in connection board to selected surface.
•
Put top of the casing again onto its bottom part. Insert the pin board of the Reader electronic
carefully in the socket board X3!
•
Screw top of casing to bottom part by using thread cutting screw 3,2 x 25 mm.
•
Attach adhesive label to clean and non-greasy casing.
(1)
X3
Fig 2: Rear view with snapped-in connection board (1)