6.
Using a 5 mm hex key, loosen the two screws securing
the fence (14) to the base.
7.
Place a square against the fence (14) and alongside
the blade.
8.
Adjust the fence (14) until it is square with the blade.
9.
Tighten the screws securing the fence (14).
10.
Loosen the Phillips head screw holding the pointer of
the mitre scale (17) and adjust it so that it accurately
indicates the zero position on the mitre scale.
11.
Retighten the screw securing the mitre scale pointer.
CHANGING A BLADE
1.
Make sure that the battery is removed from the power
point.
2.
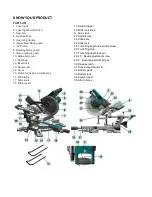
Push down on the operating handle (5) and pull the
release knob (4) to disengage the saw arm (3).
3.
Raise the saw arm (3) to its highest position.
4.
Loosen the cover plate screw about 2 turns with a
Phillips screwdriver. Do not remove this screw from the
tool.
5.
Pull the rotating blade guard (8) down. When the
rotating blade guard (8) is positioned over the upper fixed
blade guard (6) it is possible to access the blade bolt.
6.
Lift and hold up the lower blade guard (8) to expose
the threaded blade bolt.
7.
Hold the rotating guard (8) up and press the spindle
lock button (22). Rotate the blade until the spindle locks.
8.
Use the 6 mm hex key provided to loosen and remove
the blade bolt. (Loosen in a clockwise direction as the
blade screw has a left hand thread).
9.
Remove the flat washer, outer blade washer and the
blade.
10.
Wipe a drop of oil onto the inner blade washer and
the outer blade washer where they contact the blade.
11.
Fit the new blade onto the spindle taking care that the
inner blade washer sits behind the blade.
12.
Replace the outer blade washer.
13.
Depress the spindle lock button (22) and replace the
flat washer and blade bolt.
14.
Use the 6 mm hex key to tighten the blade bolt
securely (tighten in an anti-clockwise direction).
15.
Lower the blade guard, hold the rotating lower blade
guard (8) and blade bolt cover (10) in position and tighten
the fixing screw to secure the blade bolt cover in position.
16.
Check that the blade guard operates correctly and
covers the blade as the saw arm is lowered.
17.
Connect the saw to the power supply and run the
blade to make certain that it is operating correctly.
CROSS CUT
If possible, always use a clamping device such as a ‘G"
clamp to secure your workpiece.
When cutting your workpiece, keep your hands well away
from the blade area.
Do not remove a cut-off piece on the right-hand side of
the blade using your left hand.
A crosscut is made by cutting across the grain of the
workpiece. A 90°crosscut is made with the mitre table set
at 0°. Mitre crosscuts are made with the table set at some
angle other than zero.
1.
Pull on the release knob (4) and lift the saw arm (3) to its
full height.
2.
Loosen the mitre locks (20) and lifting up the mitre
latch(21) .
3.
Rotate the mitre table (16) until the pointer aligns with
the desired angle.
4.
Release mitre latch(21) and retighten the mitre locks
(20).
5.
Place the workpiece flat on the table with one edge
securely against the fence (14). If the board is warped,
place the convex side against the fence (14). If the concave
side is placed against the fence, the board could break and
jam the blade.
6.
When cutting long pieces of timber, support the opposite
end of the timber with side support bars, a roller stand or a
work surface that is level with the saw table.
7.
Before turning on the saw, perform a dry run of the
cutting operation to check that there are no problems such
as a clamp interfering with the cutting action.
8.
Hold the operating handle (5) firmly and squeeze the
release latch
(30)
. Allow the blade to reach maximum
speed and slowly lower the blade into and through the
workpiece.
9. Release the switch trigger (19) and allow the saw blade
to stop rotating before raising the blade out of the
workpiece. Wait until the blade stops before removing the
workpiece.
BEVEL CUT
If possible, always use a clamping device such as a ‘G"
clamp to secure your workpiece.
When cutting your workpiece, keep your hands well away
from the blade area.
Do not remove a cut-off piece on the right-hand side of the
blade using your left hand.
A bevel cut is made by cutting across the grain of the
workpiece with the blade angled to the fence and mitre
table. The mitre table is set at the zero degree position and
the blade set at an angle between 0°and 45°.
1.
Pull on the release knob (4) and lift the saw arm to its full
height.
2.
Loosen the mitre locks (20) and lifting up the mitre latch
(21).
3.
Rotate the mitre table (16) until the pointer aligns with
zero on the mitre scale (17).
4.
Release mitre latch (21) and retighten the mitre locks
(20).
5.
Loosen the bevel lock (12) and move the saw arm (3) to
the left to the desired bevel angle (between 0°and 45°).
Tighten the bevel lock (12).
6.
Place the workpiece flat on the table with one edge
securely against the fence (14). If the board is warped,
place the convex side against the fence. If the concave
side is placed
against the fence, the board could break and
jam the blade.
7.
When cutting long pieces of timber, support the opposite
end of the timber with side support bars, a roller stand or a


