background image

Consider the length of the material to be processed through the machine and make sure 

that there is enough height above the chipper/shredder to accommodate the material. 

Make sure the unit is located close to the area where the chips are going to be used to 

reduce carrying. 

Stay clear of the discharge area. Make sure all bystanders, children, pets, or objects that 

you do not want damaged or covered in chips, are clear of the discharge area. 

Assembly


The major components of this chipper/shredder have been assembled at the factory. 

Some minor assembly is required. The assembly process will use all the parts and 

hardware listed in the inventory. 

DO NOT attempt to start this machine until all assembly has been completed. Serious 

personal injury and damage to the machine could occur. 

To assemble the chipper/shredder:


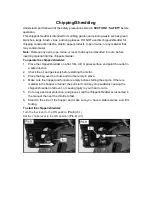
1.  Tip the chipper/shredder over and remove the bolts shown in 

Pic.2

. DO NOT turn the 

chipper/shredder over once it is full of oil and gas. The oil and gas will spill out. 

For fixing the leg: 2pcs Bolt M8x20, 1pc Bolt M8x200, 1pc Support Tube, 4pcs 

Washer Ø8, 3pcs Lock nut M8. 

For fixing the wheel assembly: 2pcs Bolt M8x200, 2pcs Support Tube, 4pcs Washer 

Ø8, 2pcs Lock nut M8. 


Pic.2 

Attaching the leg 

2.  Attach the wheel assembly and the leg with the bolts that were removed in 

Step 1

3.  Place the handle on the hopper and line up all of the holes. Secure it with flat washer 

(Ø8, 4pcs), spring washer (Ø8, 4pcs) and bolt (M8x20, 4pcs). (See 

Pic.3

Summary of Contents for FBT400

Page 1: ...INSTRUCTION MANUAL CHIPPER SHREDDER FBT400 CAUTION READ THE INSTRUCTION MANUAL BEFORE USE THE TOOL ORIGINAL INSTRUCTIONS FEIDER ZI du casque 32 impasse Aristide Berg s 31270 Cugnaux FRANCE...

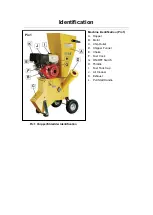
Page 2: ...e Identification Pic 1 A Hopper B Motor C Chip Outlet D Chipper Funnel E Choke F Fuel Cock G ON OFF Switch H Throttle I Fuel Tank Cap J Air Cleaner K Exhaust L Pull Start Handle Pic 1 Chipper Shredder...

Page 3: ...nd on a firm level surface 7 Do not operate the machine on a paved or gravel surface where ejected material could cause injury 8 Before starting the machine check that all screws nuts bolts and other...

Page 4: ...tion key before clearing debris in the inlet opening or discharge chute Keep the power source clear of debris and other accumulations to prevent damage to the power source or possible fire Remember th...

Page 5: ...ERATING MACHINERY Machinery noise can cause permanent hearing damage 5 WEAR PROPER APPAREL DO NOT wear loose clothing gloves neckties rings or jewelry which may get caught in moving parts Wear protect...

Page 6: ...achine 20 DO NOT OVERREACH Keep proper footing and balance at all times 21 MANY MACHINES WILL EJECT THE WORKPIECE TOWARD THE OPERATOR Know and avoid conditions that cause the workpiece to kickback 22...

Page 7: ...G THE CHIPPER SHREDDER Make sure the hopper and funnel are empty when starting the machine The pull start cord may stop suddenly causing the chipper shredder to fall over or injure your hand or arm 31...

Page 8: ...ous injury hazards to untrained users Read through this entire manual to become familiar with the controls and operations before starting the machine Site Considerations The chipper shredder must be p...

Page 9: ...re listed in the inventory DO NOT attempt to start this machine until all assembly has been completed Serious personal injury and damage to the machine could occur To assemble the chipper shredder 1 T...

Page 10: ...nut M8 3pcs See Pic 4 Pic 4 Funnel installation 5 Before operating fill the motor with oil and gas according to the instructions This chipper shredder does not have oil in the motor when shipped Add o...

Page 11: ...eyes hands and ears could result from using this machine without proper protective gear Always wear safety glasses hearing protection and leather gloves when operating this machine Loose hair and clo...

Page 12: ...n a flat firm dirt or grass surface and point the outlet in a safe direction 2 Check the oil and gas levels before starting the motor 3 Place the bag over the chute and tie it securely in place 4 Make...

Page 13: ...the cord sharply Pic 11 Continue this procedure until the engine starts When the engine has been successfully started and is running smoothly return the choke lever to the OFF position Pic 12 12 1 Whe...

Page 14: ...the bag unclogging the inlets or outlets filling the gas tank or performing maintenance and repairs Shredding Tips Feed material into the chipper shredder slowly If the motor begins to bog down you ar...

Page 15: ...ood when it is green is easier on the machine The blades will stay sharper longer The chipper shredder will work best if the blades are sharp Rotate sharpen or replace the blades as soon as chipper sh...

Page 16: ...the built up resins from the motor Engine cleaners are available at most auto parts stores Maintenance of engine Spark Plug After every 50 hours of running the spark plug should be removed Check the...

Page 17: ...ter clean the filter thoroughly using environmentally friendly water based degreasing agent and re fit Replacing Blades Sharpen or replace the blades as soon as the chipping performance begins to dete...

Page 18: ...wood stove gas or electric heater or an appliance or heater with a pilot light Store the chipper shredder in a well ventilated area DO NOT store the chipper shredder in an area that will allow toxic...

Page 19: ...ocked fuel line 6 Clean out the fuel line Engine does not run smoothly 1 Engine is warm and the choke is still in the CHOKE position 1 Move the choke to the RUN position 2 Air filter is dirty 2 Clean...

Page 20: ...3600 min CHIPPING CAPACITY 102mm Weight 105kg Sound pressure level at operator s ear LpA 91 8dB A K 2 5 dB A Declared sound power level LwA 110dB A K 2 5 dB A The noise emission is measured according...

Page 21: ...machine 2006 42 CE and to regulations transposing it Also in conformity with the following directives Directive EMC 2014 30 EU Directive RoHS 2011 65 EU Directive 2000 14 CE Annex VI 2005 88 EC Guaran...

Reviews: