FCI Electronics
Manual Part No. 415988-001
Issued: (03/12/99)
Page 14 of 18
Rev. 05/18/06 EC V06-0481
Revision C
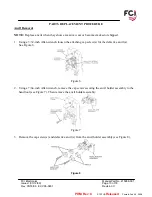
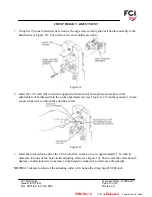
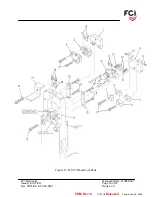
1. Loosen the two 2-56 setscrews (12) in the anvil holder (4). Then remove the terminal holder
assembly, which includes the terminal holder (10), guide pins (15), "0" rings (16), holding spring’s
(17), and holding pins (14) attached.
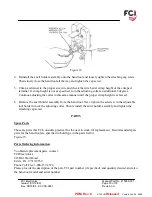
2. Remove the two holding spring’s (17) and the guide pins (15) from the terminal holder.
3. Loosen the two 2-56 setscrews (12) in the top of the terminal holder (10), which secure the holding
pins (14).
4. Using needle-nose pliers, remove both holding pins (14) by pulling straight out from terminal
holder (10). Discard the damaged holding pin(s).
Holding Pin Installation
CAUTION
Over tightening the two 2-56 setscrews (12) in the top of the terminal holder (10) can
flatten the holding pins (14), making them extremely difficult to remove.
1. Install two new holding pins (14) (0.025 in. square BergPin™ material 0.430 in. long) into terminal
holder (10) until pins are flush with the extended supports. Be sure that a flat side of each pin is at
right angles to the two 2-56 setscrew holes on top of the terminal holder (10).
2. Lightly tighten the two 2-56 setscrews (12) into the terminal holder (10) to secure the holding pins
(14).
3. Re-install the two guides pins (15), "0" rings (16), and the two holding spring’s (17).
4. Re-install the terminal holder (10) to the anvil holder (4), and tighten the two 2-56 setscrews (12) in
the anvil holder (4) onto the flats of the guide pins (15).
5. Crimp a terminal to a proper-sized wire, and inspect the terminal as described in Section II,
paragraph B.
PDM: Rev:C Released .
STATUS: Printed: Feb 09, 2009


