background image

33

VAIE 5500

EN

Label

Application

See panel

Notes

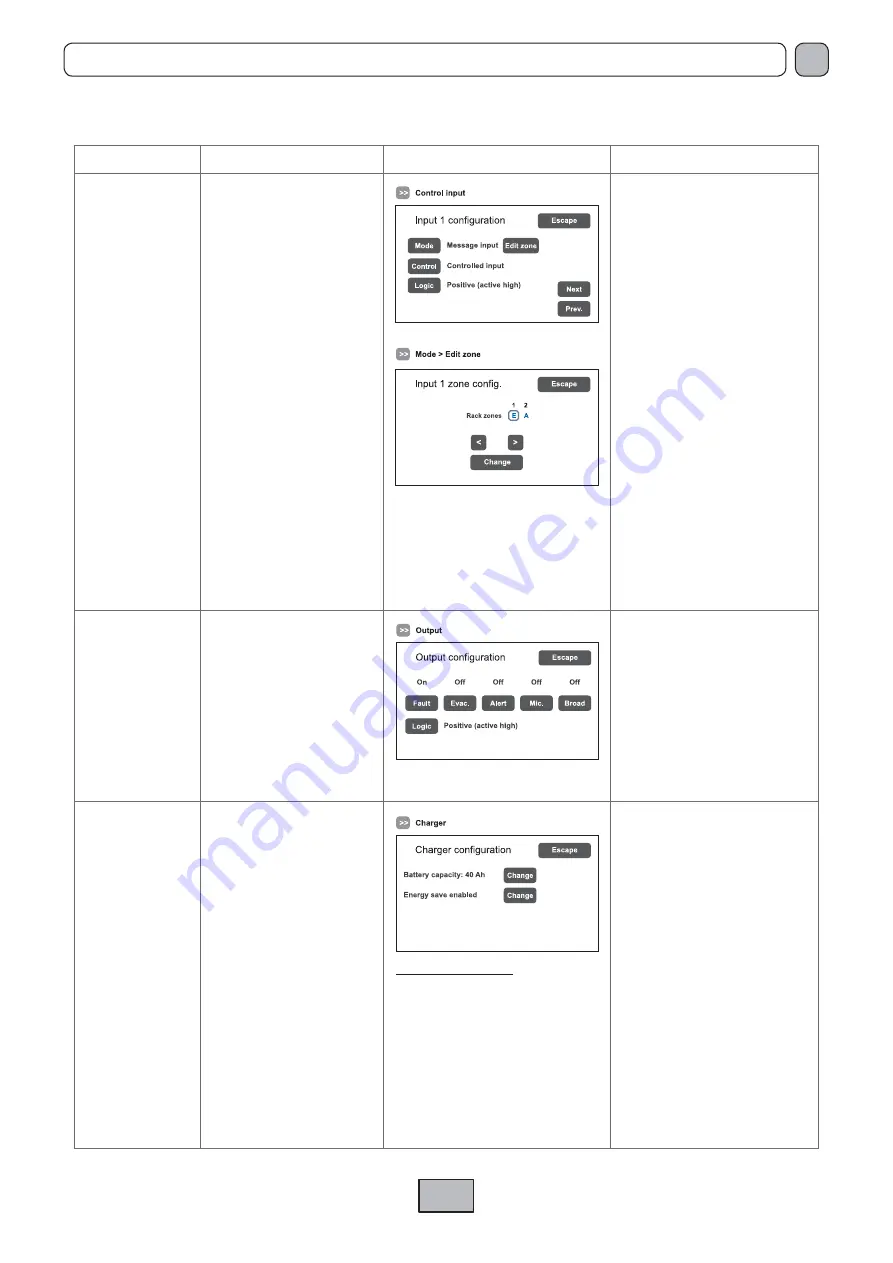
Control input

Controlled Input contacts

Panel for con

fi

 guring the controlled 

inputs.
To go from one input to another 
(from 1 to 7), press 

Next

 or 

Prev

.

Press 

Mode

 to select one of the 

following modes:

Message input > Edit zone

  Setting of the messages for the
  zones (E = evac, A = alert, 
  N = none)

Not active input 

Reset input

Press 

Control

 to enable or disable 

control over the concerned input.

Press 

Logic

 to set the logic 

typology attributed to the 
concerned input, choosing 
between:

Positive

 (active high)

Negative

 (active low)

To leave the screen, press 

Escape

’.

Output

Relay output

Panel for con

fi

 guring the relay 

output.

Activate or de-activate (On/Off) the 
type of event to be associated with 
the output in question by pressing 
the appropriate buttons.

To leave the screen, press 

Escape

’.

Charger

Battery charger

Battery con

fi

 guration panel. 

By pressing ‘

Change

’ it is possible 

to set:

- The capacity of the battery
   (choose between 18, 26, 33 
    or 40 Ah).

-  ‘

Energy save

’ mode enabled

    disabled. This enables the
    batteries to remain in the
    energy saving mode when 
    there is no mains power.

2 AMP (Pmax = 250W)

Capacity  Duration without mains supply
18 Ah   

24 h + 30 min*

26 Ah   

35 h + 30 min

33 Ah   

44 h + 30 min

40 Ah   

72 h + 30 min

*

According to UNI ISO 7240-19


 point 5.15.3 requirements:
 
24 h standby plus 30 minutes in vocal 
alarm condition. 

Summary of Contents for LIGHT

Page 1: ...p A Via Paolo Soprani 1 ZONA IND SQUARTABUE 62019 RECANATI MC ITALY TEL 071750591 r a FAX 0717505920 P O BOX 104 E mail info fbt it www fbt it INSTRUCTIONS FOR USE VAIE 5502 500W 2 ZONES LIGHT Wall mounted voice evacuation system ...

Page 2: ......

Page 3: ...2 4 2 6 Connection of standby amplifier 12 4 2 7 Connection of power supplies 13 5 OPERATIONAL CONDITIONS AND TERMINOLOGY 14 5 1 Signalling of operating conditions 14 6 DEFINITIONS 14 7 MENU STRUCTURE 15 8 USING THE SYSTEM 16 8 1 Configuration of the system 17 8 2 MUSIC Menu 20 8 3 AUDIO SETTING Menu 21 8 4 INSPECTION Menu 23 8 5 OPERATOR Menu 26 8 6 CONFIGURATION Menu 29 8 7 MANUAL emergency EMER...

Page 4: ...e equipment is in use it is necessary to ensure adequate ventilation above all leaving the slits for providing air for the cooling fans free REFER TO THE INSTALLATION AND CONNECTIONS SECTION FOR THE RELEVANT PROCEDURES TO BE CARRIED OUT BY TRAINED SPECIALISED PERSONNEL ONLY Important information for correct disposal of the product in accordance with EC Directive 2002 96 EC his product must not be ...

Page 5: ...h touch screen for selecting the alert and evacuation zones and enabling navigation for adjusting volume levels configuring the equipment and viewing failures Handheld fireman s paging microphone Sending out of pre recorded EVACUATION and ALERT messages 7 off controlled input contacts configurable for playing the evacuation and or alert messages to the programmed zones or for resetting the message...

Page 6: ...aying back the output signals from the zones or the signals of the input sources and for replaying the acoustic signal indicating that a failure has been detected beep The signalling tone will be automatically muted if the conditions of failure end Furthermore in accordance with the regulations the beep is muted by the system while the Emergency Microphone is being used 3 Handheld fireman s paging...

Page 7: ...put for emergency microphone stations max 4 10 Input terminal strip for music sources 11 Connection to 230 VAC power supply 12 Connection to 24 VDC battery power 13 Connection of loudspeaker zone 1 14 Connection of standby amplifier 15 Connection of loudspeaker zone 2 3 2 INSIDE VIEW ...

Page 8: ...inating either the plugs sealing the holes in the top or the rear door in both cases use a flat screwdriver or a cutter to lift them and remove them It is important to keep the power cables separate from those dedicated to the other connections 4 1 WALL MOUNTING Take the cardboard template included in the package and position it at a suitable height so that it is accessible to the user Ideally the...

Page 9: ...ergency units page 10 B Point 4 2 2 Connection of music input page 10 C Point 4 2 3 Connection of input contacts page 11 D Point 4 2 4 Connection of relay output page 11 AMPLIFIER circuit E Point 4 2 5 Connection of the loudspeaker lines page 12 F Point 4 2 6 Connection of the standby amplifier page 12 Once the basic connections have been made it is possible to go on to connect the power supplies ...

Page 10: ...se a CAT 5e SF UTP cable for connecting the EMG DESK socket 9 to the IN OUT sockets of the remote emergency units FMD range max 4 4 2 2 CONNECTION OF MUSIC INPUT ΊCPU CIRCUIT The MUSIC terminals 10 are available for connecting outside music sources CD player tuner etc ...

Page 11: ...RCUIT The CONT IN RJ45 socket 7 provides 7 controlled input contacts An example of a connection is shown in the figure 4 2 4 CONNECTION OF RELAY OUTPUT ΊCPU CIRCUIT One relay output is available on terminals R1 8 for signalling towards outside peripheral units ...

Page 12: ...IRCUIT Terminals A B 13 and 15 are dedicated for connection of the loudspeaker lines 2 zone version 250W without standby 1 zone version 250W with standby 4 2 6 CONNECTION OF THE STANDBY AMPLIFIER ΊAMPLIFIER CIRCUIT SIDE VIEW TYPICAL CONFIGURATION 1ͳZONE SYSTEM STANDBY ...

Page 13: ...tic circuit breaker is switched OFF 2 Connect the power cable coming from the thermal magnetic circuit breaker and the earth cable to the contacts on the terminal strip A see figure 3 Connect the external terminals B of the batteries observing the correct polarities 4 Switch the thermal magnetic circuit breaker ON 5 Make a jumper between the inside terminals of the batteries using the cable C incl...

Page 14: ...xternal peripheral unit connected to the control inputs that depending on how these are programmed activates the Alarm Status or resets the alarms Manual Emergency LED of the EMERGENCY button steady ON or flashing Procedure of action on the system manual controls by an authorised operator in order to activate emergency sources Operations in the Manual Emergency mode have priority over those activa...

Page 15: ...ge 20 MUSIC MENU BASE LEVEL Main menu for selecting the four VAIE operational levels At this basic level the RESET button is not operational This panel is shown immediately when the system is switched on To go back to the MUSIC Menu press the Music Menu button To select the required item press the relevant key MAIN MENU BASE LEVEL From the MAIN MENU screen press the AUDIO SETTING key to access thi...

Page 16: ...tion Plan PEE For the specific features of the EMERGENCY menu see page 37 CONFIGURATION MENU 3 SYSTEM LEVEL SERVICE MENU 4 SYSTEM LEVEL EMERGENCY MENU 8 USING THE SYSTEM After making all the connections observing the indications provided in the relevant chapter and once the door of the cabinet has been closed the display lights up and shows the panel of the MUSIC Menu from which it is possible by ...

Page 17: ...ON menu and select the item Beep operation C Acquisition of impedances From the CONFIGURATION menu select the item set IMP REFERENCE to access the Zone reference setting screen page From here it is possible to set the reference impedance and the tolerance for controlling the impedance of the loudspeaker lines refer to the point on Impedance acquisition and tolerance setting on page 30 In the Beep ...

Page 18: ... model 1 key unit single zone microphone unit FMD 2001 12 key unit 12 zone microphone unit FMD 2012 Once selected the microphone units click on Edit Key to set the single keys see Point Emergency units page 32 On the System configuration screen page you can set standby amplifier Spare amplifiers standby amplifier add or remove The item Rack amplifiers automatically shows the number of amplifiers p...

Page 19: ...es The default messages Alert Evacuation and Chime are stored in the SD card mounted on the CPU To access the relevant screen select the item set SD CARD INSTALL from the CONFIGURATION menu See page 34 for the relevant activities Battery capacity Press Change to select a value between 18 26 33 or 40 Ah Please see details on page 33 Energy save enabled disabled For enabling disabling the function a...

Page 20: ...cted to the MUSIC input 10 No music No source selected ADJUSTMENT OF THE GENERAL MUSIC VOLUME To adjust the volume move the cursor along the bar A The attenuation value set is visible directly on the display from 0 dB to 70 dB Off The value set is stored for each BGM source selected ADJUSTMENT OF THE MUSIC VOLUME FOR EACH ZONE OUTPUT Press the key of the required zone The Zone X output level bar B...

Page 21: ...ls set SPEECH LEVELS set PAGING LEVELS set MONITOR SPEAKER set CHIME set SPEECH LEVELS Management of the voice sources Relevant items On this screen page the volume il volume of the voice sources connected to the VAIE can be adjusted To change the value indicated move the cursor along the bar next to each source To return to the AUDIO SETTING screen press Escape Eme unit paging Remote emergency un...

Page 22: ...he input sources to be played back while Zone monitor speaker enables one of the output zones to be played back Local microphone call Emergency unit call Music input source Evac message Alert message Speaker monitor off Selectable zones Output on zone X Speaker monitor off set CHIME Management of CHIME input Configuration of the chime input is accessed from this panel Chime configuration Chime set...

Page 23: ...gories of the faulty parts and the status general reporting are shown in the following table Press the required item to access the chosen sub panel and view the details of the fault as illustrated on the following screens To return to the INSPECTION menu press Escape Label Category subject to diagnosis See panel Notes Loudspeaker lines Loudspeaker lines The diagnosis status is reported for each ou...

Page 24: ...anel displays all the data relating to the internal batteries of the VAIE 5500 The equipment carries out testing of the batteries automatically approximately once an hour It is in any case possible to start an immediate test manually by pressing the Test key To return to the INSPECTION menu press Escape report IMPEDANCE Impedance of the lines Panel for checking the impedance values measured in rea...

Page 25: ...r Activation of an automatic emergency page 39 To return to the INSPECTION menu press Escape test FRONT PANEL heck of operation of the visual and acoustic signalling devices Panel for checking operation of the monitor speaker of the display of the touch screen and of the signalling LED for the emergency operations With the exception of the yellow SYS LED which remains OFF all the other LEDs and th...

Page 26: ...n page press Main Menu For details see the table on page 27 Note Upon access to the various panels shown below the touch screen shows the programming status as currently set To change this status move the cursors to the desired positions as indicated in the table and then press Save on the set BACKGROUND TEST panel set BACKGROUND TEST Enabling and disabling of the monitoring tests Panel for enabli...

Page 27: ...es Panel for testing the incoming emergency sources Testing of handheld micro Testing of SD card Testing of EVAC message Testing of ALERT message Testing of emergency units On test enabled Off test disabled Power supplies Power supplies Panel for testing of power supplies Testing of battery charger Testing of mains supply Testing of 24 VDC batteries Testing of GND fault On test enabled Off test di...

Page 28: ...arried out before returning to the basic level that is to say to the MUSIC MENU it is advisable to log out of the system level corresponding to the current menu so as to reset the required password for future accesses and to prevent unauthorised personnel from accessing the advanced functions of the system To do this select Exit Logout from the list in the OPERATOR menu The system returns to its b...

Page 29: ...ain Menu 8 6 CONFIGURATION MENU MANAGEMENT OF ADVANCED SYSTEM FUNCTIONS AND CONFIGURATION CHANGES This option selection menu is for use only by specifically trained personnel authorised to work on advanced system functions and to modify the configuration parameters for system start up and maintenance purposes If a login password was enabled at the time of configuration the following panel will app...

Page 30: ...hen the diagnostic system detects a value beyond the tolerance chosen for the reference value a Fault is activated To return to the CONFIGURATION menu press Escape set 20KHZ LEVELS Setting the test signal level Panel for setting the test signal levels to 20 kHz in the various audio channels Press the Change keys associated with the level to be adjusted and select one of the following options level...

Page 31: ...to the CONFIGURATION menu press Escape set RACK CONFIG Rack configuration This panel contains all the parameters needed for configuring the rack System Emergency messages to broadcasting zones Emergency units Controlled inputs Output Battery charger Note that any changes whatsoever to any of the sub panels illustrated on the following page must be saved by pressing the Save button To return to the...

Page 32: ...d inactive zone Premere Escape per uscire dalla schermata Emergency units Postazioni d emergenza From this panel it is possible to use the sub menus to set the configurations of the emergency units connected to the VAIE 5500 To configure the emergency units press Set unit with keys then press the Change key to select the model Then press Edit key for configuring the keys Use the and keys to pass f...

Page 33: ...ve the screen press Escape Output Relay output Panel for configuring the relay output Activate or de activate On Off the type of event to be associated with the output in question by pressing the appropriate buttons To leave the screen press Escape Charger Battery charger Battery configuration panel By pressing Change it is possible to set The capacity of the battery choose between 18 26 33 or 40 ...

Page 34: ...f the files which have to be copied into the root directory of the SD card Format WAV Resolution 16 bit mono Sampling frequency 48 kHz Filename max 16 characters including the wav extension UOnce the files have been copied onto the SD card fit it back onto the CPU circuit and on the display press the Turn on SD key Check that the red LED lights up again Close the front door of the VAIE 5500 tighte...

Page 35: ...he Password menu panel Press Save to save the change made To return to the CONFIGURATION menu press Escape Beep operation Set the control beep From this screen the acoustic fault conventionally known as a beep can be set Beep enable disable Move the cursor to the On position beep enabled or to the Off position beep not enabled as needed see the N B note below Beep level Adjustment of the beep volu...

Page 36: ...included in the CONFIGURATION menu options Its use is permitted only to those members of the technical service personnel who have appropriate login passwords Enter the 4 digit code of the password this is 4444 by default and press Enter Upon accessing the SERVICE menu press Service Operation ...

Page 37: ...lection an EVAC message always has priority over an ALERT message 3 To end the state of emergency press the EMERGENCY key 5 again 8 7 MANUAL EMERGENCY THE PROCEDURE FOR MANAGING EMERGENCIES IN THE MANUAL MODE TO BE CARRIED OUT BY AN AUTHORISED OPERATOR IS DESCRIBED BELOW 8 7 1 GENERAL INFORMATION The manual emergency mode can be accessed at any time and has priority both over any pre recorded mess...

Page 38: ...nts 2 and 3 above several times 5 To end the state of emergency press EMERGENCY button again 8 7 5 EXIT OF THE SYSTEM FROM MANUAL MANAGEMENT OF AN EMERGENCY At the end of the procedure for managing a Manual Emergency press the red EMERGENCY key which will extinguish and if there is no activation taking place from external peripheral units connected to the controlled input contacts the system will ...

Page 39: ... announcement via the microphone or pre recorded message under way is shown by the red ALARM LED lighting up on the front panel of the VAIE 5500 8 8 4 EXITING FROM AN AUTOMATIC EMERGENCY Exit from an Automatic Emergency takes place when no input contact is active The system will return to the Idle State displaying the MUSIC MENU panel 8 8 3 SYSTEM OPERATION DURING AN AUTOMATIC EMERGENCY As long as...

Page 40: ...ESUMPTION SIGNALLING To cancel the acoustic signalling of a current fault go to the INSPECTION OPERATOR or CONFIGURATION menus press the RESET button briefly to halt the beep To cancel the signalling of the fault of which a report has been stored and that no longer exists operation has been RESUMED there must be no faults under way or the beep must already have been stopped Therefore go to the INS...

Page 41: ...andby for the others 2 zones for 100V lines Load impedance for each zone 40 Load impedance for all zones 20 Emergency controls Controlled inputs CONT IN Output R1 Programmable for normally active or normally inactive state 7 off inputs with diagnostic 1 relay for signalling state of emergency and faults N O N C Exchange state General information Mains power supply 230VAC Consumption 230VAC 230 Vac...

Page 42: ... output 8 3 Indication of fault related to the transmission path to the CIE 8 4 Indication of fault related to voice alarm zone 10 Voice alarm manual control 11 Interface to external control device s 12 Emergency microphone s 13 14 Redundant power amplifier DESCRIPTION Broadcast calls Background music LIST OF OPTIONAL FUNCTIONS LIST OF THE AUXILIARY FUNCTIONS ...

Page 43: ......

Page 44: ...a per segnalazione della condizione d allarme vocale 8 3 Indicazione di guasto relativa ai percorsi di trasmissione 8 4 Indicazione di guasto relativa alle zone d allarme 10 Controllo manuale degli allarmi vocali 11 Interfaccia per dispositivo i di controllo esterno i 12 Microfono i d emergenza 13 14 Amplificatore di riserva Le informazioni contenute in questo manuale sono state scrupolosamente co...

Reviews: