Fayat DYNAPAC DRP20D Operating	 Instruction Download Page 67

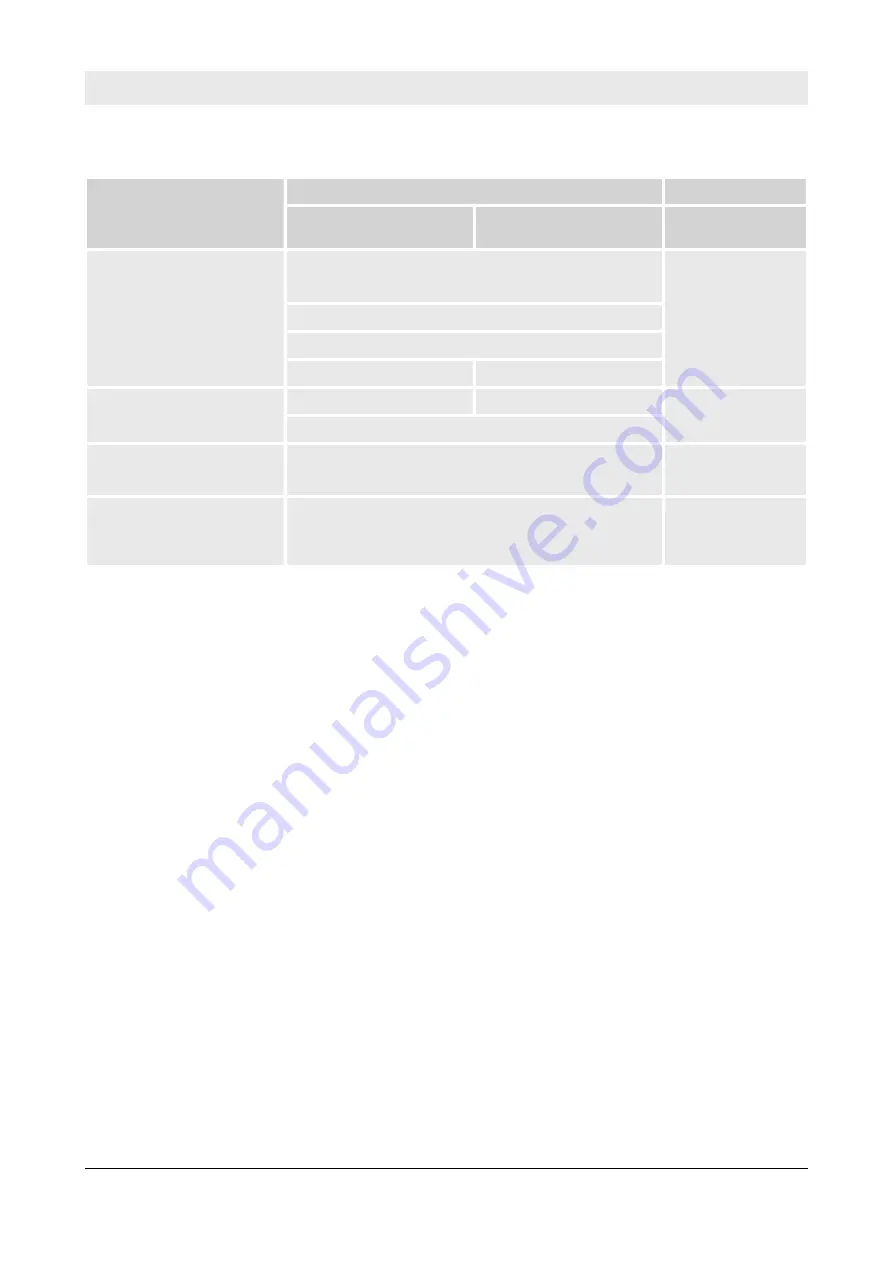
8.4  List of fuels and lubricants

Assembly group

Fuel or lubricant

Filling quantity

Summer

Winter

Observe the level

mark!

Engine oil

SAE 10W-40

Specification:


Ä

 Chapter 8.3.1 ‘Engine oil’ on page 64

0.9 l

(0.24 gal us)

SAE 15W-40

SAE 10W-30

SAE 30

SAE 10W

Fuel

Diesel

Winter diesel fuel

3.0 l

(0.8 gal us)

Specification:


Ä

 Chapter 8.3.2 ‘Fuel’ on page 64

Exciter shaft housing

as engine oil

0.4 l

(0.11 gal us)

Steering rod

Hydraulic oil (ISO), HV 32

Specification:


Ä

 Chapter 8.3.4 ‘Mineral oil based

hydraulic oil’ on page 65

0.4 l

(0.11 gal us)

Maintenance – List of fuels and lubricants


DRP20D


67

Summary of Contents for DYNAPAC DRP20D

Page 1: ...Operating Instruction Maintenance Instruction Original Operating Instructions DRP20D Reversible plate S N 101 924 45 1001 DL8 203 66 EN 12 2019...

Page 2: ...ding toluene and benzene which are known to the State of California to cause cancer and birth defects or other reproductive harm WARNING Breathing diesel engine exhaust exposes you to chemicals known...

Page 3: ...3 Modifications and alterations to the machine 22 3 3 4 Damage defects misuse of safety devices 22 3 4 Handling fuels and lubricants 23 3 4 1 Preliminary remarks 23 3 4 2 Safety regulations and enviro...

Page 4: ...safety notes 62 8 2 Preparations concluding work 63 8 2 1 Opening the protection hood 63 8 3 Fuels and lubricants 64 8 3 1 Engine oil 64 8 3 2 Fuel 64 8 3 3 Oil for exciter shaft housing 65 8 3 4 Mine...

Page 5: ...enings 89 8 10 2 Cleaning the machine 89 8 10 3 Servicing the V belt 90 8 10 4 Checking the oil level in the exciter housing 91 8 10 5 Measures prior to extended shut down period 91 9 Troubleshooting...

Page 6: ...Table of contents DRP20D 6...

Page 7: ...1 Introduction Introduction DRP20D 7...

Page 8: ...maintenance and repair measures to maintain the functional safety of your machine A description of all necessary maintenance work maintenance intervals as well as information on fuels and lubricants...

Page 9: ...constitute an extension of the warranty and liability conditions specified in the general sales and delivery conditions of Dynapac GmbH We wish you successful work with your Dynapac machine Introduct...

Page 10: ...n Germany Ammerl nder Str 93 D 26203 Wardenburg 1 2 B 924 0001 Fig 1 Machine type plate example EMISSION CONTROL INFORMATION MOTORENFABRIK HATZ KG D 94099 RUHSTORF GMBH CO Model S N Power Displ Eng Fa...

Page 11: ...2 Technical data Technical data DRP20D 11...

Page 12: ...30 0 420 16 5 Dimensions in millimetres Dimensions in inch Weights Operating weight CECE 210 463 kg lbs Basic weight 207 456 kg lbs Full engine protection hood optional equipment 10 22 kg lbs Transpor...

Page 13: ...orce 35 7868 kN lbf Amplitude 1 50 0 059 mm in Filling capacities Fuel diesel 3 0 0 8 l gal us 2 1 Noise and vibration data The following noise and vibration data were determined in accord ance with t...

Page 14: ...acc to ISO 3744 and EN 500 2 1 2 Vibration data Vector total of the weighted effective acceleration in three orthog onal directions Total vibration value ahv 2 5 m s2 on crushed rock determined acc t...

Page 15: ...3 Concerning your safety Concerning your safety DRP20D 15...

Page 16: ...n generally accepted safety and road traffic regulations n country state specific safety regulations It is the duty of the operator to be acquainted with the safety regu lations and to apply these ac...

Page 17: ...ctices for safe and environment friendly disposal of fuels and lubricants as well as replacement parts 3 1 3 Personal protective equipment Depending on the work to be carried out personal protective e...

Page 18: ...se This machine must only be used for n Compaction of all types of soils n Repair work on all types of soil n Paving of walkways n Work in trenches n Underfilling and compaction of hard shoulders Inte...

Page 19: ...g and lashing points specified in these instructions must be used It is prohibited to use other lifting and lashing points e g guide handle steering rod 3 1 6 Estimated service life of the machine If...

Page 20: ...regular safety inspections 3 2 2 Expert qualified person An expert qualified person is a person who based on his her pro fessional education and experience has profound knowledge in the field of const...

Page 21: ...perate the machine Persons under the influence of alcohol medication or drugs are not allowed to operate service or repair the machine Maintenance and repair work requires specific knowledge and must...

Page 22: ...be informed about the dangers that arise from the operation of the machine 3 3 2 Regular safety inspections Have the machine inspected by an expert qualified person as required for the conditions the...

Page 23: ...name of substance n possible dangers n composition information on constituents n first aid measures n fire fighting measures n measures in case of accidental release n handling and storage n limitatio...

Page 24: ...fuel Wear your personal protective equipment pro tective gloves protective clothing Do not inhale any fuel fumes Avoid contact CAUTION Danger of slipping on spilled diesel fuel Immediately bind spill...

Page 25: ...aused by contact with oil Wear your personal protective equipment pro tective gloves protective clothing Do not inhale any oil vapours Avoid contact CAUTION Danger of slipping on spilled oil Immediate...

Page 26: ...ntact with hot components Smoking and open fire is prohibited Wear your personal protective equipment pro tective gloves protective clothing CAUTION Health hazard caused by contact with hydraulic oil...

Page 27: ...ne components Secure the machine on the transport vehicle against rolling slip ping and turning over Loads must only be attached and hoisted by an expert capable person Use only lifting gear and lifti...

Page 28: ...ed visual inspections and func tion tests If the following tests reveal damages or other faults the machine must not be operated until these deficiencies have been corrected Do not operate the machine...

Page 29: ...gainst solid objects For backward travel guide the machine using the handle from the side Watch out for unusual noises and development of smoke Perform trouble shooting and have the fault corrected Al...

Page 30: ...d by the static charging than diesel fuel with a higher sulphur content Apply measures against electrostatic charging Do not spill any fuel Collect leaking fuel do not let it seep into the ground Wipe...

Page 31: ...rs and other oil contaminated materials in a sepa rate specially marked container and dispose of environmentally 3 9 3 Cleaning work Do not perform cleaning work while the motor is running Allow the e...

Page 32: ...been repaired When replacing safety relevant components only original spare parts must be used Repairs must only be performed by an expert qualified person When performing welding work on the machine...

Page 33: ...nt cada semana twice annual halbj hrlich tous les 6 mois cada 6 meses annual 250 h j hrlich 250 h annuellement 250 h anualmente 250 h DIESEL if available falls vorhanden si existant si est disponible...

Page 34: ...Follow operating instructions Information sticker Lashing point Information sticker Lifting point Information sticker Guaranteed sound capacity level Fig 8 Fig 9 Fig 10 Fig 11 Concerning your safety S...

Page 35: ...iebnahme avant la mise en service anterior a la puesta en servicio weekly w chentlich hebdomadairement cada semana twice annual halbj hrlich tous les 6 mois cada 6 meses annual 250 h j hrlich 250 h an...

Page 36: ...ning sticker Starter rope Made by Designation Type Nominal Power Operating Mass Year of Construction Serial No Made in Germany Ammerl nder Str 93 D 26203 Wardenburg B 924 0002 Fig 16 Fig 17 Concerning...

Page 37: ...3 12 Safety components 2 4 3 1 B 695 0046 Fig 18 1 Protection hood optional equipment 2 Heat protection cover 3 Belt guard 4 Protection hood Concerning your safety Safety components DRP20D 37...

Page 38: ...Concerning your safety Safety components DRP20D 38...

Page 39: ...4 Indicators and control elements Indicators and control elements DRP20D 39...

Page 40: ...2 4 5 3 1 B 695 0021 Fig 19 1 Recoil starter 2 Handle 3 Throttle lever 4 Locking pawl lever 5 Steering rod height adjustment Indicators and control elements DRP20D 40...

Page 41: ...5 Checks prior to start up Checks prior to start up DRP20D 41...

Page 42: ...regulations and environmental protec tion regulations must be followed when han dling fuels and lubricants Chapter 3 4 Han dling fuels and lubricants on page 23 WARNING Danger of injury caused by rota...

Page 43: ...and fuel lines and for leaks 2 Check the bolted connections are tight and secure 3 Check the machine for contamination and damage 4 Check the hydraulic oil cooler for dirt 5 Check the starter rope for...

Page 44: ...il dipstick 2 Pull out the dipstick and wipe it clean with a lint free clean cloth 3 Insert the dipstick and pull it out again to check the oil level The oil level must be between the MIN and MAX mark...

Page 45: ...se only fuel of the permitted specification Chapter 8 3 2 Fuel on page 64 Protective equipment n Working clothes n Safety shoes n Protective gloves 1 Clean the area around the filling port 2 Remove th...

Page 46: ...machine safely Chapter 6 4 Parking the machine in secured condition on page 53 2 Allow the engine to cool down 3 Check all rubber buffers for tight fit cracks and tear offs 4 Replace damaged rubber bu...

Page 47: ...6 Operation Operation DRP20D 47...

Page 48: ...down the steering rod Do not click the locking pawl lever into posi tion again The steering rod must be able to swing freely 2 Adjust the steering rod with the height adjustment 1 to the required heig...

Page 49: ...on when working in trenches WARNING Loss of hearing caused by too high noise bur dens Wear your personal protective equipment ear protection Protective equipment n Hearing protection n Working clothes...

Page 50: ...starter rope all the way against the end stop Pull the starter handle quickly and with power 7 Manually guide the starter handle back to initial position 8 If the engine does not start during the firs...

Page 51: ...caused by uncontrolled machine movement Always hold on to a running machine Always keep an eye on a running machine Protective equipment n Hearing protection n Working clothes n Safety shoes 1 Make s...

Page 52: ...ruptions you should always return the throttle lever to MIN position idle speed Vibration is switched off 7 For short work interruptions you should always park the machine in secured condition Chapter...

Page 53: ...sition MIN idle speed Vibration is shut down 3 NOTICE Danger of engine damage Do not shut down the engine all of a sudden from full load speed but let it idle for about two minutes Set the throttle le...

Page 54: ...Operation Parking the machine in secured condition DRP20D 54...

Page 55: ...7 Loading transporting the machine Loading transporting the machine DRP20D 55...

Page 56: ...e specified loading direction Lifting tackle must not be damaged by machine parts When lifting the machine make sure the load does not move in an uncontrolled way If necessary hold the load steady wit...

Page 57: ...ds Do not step or stand under suspended loads Lift the machine carefully and set down again at the intended location A B B 695 0024 Fig 40 A Machine with standard protection hood B Machine with full e...

Page 58: ...ust not be damaged by machine parts Protective equipment n Working clothes n Safety shoes n Protective gloves 1 Pull at least two suitable lashing belts crosswise across the marked lashing point 2 Las...

Page 59: ...2 Move the steering rod to an upright position and engage the locking pawl lever securely 3 Remove the split pin and pull the transport wheels out of the holding fixture on the steering rod 4 Stand t...

Page 60: ...stall the second transport wheel on the opposite side and secure it with the split pin 8 Fold down the steering rod and engage the locking pawl lever 1 securely The machine can now be moved B 692 0032...

Page 61: ...8 Maintenance Maintenance DRP20D 61...

Page 62: ...personal protective equipment Do not touch hot components Park the machine on horizontal level firm ground Perform maintenance work only with the engine shut down Make sure that the engine cannot be...

Page 63: ...this work close all maintenance flaps and doors again and return all components to their operating condition 8 2 1 Opening the protection hood 1 2 1 2 2 A B B 692 0035 Fig 48 A Standard protection ho...

Page 64: ...adversely affects the properties of the engine oil especially at low ambient temperatures Optimal operating conditions can be achieved by using the oil vis cosity chart as reference 8 3 1 3 Oil change...

Page 65: ...s in refuelling systems and fuel lines are not permitted Copper containing materials copper lines brass items should be avoided because they can cause catalytic reactions in the fuel with subsequent d...

Page 66: ...The viscosity index must be at least 150 observe information of manufacturer Maintenance Fuels and lubricants DRP20D 66...

Page 67: ...age 64 0 9 l 0 24 gal us SAE 15W 40 SAE 10W 30 SAE 30 SAE 10W Fuel Diesel Winter diesel fuel 3 0 l 0 8 gal us Specification Chapter 8 3 2 Fuel on page 64 Exciter shaft housing as engine oil 0 4 l 0 11...

Page 68: ...arance adjust if necessary Chapter 8 8 6 Checking adjusting the valve clearance on page 79 3 Check engine and machine for leaks 4 Retighten the fastening screws on air filter exhaust and other attachm...

Page 69: ...76 8 8 5 Replacing the V belt 77 8 8 6 Checking adjusting the valve clearance 79 8 8 7 Replacing the starter rope 81 8 8 8 Checking the hydraulic oil level 83 Every 2 years every 500 operating hours...

Page 70: ...se a damaged air filter ele ment If in doubt use a new air filter Protective equipment n Working clothes n Safety shoes n Protective gloves n Safety goggles 1 Park the machine safely Chapter 6 4 Parki...

Page 71: ...by moving the gun up and down inside the element until it is free of dust 8 Examine the air filter with a torch for cracks and holes 9 Replace the air filter if it is damaged 10 Insert the air filter...

Page 72: ...pment n Working clothes n Safety shoes n Protective gloves 1 Park the machine safely Chapter 6 4 Parking the machine in secured condition on page 53 2 Place the transparent container under the drain p...

Page 73: ...ition Chapter 6 4 Parking the machine in secured condition on page 53 2 Clean the area around the dipstick and pull the dipstick out 3 Clean the area around the drain plug 4 WARNING Danger of burning...

Page 74: ...ghtening the screw 1 make sure that the tensioning springs touch the oil filter with both ends 12 Tighten the screw 13 Fill in new engine oil 14 After a short test run check the oil level on the dipst...

Page 75: ...opposite side and secure it properly NOTICE Components may get damaged Do not use low ash engine oils for the exciter shaft housing 8 Fill in new oil 9 Stand the machine horizontally and check the oil...

Page 76: ...he air filter 8 Insert the air filter 1 carefully into the filter housing and fasten it with the knurled nut 2 9 NOTICE Danger of engine damage Ensure correct fit of air filter cover and seal Close th...

Page 77: ...ly friendly way 8 8 5 Replacing the V belt Protective equipment n Working clothes n Safety shoes n Protective gloves 1 Park the machine safely Chapter 6 4 Parking the machine in secured condition on p...

Page 78: ...chine movement Always hold on to a running machine Always keep an eye on a running machine Protective equipment n Working clothes n Hearing protection n Safety shoes Tool n Sirometer 1 Park the machin...

Page 79: ...rvice Before checking the valve clearance let the engine cool down Protective equipment n Working clothes n Protective gloves 1 Park the machine in secured condition Chapter 6 4 Parking the machine in...

Page 80: ...valve is fully open 4 Check the valve clearance on the exhaust valve adjust if necessary 1 Loosen screw 3 on the rocker arm 2 Adjust the hexagon nut 2 until the feeler gauge 1 can be inserted and pul...

Page 81: ...rking the machine in secured condition on page 53 2 Allow the engine to cool down 3 Unscrew the fastening screws 1 and disassemble the recoil starter 2 4 Pull the starter rope with the starter handle...

Page 82: ...in the coil 10 CAUTION Danger of injury caused by the starter handle hitting against your body Do not let the starter handle hit back Slowly guide the starter handle back to initial position 11 Pull t...

Page 83: ...chine in secured condition on page 53 2 Move the steering rod to an upright position and engage the locking pawl lever securely 3 Clean the area around the oil level inspection plug and unscrew the pl...

Page 84: ...e permitted specification 6 Clean the area around the filler plug and unscrew the filler plug 7 Press the handle forward against the stop and secure it in this position using suitable means B 695 0014...

Page 85: ...cloth underneath the filler bore to collect leaking oil 12 Fill in oil through the filler bore until it starts to run out through the level inspection bore 13 Retighten the filler and level inspection...

Page 86: ...ine in secured condition on page 53 2 Move the steering rod to an upright position and engage the locking pawl lever securely 3 Clean the area around the filler plug and unscrew the filler plug 4 Pres...

Page 87: ...ing oil NOTICE Components may get damaged Use only oil of the permitted specification 9 Fill in oil through the filler bore until it starts to run out through the level inspection bore 10 Slacken the...

Page 88: ...Retighten the filler and level inspection plugs 14 Pull the locking pawl lever 1 and fold down the steering rod 15 Dispose of oil in line with environmental regulations HV 32 B 695 0017 Fig 99 1 B 69...

Page 89: ...ear your personal protective equipment safety gloves protective working clothes goggles Blow out the cooling fins and cooling air intake openings with compressed air 5 In case of damp or oily contamin...

Page 90: ...gine to cool down 3 Unscrew the V belt guard 1 4 Check condition and tension of V belt Compression measurement 5 15 mm 0 2 0 6 in 5 The V belt cannot be re tightened Replace the V belt if it is damage...

Page 91: ...k the oil level top up if necessary Nominal value Bottom edge of filling drain bore 7 Clean the bleed screw and filling drain plug and screw them in with a low strength sealing agent e g spare parts n...

Page 92: ...Replace the air filter 3 Change the engine oil and clean the oil filter 4 Check cables hoses and lines for cracks and leaks 5 Check the service life of hydraulic hoses and replace if nec essary 6 Star...

Page 93: ...9 Troubleshooting Troubleshooting DRP20D 93...

Page 94: ...ce Whenever a fault occurs you should therefore thoroughly read these instructions on correct operation and maintenance If you cannot locate the cause of a fault or rectify it yourself by fol lowing t...

Page 95: ...ension of the spring Check the pre tension of the spring adjust if necessary Spring broken Replace the recoil starter Engine ignites but does not run Fuel filter clogged Check the fuel filter replace...

Page 96: ...Cleaning the cooling fins and the cooling air intake openings Check air guide plates and ducts for com pleteness and good sealing Engine runs with high speed but no vibration Centrifugal clutch defec...

Page 97: ...Protective equipment n Working clothes n Safety shoes n Protective gloves 1 Park the machine safely Chapter 6 4 Parking the machine in secured condition on page 53 2 Press the handle forward against t...

Page 98: ...Troubleshooting Malfunctions during operation DRP20D 98...

Page 99: ...10 Disposal Disposal DRP20D 99...

Page 100: ...cycling company WARNING Health hazard caused by fuels and lubricants Safety regulations and environmental protec tion regulations must be followed when han dling fuels and lubricants Chapter 3 4 Han d...

Page 101: ......

Page 102: ......

Reviews: