Fayat Group DYNAPAC CA5000 Instruction Manual Download Page 143

Maintenance - 1000h

4812158701_G.pdf

2019-10-01

Maintenance - 1000h

Performed after 1000 operating hours (each year)

Park the roller on a level surface.
The engine must be switched off and the
parking brake activated when checking or
adjusting the roller, unless otherwise specified.

Park the roller on a level surface.
The engine must be switched off and the
parking brake activated when checking or
adjusting the roller, unless otherwise specified.

Ensure that there is good ventilation (air
extraction) if the engine is run indoors. Risk of
carbon monoxide poisoning.

Ensure that there is good ventilation (air
extraction) if the engine is run indoors. Risk of
carbon monoxide poisoning.

Hydraulic filter - Replacement

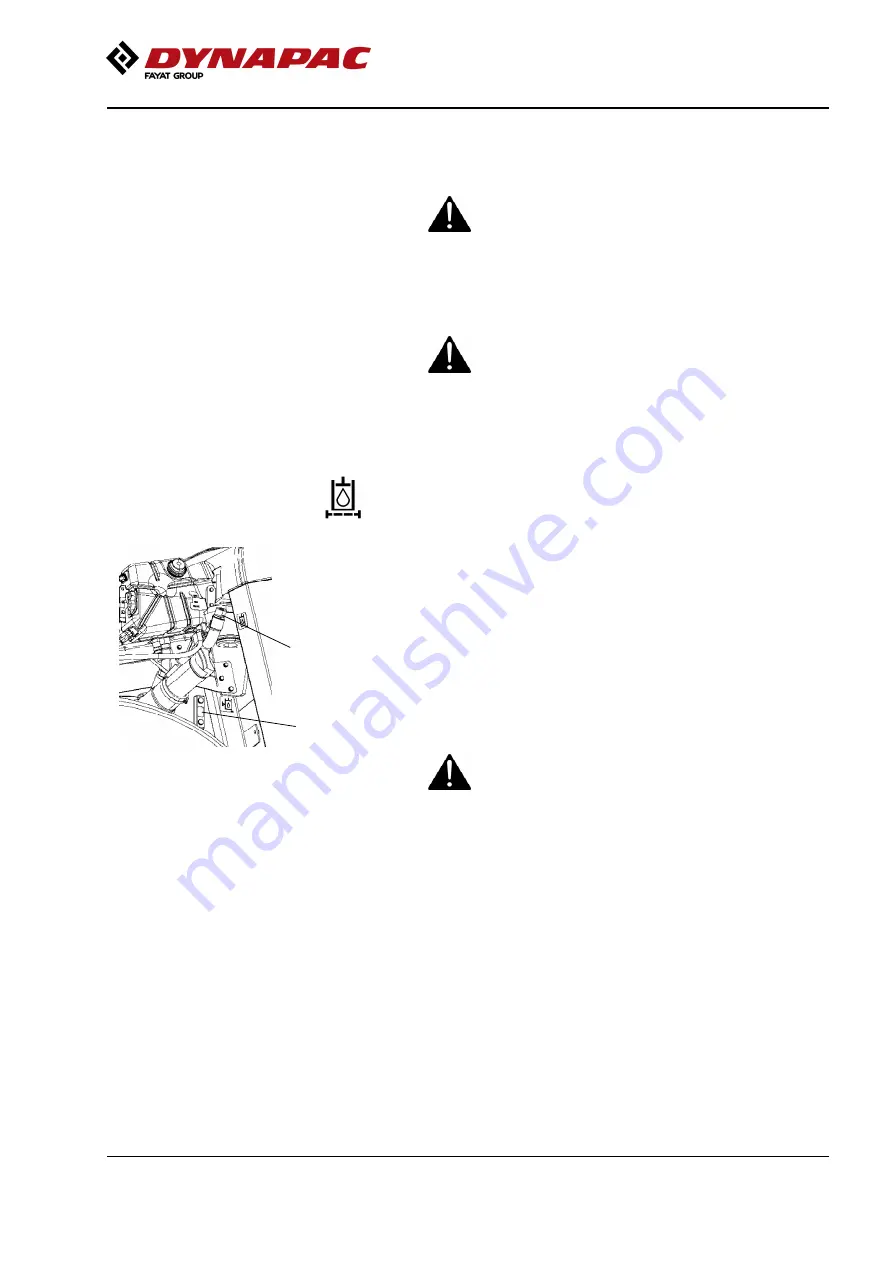
Fig. Hydraulic reservoir
     2. Filler cap/Bleeding filter
     3. Sight glass

2

3

Undo the filler cap/bleeder filter (2) on top of the
reservoir so that over-pressure inside the reservoir can
be eliminated.

Make sure that the bleeding filter (2) is not clogged, air
must have unobstructed passage through the cap in
both directions.

If passage in either direction is blocked, clean the filter
with a little diesel oil and blow through with
compressed air until the block is removed, or replace
the cap with a new one.

Wear protective goggles when working with
compressed air.

Wear protective goggles when working with
compressed air.

131

Summary of Contents for DYNAPAC CA5000

Page 1: ...Serial number Serial number 10000129xxA007868 023452 10000129xxA007868 023452 10000130xxA008183 022291 10000130xxA008183 022291 10000131xxA007867 023318 10000131xxA007867 023318 10000132xxA008433 0223...

Page 2: ......

Page 3: ...Optional 9 Air conditioning 9 Special instructions 11 Standard lubricants and other recommended oils and fluids 11 Higher ambient temperatures above 40 C 104 F 11 Temperatures 11 High pressure cleanin...

Page 4: ...system 25 Propulsion system Transmission 25 Brake system 26 Steering system 26 Vibration system 26 Cab 26 FOPS and ROPS 26 Identification 27 Product and component plates 27 Product identification num...

Page 5: ...ls cab 49 Function description of instruments and controls in the cab 50 Using the cab controls 51 Defroster 51 Heat 51 AC ACC 51 ACC Control panel 52 Main display screen 52 ACC Operation menus 52 Ele...

Page 6: ...with speed limiter speed potentiometer Optional 67 Slopes 68 Machine with TC Anti Spin 69 Slopes TC Anti Spin 69 Interlock Emergency stop Parking brake Check 70 Burnout of DPF filter IIIB T4i 71 DPF...

Page 7: ...ll weather 82 Miscellaneous 83 Lifting 83 Locking the articulation 83 Lifting the roller 84 Lifting the roller with jack 84 Unlocking the articulation 85 Towing Recovering 85 Short distance towing wit...

Page 8: ...operation 100 Every 1000 hours of operation 101 Every 2000 hours of operation 102 Every other year 103 Service Checklist 104 Maintenance 10h 105 Scrapers Check adjustment 105 Scrapers Pad drum 106 Sc...

Page 9: ...and fastening screws Check 120 Battery Check condition 121 Air conditioning Optional Inspection 121 Automatic Climate Control Optional Inspection 122 Maintenance measures 500 h 123 Drum cartridge Chec...

Page 10: ...ge 136 Rear axle planetary gear Oil change 136 Drum gearbox Oil change 137 Radiator Check Cleaning 137 Fuel pre filter Replacement 138 Replacing the fuel filter 138 Diesel engine Oil and Filter change...

Page 11: ...Oil change 149 Radiator Check Cleaning 150 Fuel pre filter Replacement 150 Replacing the fuel filter 151 Diesel engine Oil and Filter change 152 Seat bearing Lubrication 153 Hydraulic reservoir Drain...

Page 12: ...e 4812158701_G pdf 2019 10 01...

Page 13: ...can result in life threatening or serious injury if the warning is ignored CAUTION Marks a danger or hazardous procedure that can result in damage to the machine or property if the warning is ignored...

Page 14: ...e carrying out any maintenance Ensure good ventilation extraction of air by fan where the engine is run indoors Ensure good ventilation extraction of air by fan where the engine is run indoors CALIFOR...

Page 15: ...t by the engine supplier s certified personnel Specific maintenance and checks on diesel engines must be carried out by the engine supplier s certified personnel If the roller is equipped with a Step...

Page 16: ...Introduction 4812158701_G pdf 2019 10 01 4...

Page 17: ...like as well as on poor ground conditions that jeopardizes the bearing strength and capacity to support the roller Never operate with roller outside the edge if the substrate does not have full bearin...

Page 18: ...he fluid is cold See instructions in the STOP section Avoid using the roller before the hydraulic fluid has reached its normal working temperature Braking distances can be longer than normal when the...

Page 19: ...edge if the substrate does not have full bearing strength or is close to a slope Never operate with roller outside the edge if the substrate does not have full bearing strength or is close to a slope...

Page 20: ...ear window To exit the cab in an emergency release the hammer on the rear right post and break the rear window Dynapac always recommends mounted ROPS Roll Over Protective Structure or a ROPS approved...

Page 21: ...n result in serious personal injury Do not disconnect or undo the hose couplings The cooling system is pressurized Incorrect handling can result in serious personal injury Do not disconnect or undo th...

Page 22: ...Safety Optional 4812158701_G pdf 2019 10 01 10...

Page 23: ...additional equipment such as noise suppression may need to be more carefully monitored in the higher temperature ranges High pressure cleaning Do not spray directly onto electrical components Do not u...

Page 24: ...ny welding or drilling in the structure or cab If the machine is fitted with a Roll Over Protective Structure ROPS or ROPS approved cab never carry out any welding or drilling in the structure or cab...

Page 25: ...tery A spark can ignite the oxy hydrogen gas formed around the battery Check that the battery used for jump starting has the same voltage as the dead battery Check that the battery used for jump start...

Page 26: ...Special instructions 4812158701_G pdf 2019 10 01 14...

Page 27: ...ith the operational cycle described in EU directive 2000 14 EC on machines equipped for the EU market on soft polymer material with vibration switched on and the operator s seat in the transport posit...

Page 28: ...36 60 5 CA5000 1536 60 5 CA5500 CA6000 CA6500 1546 60 9 CA5500 CA6000 CA6500 1546 60 9 D Diameter drum PD 1518 59 8 D Diameter drum PD 1518 59 8 S Thickness drum amplitude Nominal D S Thickness drum a...

Page 29: ...Width tractor section 2130 84 O1 Overhang left frame side O1 Overhang left frame side CA5000 CA5500 CA6000 105 4 1 CA5000 CA5500 CA6000 105 4 1 CA6500 125 4 9 CA6500 125 4 9 O2 Overhang right frame s...

Page 30: ...s 42 600 43 000 CA6000PD kg 19 100 19 300 CA6000PD kg 19 100 19 300 lbs 42 100 42 600 lbs 42 100 42 600 CA6500D kg 20 700 20 900 CA6500D kg 20 700 20 900 lbs 45 600 46 100 lbs 45 600 46 100 CA6500PD k...

Page 31: ...2 1 1 0 mm CA6500D PD VM3 VP3 class 2 1 1 0 mm 0 08 0 04 in 0 08 0 04 in Vibration frequency High amplitude Low amplitude Vibration frequency High amplitude Low amplitude CA5000 6500D PD 29 30 Hz CA50...

Page 32: ...mph 11 7 11 5 7 Climbing capacity theoretical without vibration 56 58 Climbing capacity theoretical without vibration 56 58 Propulsion CA5500 D PD Propulsion CA5500 D PD ATC AntiSpin ATC AntiSpin Spe...

Page 33: ...mph 11 7 11 5 7 Climbing capacity theoretical without vibration 49 46 Climbing capacity theoretical without vibration 49 46 Propulsion CA6500 D PD Propulsion CA6500 D PD ATC AntiSpin ATC AntiSpin Spe...

Page 34: ...EAT require the use of Ultra Low Sulphur Diesel ULSD fuel which has a sulphur content of 15 ppm parts per million or less A higher sulphur content will cause operating problems and jeopardise the ser...

Page 35: ...bration system 42 Control systems 20 Control systems 20 Brake release 1 7 Brake release 1 7 Hydraulic fan system 19 Hydraulic fan system 19 Air Conditioning Automatic Climate Control ACC Optional The...

Page 36: ...0 470 520 560 620 M22 446 497 626 699 752 839 M22 446 497 626 699 752 839 M24 570 640 800 900 960 1080 M24 570 640 800 900 960 1080 M30 1130 1260 1580 1770 1900 2100 M30 1130 1260 1580 1770 1900 2100...

Page 37: ...out When the engine is running particles are collected in the DPF and the particles have be burned away in order to clean the filter During the burnout regeneration process the exhaust gas temperature...

Page 38: ...ydrostatic system in which a hydraulic motor drives the eccentric shaft which generates the drum s vibrations High amplitude or low amplitude are determined by the hydraulic motor s direction of rotat...

Page 39: ...tion Number PIN model type designation 2 Engine plate Type description product and serial numbers 2 Engine plate Type description product and serial numbers 3 Cab ROPS plate Certification product and...

Page 40: ...pe of machine the PIN product identification number serial number service weight engine power and year of manufacture If the machine is delivered outside the EU there are no CE markings and on some ma...

Page 41: ...ngine 1 Engine plate The plates specify the type of engine serial number and the engine specification Please specify the engine serial number when ordering spares Refer also to the engine manual On ce...

Page 42: ...700792772 6 Warning Ballasted tires 4700903985 17 Diesel fuel 4700991658 4811000345 6 Warning Ballasted tires 4700903985 17 Diesel fuel 4700991658 4811000345 7 Warning Locking 4700908229 4812125363 18...

Page 43: ...23 Warning Rotating engine components Keep your hands at a safe distance 4700903424 Warning Hot surfaces in the engine compartment Keep your hands at a safe distance 4700903459 Warning Instruction man...

Page 44: ...cription 4812158701_G pdf 2019 10 01 4812125363 Warning Locking The articulation must be locked during transport and lifting but be open during operation Read the instruction manual 4700903590 Emergen...

Page 45: ...tment Master switch Hoisting plate Handbook compartment Master switch Hydraulic fluid Biological hydraulic fluid Securing point Hydraulic fluid Biological hydraulic fluid Securing point Tire pressure...

Page 46: ...h Dip 6 Strike off blade Down 18 Increase in frequency 30 Burnout delay DPF Filter 6 Strike off blade Down 18 Increase in frequency 30 Burnout delay DPF Filter 7 Central warning indicator 19 Reduction...

Page 47: ...rations second push will stop vibrations 4 Vibration on off First push will start vibrations second push will stop vibrations 5 Strike off blade up Optional Raises the strike off blade when Strike off...

Page 48: ...uency decrease Optional Decreases vibration frequency 19 Frequency decrease Optional Decreases vibration frequency 20 Working lights Optional By activating the working lights will turn ON 20 Working l...

Page 49: ...ptional Activate the hazard warning light by depressing the button 26 Hazard indicators Optional Activate the hazard warning light by depressing the button 27 Rotating beacon Optional Activate the rot...

Page 50: ...ht that goes out after 2 min DPF regeneration delayed Flashes yellow at approx 1 Hz once every second DPF regeneration delayed Flashes yellow at approx 1 Hz once every second DPF regeneration required...

Page 51: ...e until the Diesel engine is started or an active screen choice is made via the function buttons below the display Fig Main screen Working screen If the engine is started before any active screen choi...

Page 52: ...he main menu Exit Return button returns 1 step at once Pressing the button approx 2 sec displays the main menu again Exit Return button returns 1 step at once Pressing the button approx 2 sec displays...

Page 53: ...ngine functions The message which consists of an SPN and FMI code can be interpreted via the engine supplier error code list The alarm message shown is acknowledged by pressing the OK button on the di...

Page 54: ...fluid temperature coldl If the symbol is displayed the hydraulic oil is cold and the speed cannot be increased until the oil has reached 0 C 32 F The maximum speed cannot be used between 0 C 32 F and...

Page 55: ...tion frequency meter Supervision only active if Adjustable frequency or ECO available Optional 8 Power group 1 see Fuse 3 8 Power group 1 see Fuse 3 9 Power group 2 see Fuse 4 9 Power group 2 see Fuse...

Page 56: ...e user and machine settings access the service menu for calibration purposes special service personnel only requires pin code and to see the version of installed software USER SETTINGS Users can chang...

Page 57: ...9 10 01 SERVICE MENU The service menu is also accessible via the main menu for adjustments and to display the diesel particle filter s DPF soot and ash levels DPF status ADJUSTMENTS TESTMODES Installa...

Page 58: ...e move the joystick fully forward F and press in both black buttons on the top of the joystick See also manual W3025 Continue in the same way with the other positions for the joystick N R and the spee...

Page 59: ...be set before it is possible to start the machine Conditions that must be set Activated P brake Selector lever in neutral Speed selector for diesel engine in low Low idling not all models Operator he...

Page 60: ...splay of alarm see table for information High amplitude Low amplitude Strike off blade Vibration is enabled in the operating position Automatic vibration control If the function is activated via the r...

Page 61: ...achine description 4812158701_G pdf 2019 10 01 Instruments and controls cab Fig Right rear cab post 15 Hammer for emergency exit ACC Heater AC 10 14 Radio CD 8 9 15 1 2 3 4 5 6 7 Fig Cab roof front 49...

Page 62: ...ate the front screen wiper 5 Front wiper switch Press to operate the front screen wiper 6 Rear wiper switch Press to operate the rear screen wiper 6 Rear wiper switch Press to operate the rear screen...

Page 63: ...d if necessary turn down the heat and fan speed AC ACC NOTE When using AC ACC all the windows must be closed for the system to work efficiently To quickly reduce the temperature in the cab adjust the...

Page 64: ...2 Mode Displays the mode Automatic Heat Cool and Defrost 3 Temperature Set point Displays current inside set point temperature 4 Blower speed Displays current blower speed setting ACC Operation menus...

Page 65: ...s turned off while warming Heat is selected Heat Interior temperature warms up with the electronic heater valve A C compressor is turned off while warming Heat is selected Defrost When defrosting Defr...

Page 66: ...t will be turned off the blower will run at 15 the heater valve will be fully opened and the air circulation will switch to fresh air until the after coil temperature is above 20 C 78 F When the after...

Page 67: ...ing I O board display 5A 10 Reserve Diesel engine 10A 3 ECU PWR1 Speed Frequency sensor 10A 11 12V outlet Radio CD 10A 3 ECU PWR1 Speed Frequency sensor 10A 11 12V outlet Radio CD 10A 4 ECU PWR2 Forwa...

Page 68: ...master switch Is the machine equipped with Deutz engine IIIA T3 there is a starter relay 5 and a grid heater relay 6 on the plate at the diesel engine control unit ECM box 5 6 5 Starter relay 50A 6 G...

Page 69: ...s 10A 2 Windscreen wiper washers 10A 3 Cab fan 15A 3 Cab fan 15A 4 Reserve 4 Reserve 5 Reserve 5 Reserve 6 Reserve 6 Reserve 7 Dyn lyzer 7 5A 7 Dyn lyzer 7 5A 8 Reserve 8 Reserve The electrical system...

Page 70: ...Machine description 4812158701_G pdf 2019 10 01 58...

Page 71: ...connected if necessary The cover must be unlocked when operating so that the battery can be quickly disconnected if necessary 1 2 3 4 Fig Operator s seat 1 Lock pack Length adjustment 2 Weight adjustm...

Page 72: ...3 Wheel seat cushion inclination 4 Wheel backrest inclination 5 Wheel armrest inclination 6 Wheel lumbar support adjustment Adjust the operator s seat so that the position is comfortable and so that...

Page 73: ...new position To adjust the operator s seat see the section for basic comfort seat Adjust all settings when the machine is stationary Adjust all settings when the machine is stationary Always ensure t...

Page 74: ...perations Turn the ignition key 1 to position I the start screen will be shown in display 4 5 3 Fig Status image 3 Fuel level 4 Hourmeter 5 Voltmeter Check that the voltmeter 5 reads at least 24 volts...

Page 75: ...2 ROPS structure 3 Rubber element 4 Anti slip If a ROPS 2 Roll Over Protective Structure or a cab is fitted to the roller always wear the seat belt 1 provided and wear a protective helmet Replace the...

Page 76: ...4812158701_G pdf 2019 10 01 View Fig view Before starting make sure that the view forwards and backwards is unobstructed All cab windows should be clean and the rear view mirrors should be correctly a...

Page 77: ...t temperature is below 10 C 50 F it must be warmed up at idle low speed until the hydraulic oil temperature exceeds 10 C 50 F Ensue that there is good ventilation air extraction if the engine is run i...

Page 78: ...irements If the machine is only to be transported MID or ECO should be selected instead Check that the steering is working correctly by turning the steering wheel once to the right and once to the lef...

Page 79: ...mph Wheelspin 7 km h 4 5 mph Wheelspin 7 km h 4 5 mph Tortoise 4 5 km h 3 mph Tortoise 4 5 km h 3 mph Carefully move the forward reverse lever 2 forwards or backwards depending on which direction of t...

Page 80: ...uck select the gear position that is most suitable for the situation using the gear position switch Drum slipping select Drum spin mode gear position 2 Rear tires slipping select Wheelspin mode gear p...

Page 81: ...Anti Spin is activated or disengaged Carefully move the forward reverse lever 2 forwards or backwards depending on which direction of travel is required Speed increases as the lever is moved away fro...

Page 82: ...g up from the seat when the roller is moving very slowly forwards backwards Check in both directions Hold the steering wheel firmly and brace yourself for a sudden stop A buzzer goes on and after 7 se...

Page 83: ...he machine can be operated as normal or be allowed to idle during this time An image indicating high exhaust temperature 3 is displayed when burnout starts pop up and goes out after 10 seconds An indi...

Page 84: ...ayed due to other engine fault Long beep 114 One of the stipulated requirements is not satisfied and burnout is delayed Engine temperature below 70 C 1Hz Long beep 114 One of the stipulated requiremen...

Page 85: ...ration using the switch 2 on the forward reverse lever In automatic mode AVC vibration is activated when the speed is 1 5 km h 0 9 mph and turns off at a speed of 1 2 km h 0 75 mph Activation of vibra...

Page 86: ...when vibration is in operation Switch the vibration off and wait until vibration stops before changing amplitude By pressing button 1 high amplitude is achieved Seismic Optional Fig Function keys 1 S...

Page 87: ...ed rock and rockfill 24 26 Hz 31 33 Hz Dynapac Compaction Meter DCM including Active Bouncing Control ABC Optional Fig Principal components 1 Display with CMV view 2 Sensor Processor unit 1 2 The Comp...

Page 88: ...e Compaction Meter and after a certain warning time shuts off vibration if the machine is run in double jump bouncing This is to save both machine and material as well as the operator from damages whe...

Page 89: ...y The resulting numerical value is a relative measure of the ground stiffness achieved Operation CMV The Compaction Meter measures the dynamic stiffness of the ground and presents a value based on thi...

Page 90: ...toward past neutral the system switches to a rapid braking Mode and the machine stops Activate normal driving Mode again by moving the forward reverse lever back to neutral Emergency braking 2 1 Fig C...

Page 91: ...s engine running unless the parking brake is activated Never disembark from the machine when the is engine running unless the parking brake is activated Make sure that the roller is parked in a safe p...

Page 92: ...fter the ignition lock has been switched off in order to avoid the engine s electronic control unit ECU sustaining damage Before switching off the battery isolation switch wait for at least 30 seconds...

Page 93: ...Engine Refer to the manufacturer s instructions in the engine manual that is supplied with the roller Battery Dismantle the battery batteries from the machine clean the outside and maintenance charge...

Page 94: ...Long term parking 4812158701_G pdf 2019 10 01 Tires All weather Make sure that tire pressure is 150 170 kPa 1 5 1 7 kp cm 82...

Page 95: ...install the locking dowel 3 in the uppermost locking lug and secure the dowel in position with the locking pin 2 Locking the articulation 1 2 Fig Steering joint lock locked 1 Lock handle 2 Locking dow...

Page 96: ...1 Figure Roller lifted with jack 1 Lifting plate 2 Jack 3 Marking 2 3 Lifting the roller with jack The machine s gross weight is specified on the hoisting plate 1 Refer also to the Technical specific...

Page 97: ...Insert the locking pin 2 to secure the locking dowel 3 Unlocking the articulation 1 2 Fig Steering joint lock open 1 Lock handle 2 Locking dowel Remember to restore the steering joint lock on the stee...

Page 98: ...knob Deactivate the brake with the parking brake knob 2 Move the forward reverse lever forwards or backwards just outside the neutral position If the control is in neutral the brakes are still activa...

Page 99: ...ton The release pump for the brakes is located on the valve block which is positioned in the rear of the engine compartment Press the break release button 3 Pump with the arm 2 until the brakes are re...

Page 100: ...f Reverse the towing preparations according to alternative 1 or 2 in the preceding section Reverse the towing preparations according to alternative 1 or 2 in the preceding section Transport Tie down a...

Page 101: ...he lashings permitted distance interval in meters The lashings permitted distance interval in meters 1 4 Double lashings LC at least 1 7 tonnes 1700 daN STF 300 kg 300daN 1 4 Double lashings LC at lea...

Page 102: ...at least 300 kg 300 daN The lashings are re tightened as required Each of lashings 1 4 is either a double or two single lashings A double lashing runs in a sling through a lashing point or around a ma...

Page 103: ...ing distance will be longer if the hydraulic fluid is cold 12 Test the brakes Remember that the braking distance will be longer if the hydraulic fluid is cold 13 Set the transportation working mode bu...

Page 104: ...Operating instructions Summary 4812158701_G pdf 2019 10 01 92...

Page 105: ...to the customer delivery inspection must be conducted as per the check list in the warranty document Any transport damage must be reported immediately to the transport company as this is not covered b...

Page 106: ...Preventive maintenance 4812158701_G pdf 2019 10 01 94...

Page 107: ...stem 84 liters 22 2 gal Diesel engine Diesel engine Lubricating oil 14 liter 14 8 qts Lubricating oil 14 liter 14 8 qts Coolant without cab 30 liters 31 7 qts Coolant without cab 30 liters 31 7 qts Co...

Page 108: ...manual TRANSMISSION OIL Air temperature 15 C 40 C 5 F 104 F Dynapac Gear oil 300 P N 4812161883 5 liters P N 4812161884 20 liters TRANSMISSION OIL Air temperature 15 C 40 C 5 F 104 F Dynapac Gear oil...

Page 109: ...uts 33 Fresh air filter 7 Bleeding filter 20 Wheel nuts 33 Fresh air filter 8 Hydraulic fluid filter x1 21 Tires pressure 34 Air conditioning 8 Hydraulic fluid filter x1 21 Tires pressure 34 Air condi...

Page 110: ...y 15 hours before First Service 50h For Periodic Service 250h 1000h a Service message is shown in the same way but with the difference that it is shown 30 hours before the Periodic service interval Se...

Page 111: ...servoir 6 Check fluid level in hydraulic reservoir Test the brakes Test the brakes After the FIRST 50 hours of operation Refer to the contents to find the page number of the sections referred to Pos i...

Page 112: ...n drum cartridges 4 Inspect the filter element in the air cleaner Replace as required 4 Inspect the filter element in the air cleaner Replace as required 23 22 Check the oil level in rear axle planeta...

Page 113: ...eplace the fuel filter Refer to the engine manual 3 Replace the fuel filter Refer to the engine manual 3 Replace the fuel pre filter Refer to the engine manual 3 Replace the fuel pre filter Refer to t...

Page 114: ...fuel pre filter Refer to the engine manual 3 Replace the fuel pre filter Refer to the engine manual 29 Lubricate the Forward Reverse lever 29 Lubricate the Forward Reverse lever 2 25 Change the engine...

Page 115: ...ter element in the air cleaner Replace as required 22 Check the oil level in the rear axle s differential 22 Check the oil level in the rear axle s differential 23 Check oil level in rear axle s plane...

Page 116: ...Maintenance 4812158701_G pdf 2019 10 01 Service Checklist 104...

Page 117: ...ation air extraction if the engine is run indoors Risk of carbon monoxide poisoning Scrapers Check adjustment It is important to consider movement of the drum when the machine turns i e the scrapers c...

Page 118: ...r tooth 2 to 25 mm 1 0 in between scraper tooth and drum Center each scraper tooth 2 between the pads Tighten the screws 1 Scrapers Heavy duty Pad drum Fig Scrapers 1 Screws 2 Scraper teeth 1 2 Undo t...

Page 119: ...the engine has free circulation of cooling air through the protective grille in the hood To open the engine hood turn the lock handle 1 upward Raise the hood to its fully open position checking that t...

Page 120: ...in the engine manual Flush the system every other year and change the coolant Make sure also that the air flow through the cooler is unobstructed Flush the system every other year and change the coola...

Page 121: ...ise the service life of the components which can result in engine breakdown Stop the engine Short circuit press the filler gun against a non insulated part of the roller before refuelling and against...

Page 122: ...Maintenance 10h 4812158701_G pdf 2019 10 01 110...

Page 123: ...ood ventilation air extraction if the engine is run indoors Risk of carbon monoxide poisoning Hydraulic filter Replacement Fig Hydraulic reservoir 2 Filler cap Bleeding filter 3 Sight glass 2 3 Undo t...

Page 124: ...on the new filter seal Screw tight the filter by hand First tighten the filter until its seal is in contact with the filter attachment Then turn an additional half revolution Do not tighten the filte...

Page 125: ...ed in the cartridges Repeat the procedure on the opposite side Tires Air pressure Wheel nuts Tightening Fig Wheels 1 Air valve 2 Wheel nut 1 2 Check the tire pressures using a pressure gauge If the ti...

Page 126: ...eering hitch 1 Nut 24mm 1 Nobody must be allowed near the steering joint when the engine is running Risk of being crushed when the steering is operated Switch off the engine and activate the parking b...

Page 127: ...r extraction if the engine is run indoors Risk of carbon monoxide poisoning Ensure that there is good ventilation air extraction if the engine is run indoors Risk of carbon monoxide poisoning Air clea...

Page 128: ...Maintenance 50h 4812158701_G pdf 2019 10 01 116...

Page 129: ...air extraction if the engine is run indoors Risk of carbon monoxide poisoning Drum cartridge Checking the oil level Fig Left drum side 1 Groove 1 Position the roller on a flat surface with the groove...

Page 130: ...ller plug 1 2 1 Never work under the roller when the engine is running Park on a level surface Block the wheels securely Never work under the roller when the engine is running Park on a level surface...

Page 131: ...level if the level is low Use transmission oil See lubrication specification Clean and refit the plug Check the fluid level in the same way on the rear axle s other planetary gear Drum gearbox Checki...

Page 132: ...air Be careful when using a high pressure washer do not place the nozzle too close to the radiator Be careful when using a high pressure washer do not place the nozzle too close to the radiator Wear p...

Page 133: ...t the positive cable first When disconnecting the battery always disconnect the negative cable first When connecting the battery always connect the positive cable first The cable shoes should be clean...

Page 134: ...ubbles are visible through the sight glass this is a sign that the refrigerant level is too low If so stop the unit The unit may be damaged if it is run with insufficient refrigerant Fig Engine compar...

Page 135: ...extraction if the engine is run indoors Risk of carbon monoxide poisoning Drum cartridge Checking the oil level Fig Left drum side 1 Groove 1 Position the roller on a flat surface with the groove 1 o...

Page 136: ...e air cleaner s main filter when the warning lamp on the display lights when the diesel engine is operating at full speed 3 6 4 5 2 Fig Air cleaner 1 Clips 2 Cover 3 Main filter 4 Backup filter 5 Filt...

Page 137: ...leaner Cleaning Wipe clean on both sides of the outlet pipe Outer edge of outlet pipe Inner edge of outlet pipe Wipe clean the inside of the cover 2 and the filter housing 5 See the previous illustrat...

Page 138: ...und at the front or rear of the rear axle At a low level remove the filler plug 2 and top up with oil to the correct level Use transmission oil see lubricant specifications Clean and refit the plug Re...

Page 139: ...raulic fluid cooler 4 Condenser element AC Optional 5 Screws x 2 1 2 3 4 5 5 Check that air can pass unobstructed through the radiators 1 2 and 3 Clean a dirty radiator using compressed air or a high...

Page 140: ...ilter 1 The filter is of the disposable type and cannot be cleaned Han in to environment friendly station Deliver the drain oil to environmentally correct handling Deliver the drain oil to environment...

Page 141: ...erside of the tractor frame and is installed with a hose in the engine Drain the oil when the engine is warm Place a receptacle that holds 19 liters 5 gal under the drain plug Replace the engine oil f...

Page 142: ...nd operated grease gun Clean and grease the chain 3 between the seat and the steering column Also grease the seat slide rails 6 If the chain is slack on the sprocket 2 loosen the screws 4 and move the...

Page 143: ...sure that there is good ventilation air extraction if the engine is run indoors Risk of carbon monoxide poisoning Hydraulic filter Replacement Fig Hydraulic reservoir 2 Filler cap Bleeding filter 3 Si...

Page 144: ...new filter seal Screw tight the filter by hand First tighten the filter until its seal is in contact with the filter attachment Then turn an additional half revolution Do not tighten the filter too ha...

Page 145: ...erfill with oil risk for overheating Do not overfill with oil risk for overheating Now repeat the procedure on the opposite side of the drum Fig Drum 1 Ventilation screw 1 Drum cartridge Cleaning the...

Page 146: ...rt a new filter and refit the air cleaner in the reverse order Check the condition of the dust valve 6 replace if necessary When refitting the cover make sure that the dust valve is positioned downwar...

Page 147: ...previous illustration Wipe also both surfaces for the outlet pipe see adjacent figure Check that the hose clamps between the filter housing and the suction hose are tight and that the hoses are intact...

Page 148: ...er the drain oil to environmentally correct handling Refit the drainage plugs and top up with fresh oil until the correct level is reached Refit the level filler plugs Use transmission oil see Lubrica...

Page 149: ...cooler 3 Hydraulic fluid cooler 4 Condenser element AC Optional 5 Screws x 2 1 2 3 4 5 5 Check that air can pass unobstructed through the radiators 1 2 and 3 Clean a dirty radiator using compressed ai...

Page 150: ...1 The filter is of the disposable type and cannot be cleaned Han in to environment friendly station Deliver the drain oil to environmentally correct handling Deliver the drain oil to environmentally...

Page 151: ...tacle that holds 19 liters 5 gal under the drain plug Replace the engine oil filter 2 at the same time Refer to the engine manual Fig Engine compartment 2 Oil filter 2 Take great care when draining wa...

Page 152: ...olumn forward Tighten the screws and check chain tension No not tension the chain too tightly It should be possible to move the chain about 10 mm 0 4 in to the side with a forefinger thumb at the mark...

Page 153: ...t will gather near the drainage plug 1 Drain as follows Place a container under the plug 1 Loosen the drain plug 1 Then open the drain cock 2 and drain out water and sediment until only pure diesel fu...

Page 154: ...ating Nobody must be allowed near the steering joint when the engine is running Risk of being crushed when the steering is operated Switch off the engine and activate the parking brake before lubricat...

Page 155: ...rain cock 2 Plug 1 2 Obtain a container for collecting the used fluid The container should be able to hold at least 60 liters 16 gal Observe care when draining hot hydraulic fluid Wear protective glov...

Page 156: ...ilter and cannot be cleaned Make sure that the old sealing ring is not left on the filter holder Otherwise this could cause leakage between the new seal and the old one Make sure that the old sealing...

Page 157: ...nd goggles Observe care when draining drum oil hot drum oil Wear protective gloves and goggles Save the oil and hand in to an environment friendly waste disposal station Save the oil and hand in to an...

Page 158: ...a suitable receptacle capacity about 5 0 liters 5 3 qts Refit the drain plug 1 and fill with oil up to the level plug 3 according to Drum gearbox Checking the oil level Use transmission oil according...

Page 159: ...rt a new filter and refit the air cleaner in the reverse order Check the condition of the dust valve 6 replace if necessary When refitting the cover make sure that the dust valve is positioned downwar...

Page 160: ...are intact Inspect the entire hose system all the way to the engine Check that the hose clamps between the filter housing and the suction hose are tight and that the hoses are intact Inspect the entir...

Page 161: ...engine is running Park on a level surface Block the wheels securely Never work under the roller when the engine is running Park on a level surface Block the wheels securely Wipe clean and remove the...

Page 162: ...n using a high pressure washer do not place the nozzle too close to the radiator Be careful when using a high pressure washer do not place the nozzle too close to the radiator Wear protective goggles...

Page 163: ...ironmentally correct handling Refer to the engine manual for detailed instructions when replacing the fuel filter Refer to the engine manual for detailed instructions when replacing the fuel filter St...

Page 164: ...tacle that holds 19 liters 5 gal under the drain plug Replace the engine oil filter 2 at the same time Refer to the engine manual Fig Engine compartment 2 Oil filter 2 Take great care when draining wa...

Page 165: ...olumn forward Tighten the screws and check chain tension No not tension the chain too tightly It should be possible to move the chain about 10 mm 0 4 in to the side with a forefinger thumb at the mark...

Page 166: ...t will gather near the drainage plug 1 Drain as follows Place a container under the plug 1 Loosen the drain plug 1 Then open the drain cock 2 and drain out water and sediment until only pure diesel fu...

Page 167: ...s a sign that the refrigerant level is too low If so stop the unit The unit may be damaged if it is run with insufficient refrigerant Check the moisture indicator 2 It should be blue If it is beige th...

Page 168: ...ating Nobody must be allowed near the steering joint when the engine is running Risk of being crushed when the steering is operated Switch off the engine and activate the parking brake before lubricat...

Page 169: ......

Page 170: ...Dynapac Compaction Equipment AB Box 504 SE 371 23 Karlskrona Sweden www dynapac com...

Reviews: