background image

8

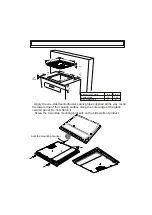
· Screw the 4 worktop mounting brackets on the side walls of product.

· Apply the one-sided self-adhesive sealing tape supplied all the way round
the lower edge of the cooking surface along the outer edge of the glass
ceramic panel. Do not stretch it.

worktop mounting bracket

520mm

590mm

41mm

560mm

490mm

Min.

A

Min.

B

Min.

130mm

Min.

25mm

Neighboorhood walls

A  [mm]

B [mm]

Combustible

60

150

Non-combustible

25

40

Summary of Contents for 4-J INOX

Page 1: ...MK 4 J INOX ...

Page 2: ......

Page 3: ......

Page 4: ...òå ñå ïîä íàäçîð èëè èì áèëå äàäåíè èíñòðóêöèè âî âðñêà ñî óïîòðåáàòà íà óðåäîò íà áåçáåäåí íà èí è äîêîëêó ãè ðàçáèðààò ìîæíèòå îïàñíîñòè Äåöàòà íå ñìåàò äà èãðààò ñî óðåäîò èñòåœåòî è îäðæóâàœåòî íå ñìåàò äà ñå èçâðøóâààò îä äåöà áåç íàäçîð ÏÐÅÄÓÏÐÅÄÓÂÀŒÅ Óðåäîò è íåãîâèòå äîñòàïíè äåëîâè ñå âæåøòóâààò çà âðåìå íà óïîòðåáàòà Òðåáà äà âíèìàâàòå äà íå ãè äîïèðàòå ãðå íèòå åëåìåíòè Äåöàòà ïîìàëè îä...

Page 5: ... îä ñòðàíà íà íåîâëàñòåíè òåõíè àðè ìîæå äà âå äîâåäå âî îïàñíîñò Îïàñíî å äà ãè èçìåíóâàòå èëè ìîäèôèöèðàòå ñïåöèôèêàöèèòå íà óðåäîò íà áèëî êî íà èí Ïðåä èíñòàëàöè àòà îñèãóðåòå ñå äåêà ëîêàëíèòå óñëîâè íà ìðåæàòà âèäîò è ïðèòèñîêîò íà ãàñîò èëè íàïîíîò è ôðåêâåíöè àòà íà ñòðó àòà ñå âî ñîãëàñíîñò ñî áàðàœàòà íà óðåäîò Áàðàœàòà íà îâî óðåä ñå íàçíà åíè íà íåãîâàòà åòèêåòà ÂÍÈÌÀÍÈÅ Îâî óðåä å íàì...

Page 6: ...ïîðåòîò áåç íàäãëåäóâàœå êîãà ãîòâèòå ñî ìàñòè èëè ìàñëà Ìîæå äà ñå çàïàëàò ïðè ãîëåìî çàãðåâàœå Íèêîãàø íå òóðà òå âîäà âðç ïëàìåí ïðåäèçâèêàí îä ìàñëî Ïîêðè òå à òàâàòà ñî íå çèíèîò êàïàê çà äà ãî çàäóøèòå ïëàìåíîò è èñêëó èòå ãî øïîðåòîò Ñåêîãàø ïîñòàâóâà òå ãè òàâèòå âî öåíòàðîò íà ãðå íàòà çîíà è çàâðòåòå ãè ðà êèòå íà áåçáåäíà ïîçèöè à çà äà íå ìîæàò äà ñå çàôàòàò èëè òóðíàò Àêî óðåäîò íå ãî...

Page 7: ......

Page 8: ...520mm 590mm 41mm 560mm 490mm Min 60mm Min 150mm Min 130mm Min 25mm ...

Page 9: ...1 5 mm 380V 3N 5x1 5 mm 400V 3N 5x1 5 mm 415V 3N Поврзувањето на кабелот за напојување може да се разликува во зависност од видот на кутијата со терминалот Декларација за усогласеност Изјавуваме дека нашите производи ги исполнуваат применливите европски директиви решенија и одредби како и побарувањата наведени во посочените стандарди 32A ...

Page 10: ......

Page 11: ......

Page 12: ......

Page 13: ......

Page 14: ......

Page 15: ......

Page 16: ......

Page 17: ......

Page 18: ......

Page 19: ......

Page 20: ......

Page 21: ...69 ...

Page 22: ......

Page 23: ......

Page 24: ......

Page 25: ...OPERATING AND INSTALLATION INSTRUCTIONS BUILT IN VITROCERAMIC HOB 4 J INOX EN ...

Page 26: ... The Control Select Heater Turn on dual and triple zones 3 Turn Off Individual Heaters 5 7 18 Timer Function Key Lock Child Lock TOUCH CONTROL SAFETY FUNCTIONS Sensor Safety Cut Off Over Temperature Switch Off Operating Time Limitations Residual Heat Functions CONTENTS ...

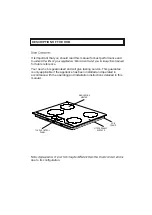
Page 27: ... hob is guaranteed and will give lasting service This guarantee is only applicable if the appliance has been installed and operated in accordance with the operating and installation instructions detailed in this manual due to its configuration SINGLE ZONE HEATER OVAL ZONE HEATER HOB FRAME VITROCERAMIC SURFACE TOUCH CONTROL PANEL ...

Page 28: ...instruction concerning use of the appliance in a safe way and understand the hazards involved Children shall not play with the appliance Cleaning and user maintenance shall not be made by children without supervision WARNING The appliance and its accessible parts become hot during use Care should be taken to avoid touching heating elements Children less than 8 years of age shall be kept away unles...

Page 29: ...hould be allowed to cool before closing the lid The appliance is not intended to be operated by means of an external timer or separate remote control system Do not use harsh abrasive cleaners or sharp metal scrapers to clean the oven door glass and other surface since they can scratch the surface which may result in shattering of the glass or damage to the surface Do not use steam cleaners for cle...

Page 30: ...hile cleaning to avoid scratching Avoid hitting or knocking on the glass with accessories Ensure that the supply cord is not wedged during the installation If the supply cord qualified persons in order to prevent a hazard Do not operate the appliance before it is fully installed The appliance must be installed by an authorized technician and put into use The producer is not responsible for any dam...

Page 31: ...he handles to a safe position so they cannot be knocked or grabbed If you will not use the appliance for a long time plug it off Keep the main control switch off Also when you do not use the appliance keep the gas valve off Make sure the appliance control knobs are always in the 0 stop position when it is not used During cleaning and maintenance Always turn the appliance off before operations such...

Page 32: ...rce in the country of use are to be followed safety regulations proper recycling in accordance with the regulations etc Locating your built in hob After removing the packaging material from the appliance and its accessories ensure that the hob is not damaged If you suspect any damage do not use the appliance and contact an authorised service personal or a qualified electrician immediately This bui...

Page 33: ...ve sealing tape supplied all the way round the lower edge of the cooking surface along the outer edge of the glass ceramic panel Do not stretch it worktop mounting bracket 520mm 590mm 41mm 560mm 490mm Min A Min B Min 130mm Min 25mm Neighboorhood walls A mm B mm Combustible 60 150 Non combustible 25 40 ...

Page 34: ...ty regulations If there is no dedicated hob circuit and fused switch they must be installed by a qualified electrician before the hob is connected Fused switch must be easily accessible once the hob has been installed Do not use adaptors multiple sockets and or extension leads and delayed functioning type must be installed inside the supply circuit Declaration of conformity We declare that our pro...

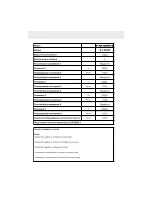
Page 35: ...n authorised service personal or a qualified electrician Unplug your appliance before each maintenance For reconnection follow the connection diagrams strictly 3x2 5 mm 220V 3x2 5 mm 230V 3x2 5 mm 240V 3x2 5 mm 220V 3x2 5 mm 230V 3x2 5 mm 240V 5x1 5 mm 380V 3N 5x1 5 mm 400V 3N 5x1 5 mm 415V 3N 5x1 5 mm 380V 3N 5x1 5 mm 400V 3N 5x1 5 mm 415V 3N Supply cable connection can be differ according to ter...

Page 36: ...rmed by displays and acoustic signals Stand By Mode S Mode The mains are applied to the hob control and all heater displays are off or a residual heat display is active Operating Mode B Mode At least one heater display shows a heat setting between 0 and 9 Lock Mode VR Mode The hob control is locked ...

Page 37: ...e even if other buttons are pressed simultaneously If there is a residual heat of a heater remaining this will be indicated in the correspondent heat setting Heater Display Select Heater If a single heater is chosen with the corresponding Active Deactive Heater Button the Decimal Point of the related Heater Display flashes For the Heat Setting Buttons or The buttons must be pressed within 3 sec ot...

Page 38: ...riple heater is switched on The Triple Zone Indicator will be illuminated and the triple zone will be energized After touching once again the triple zone of the heater will be switched off again Each operation causes a status change of the dual triple zones following in this manner Dual zone on triple zone on all extended zones off dual zone on triple zone on dual zone on etc All heaters are equip...

Page 39: ...ter Display flashes To turn signal sounds and 0 appears in the heat setting display display and also the related timer Cooking Zone Indicator Timer Function and the Timer Display is turned off If there is a residual heat for this heater remaining this will be indicated by a static display H in the heat setting display Reduction of the heat setting to 0 by operating button The heater can also be tu...

Page 40: ...r provides following features The control can run max 4 heater assigned timers and 1 minute minder which is assigned to no heater simultaneously independent of any heater In order to use both functions timer function must be activated by the Active Deactive Timer button Touching for the fist time after activating the heaters the control proposes the minute minder no Cooking Zone Indicator is flash...

Page 41: ...ivating the key lock function it will proceed increasing the minutes until run out indication To stop the buzzer you have to confirm the run out by touching any button Heater timer Heater timers can be set only for activated heaters heater level must be set between 1 9 second time the timer is assigned to the activated heater The proposed flashing the next active heater assigned to the timer in th...

Page 42: ...first have to select the timer by toggling the Active Deactive Timer Button until it is displayed The value can be erased then in 2 different ways Decrement by touching until 00 appears on the Timer Display Touch and simultaneously for 0 5sec until 00 is shown in Timer Display set to 0 The heater timer or minute minder run out is indicated acoustically by a buzzer tone This will be erased by touch...

Page 43: ...out unlocking control is unlocked and can be operated in normal order Child Lock Child lock functionality is foreseen to lock the appliance in a complicated Multi Step process Child locking and unlocking is only available in the S Mode First has to be pressed until the buzzer beeps then the and have to be pressed for at least 0 5 sec but max 1 sec simultaneously Following L is showed as a confirma...

Page 44: ...pressing until the beep then the and have to be pressed a confirmation for successful unlocking L symbol in the displays will be erased immediately ...

Page 45: ...case of one or more buttons are pressed longer than 12 sec the sensor monitoring routine indicates acoustically that wrong operation pot or other object placed on the button sensor failure etc and switches off the appliance The safety turn off causes that the hob control is turned off to the S Mode An F will flash in all heater displays If residual heat is present it will be displayed in all other...

Page 46: ...ter 4 heater display with the letter t for all the time until the temperature decreases After the temperature falling the t displays will be erased and the hob control unit falls back into the S Mode This means that the user can reactivate the appliance by touching Operating Time Limitations The hob control unit has a limitation of the operating time If the heat setting for this heater has not bee...

Page 47: ...y is shown as long as the calculated heater temperature is 60 C The display of the residual heat has the lowest priority and is overwritten by every other display value during safety turn offs and displaying an error code After reapplying the supply voltage to the hob control after an interruption of the supply voltage occurred causes that the residual heat display flashes if the corresponding hea...

Page 48: ...urns let the appliance cool down Remove all split food and fat with a window scrape Then wipe the hob with a suitable washing up liquid and a clean damp cloth Rub the appliance using a clean dry cloth If aluminium foil or plastic items are accidentally melt on the hob surface they should be immediately removed from the hot cooking area with a scraper This will avoid any possible damage to the surf...

Page 49: ......

Page 50: ...UPUTSTVO ZA UPOTREBU I INSTALACIJU UGRADNE STAKLENO KERAMI KE PLO E BO 4 J INOX ...

Page 51: ...vojnih i trojnih zoni 12 Postavqawe nivo kuvawa sa ili bez poja anog zagrevawa 12 Iskqu avawe pojedinih greja a 13 Tajmer funkcija 14 Zakqu avawe za za titu dece 17 Stop Go funkcija 18 SIGURNOSNE FUNKCIJE SENZORSKIH KONTROLA 20 Senzorski sigurnosni prekida 20 Iskqu avawe kod prekomerne temperature 21 Ograni avawe vreme rada 21 Funkcije rezidualne preostale temperature 22 I EWE I ODR AVAWE 23 ...

Page 52: ... garanciju i obezbe en dugoro ni servis Garancija ima va nost samo pod uslovom aparat da je instaliran i upotrebqavan suglasno uputstva za upotrebu i instalirawe koje su date u ovom upatstvom Napomena Izgled Va e plo e mo e se razlikovati od modela koji je prikazan gore zbog wegove konfiguracije Greja ovalne zone Stakleno kerami ka povr ina Ram plo e Greja jedina ne zone Kontrolni senzorski panel ...

Page 53: ...ni su bili pod nadzorom ili su dobili instrukcije o upotrebi aparata na bezbjednom naèinu i razumiju potencijalne opasnosti Deca se ne smiju igrati ureðajem Djeca bez nadzora ne smiju èistiti i održavati ureðaj UPOZORENJE Ureðaj i njegovi dijelovi postaju vruãi tokom upotrebe Morate obratiti pažnju ne dodirivati grijaèe unutar peãi Djeca manja od 8 godina ne smiju se puštati u blizini osim ako nis...

Page 54: ...da se ohladi pre nego šta zatvorite poklopac Ureðaj nije namijenjen da se upravlja preko spoljašnjeg tajmera ili preko zasebnog sistema daljinskog upravljanja Kako bi onemoguãili prevrtanje ureðaja moraju se postaviti stabilizatori okom upotrebe ureðaj se zagrijava Morate obratiti pažnju ne dodirivati grejne elemente unutar peãi Tokom upotrebe ruèice koje normalno se drže kratko vrijeme mogu posta...

Page 55: ...dnu drugu primjenu kao na pr nedomaãu upotrebu ili u komercijalne svrhe ili za zagrijanje sobe Ne pokušavajte podiãi ili pomijerati ureðaj vuèenjem za kvaku Ovaj ureðaj nije povezan na aparat za evakuaciju produkta sagorjevanja Mora se instalirati i povezati u skladu sa najnovijim propisima o instalaciju Treba se obratiti osobita pažnja na traženja oko ventilacije Jedino za ureðaje na gas Ukoliko ...

Page 56: ... vrata peãi vratite se korak natrag kako bi izbjegli vruãu paru koja izlazi iz peãi Postoji rizik od opekotina Ne postavljati zapaljive materije unutuar ili u blizini ureðaja dok radi Uvijek koristiti rukavice kada postavljate ili sklanjate hranu u peã Ne ostavljati šporet kada kuvate èvrsta ili teèna ulja Mogu zapaliti se ako su previše zagrijana Nikada ne posipati vodu na plamenovima nastalim od...

Page 57: ... snazi date dr ave moraju biti ispo tovani bezbednosna regulativa odgovaraju e reciklirawe u saglasnosti sa regulativama itd Lokacija ugradqive plo e Nakon to se otkloni pakovawe i materijal za pakovawe aparata proverete dali ima o te ewa na aparatu Ukoliku primetite ili sumwate da ima bilo kakva o te ewa ne upotrebqavajte aparat i odmah stupite u kontakt sa ovla enog servisa ili sa kvalifikovanog...

Page 58: ...ive materijale kao to su zavese ili hartije u blizini plo e Stavite od obezbe ene jednostrane samolepqive trake oko celog doweg ruba povr ine za kuvawe preko nadvore nog ruba stakleno kerami ke plo e Ne zate ite Pri vrstite 4 dr a a na strani nih zidova proizvoda Dr a za montirawe radne povr ine Susedni zidovi A mm B mm Zapaqivi 60 150 Nezapaqivi 25 40 ...

Page 59: ...sa vi e prikqu aka i ili produ ne kablove Prekida strujnog kola otvora od najmawe 3mm od 20A tipa sa funkcijom odlagawa mora biti instaliran unutar kola za napajawe Sa stakleno kerami kom plo om nije dostavqen kabl VA NO Slede e veli ine pre nika kabla za napajawe moraju se koristiti bar u slu aju jednofazne konekcije Vrednost navedena na plo ici Pre nik kabla za napajawe Vrednost navedena na plo ...

Page 60: ...we se nalazi na dnu aparata U toku instalirawa molimo proverite dali se koriste izolirane kablove Pogre no povezavawe mo e o tetiti aparat Ovakva o te ewa nisu pokrivena garancijom Sve popravke mora izvr avati ovla eni serviser ili kvalifikovani elektri ar Pre svakog i ewa iskqu ite aparat iz tekera Za ponovo elektri no povezavawe striktno sledite dijagram ...

Page 61: ...0 do 9 Re im zakqu avawa VR Re im Kontrolna jedinica na plo i je zakqu ena Opis re ima Displej greja a Aktivni ili neaktivni greja Tajmer displej Indikatore zone za kuvawe Tajmer funkcija Decimalna ta ka Indikator dvojne zone Indikator trojne zone Izbor dvojne trojne zone Pode avawe topline Smawivawe tajmera Aktivni ili neaktivni tajmer Pode avawe topline Pove avawe tajmera Indikator za zakqu avaw...

Page 62: ...r ini stakleno kerami ke plo e Aparat mo e se iskqu iti u bilo koje vreme pritiskawem na ak i kad se jednovremeno pritiskaju druga dugmad Ako ima pojave preostale topline kod nekog greja a to e biti prikazano preko odgovaraju eg displeja greja a Izbor greja a Ako se odabere jedina ni greja preko odgovaraju eg dugmeta za aktivirawe deaktivirawe greja a onda decimalna ta ka odgovaraju eg displeja gr...

Page 63: ...e ukqu en Indikator za trojnu zonu zasvetli e i kod trojne zone ima napajawa Nakon ponovnog pritiska na trojna zona greja a se iskqu uje Svaka operacija mewa status dvojnih trojnih zona po slede im redosledom dvojna zona ukqu ena trojna zona ukqu ena sve ekstenzivne zone iskqu ene dvojna zona ukqu ena trojna zona ukqu ena itd Postavqawe nivo kuvawa sa ili bez poja anog zagrevawa Svi greja i su opr...

Page 64: ...a Za iskqu ivawe greja a treba jednovremeno pritisnuti na dugmad i Ukqu uje se zvu ni signal a na displeju se pojavqa 0 Ukoliko je bio aktiviran tajmer na odabranog greja a onda e 0 da se pojavi na displeju greja a a odgovaraju i indikator za tajmer funkcije na zoni kuvawa i displej tajmera su iskqu eni Ako kod greja a postoji preostala toplina to e biti prikazano stati nim prikazom N na displeju ...

Page 65: ...minutni potsetnik koji nije nazna en za nijedan greja Svi tajmeri mogu biti upotrebqeni samo u V re imu Tajmer greja a mo e da se ukqu i samo kod ve aktiviranog greja koji je ukqu en na nivo od 1 9 Minutni potsetnik je nezavisan od greja a Za kori ewe obe funkcije tajmer funkcija mora da je aktivirana pomo u dugme za aktivirawe deaktivirawe tajmera Posle ukqu ivawa greja a prvim pritiskom na dugme...

Page 66: ... iti funkcionisawem sve do isteka postavqenog vreme trajawe Kad tajmer dostigne 00 ukqu uje se zvu ni signal koji ozna ava da je vreme isteklo Za prekid zvu nog signala treba da potvrdite istek vremena pritiskom na bilo koje dugme Tajmer greja a Tajmeri greja a mogu se ukqu iti samo kad su greja i aktivirani vrednost greja a mora biti postavqena na nivo 1 9 Prvo pritiskawe na dugme aktivira minutn...

Page 67: ...ada mora prvo da izaberete tajmer pritiskawem na dugme za aktivirawe deaktivirawe tajmera sve dok se isti ne pojavi Nakon toga mo ete na dva na ina da poni tite vrednosti Pritiskawem na dugme sve dok se ne pojavi 00 na displej tajmera Jednovremenim pritiskawem na dugmad i za period od 0 5 sek sve dok se ne pojavi 00 na displej tajmera Kada tajmer greja a do e do 00 ozna eno nivo greja a e se names...

Page 68: ...ja na zakqu avawe za za titu dece je predvi ena za zaklu uvawe aparata preko komplikovane procedure od vi e koraka Zakqu avawe za za titu dece je dostupna samo u Y Re ima Prvo pritisnite na dok se ne ukqu i zvu ni signal zatim treba pritisnuti jednovremeno dugmad i za najmawe 0 5 sekundi ali ne vi e od 1 sekunde Nakon ovog aparat mo e da se zakqu a dopirom na dugme Kao potvrdu uspe ne operacije za...

Page 69: ...iskawem na dugme za period od 1 sekunde Ukqu avawe se potvr uje sa dva zvu na signala Stop funkcija je aktivna i temperatura svih greja a koji su ukqu eni smawi e se na nivo 1 za period od 1 minutu zatim u toku preostalih 9 minuta prikazuje se svetlo u horizontalnoj liniji od dole pa sve do gornog dela Nakon ovog svi greja i se smawuju na nivo 0 u preostalom periodu Kod svih neaktivnih pode avawa ...

Page 70: ...akon deaktivirawa funkcije Stop G o preostalo vreme poja anog zagrevawa e te i to zna i da vremetrajawe poja anog zagrevawa se ne smeta u toku Stop Go funkcije Za deaktivirawe Stop Go funkcije pritisnite dugme za period od 1 sekunde Ovo se potvr uje zvu nim signalom Zatim oslobodite dugme i pritisnite bilo koje drugo dugme u roku od 10 sekundi osim dugmad i Sada date komade koje su aktivirane pre ...

Page 71: ...o da je izvr eno pogre no aktivirawe u slu ajeva kada je neki sud ili drugi predmet postavqen na dugme poni tavawe senzora itd i aparat se iskqu ava Sigurnosno iskqu avawe iskqu uje aparat u Y Re imu F trep e na displeju svih greja a Ako postoji preostala toplina isto e biti prikazano na svih displeja greja a Kontrolna jedinica aparata e pre i u Y Re imu U isto vreme aktivira se zvu ni signal Nako...

Page 72: ...a svih 4 greja a slovom t sve dok se temperatura ne smawi Nakon to e temperatura opasti slovo t e se ugasiti i kontrolna jedinica plo e prelazi u Y re im Ovo zna i da korisnik mo e da ukqu i plo u dugmetom Vremensko ograni avawe rada Kontrolna jedinica plo e ima vremensko ograni avawe rada Ako postavqena temperatura greja a se ne promeni u odre eni period onda greja se automatski iskqu ava za dese...

Page 73: ...eostalu toplinu Displej rezidualne topline prikazuje se sve dok je zabele ana temperatura greja a 600 S Displej preostale topline ima najmawi prioritet i zamewen je drugim vrednostima prilikom sigurnosna iskqu avawa ili prikazivawa kodova gre ki Nakon povratka napajawa u kontrolnoj jedinici posle nekog prekida displej preostale topline svetli ukoliko se kod odgovaraju eg greja a nalazila preostala...

Page 74: ...ju a sijalica je ukqu ena Da bi se izbegle opekotine dozvolite aparatu da se ohladi Otklonite ostatke hrane pomo u struga a za stakla Zatim obri ite plo u sredstvom za i ewe i obri ite istom i suvom krpom U slu aju stopqene aluminiumske folije ili plasti nih predmeta na povr ini plo e treba ih odmah otkloniti sa zagrejane povr ine pomo u struga em Ovim e se izbe i mogu a o te ewa na povr ini Ovo i...

Page 75: ...52208777 ...

Page 76: ...4 J INOX EN ...

Page 77: ......

Page 78: ......

Page 79: ......

Page 80: ... mental capabilities or lack of experience and knowledge if they have been given supervision or instruction concerning use of the appliance in a safe way and understand the hazards involved Children shall not play with the appliance Cleaning and user maintenance shall not be made by children without supervision WARNING The appliance and its accessible parts become hot during use Care should be tak...

Page 81: ...f before replacing the lamp to avoid the possibility of electric shock CAUTION Accessible parts may be hot when the cooking or grilling is in use Young children should be kept away Your appliance is produced in accordance with all applicable local and international standards and regulations Maintenance and repair work must be made only by authorized service technicians Installation and repair work...

Page 82: ...cted and removed immediately Protect your appliance against atmospheric effects Do not expose it to effects such as sun rain snow etc The surrounding materials of the appliance cabinet must be able to withstand a temperature of min 100 C During usage When you first run your oven a certain smell will emanate from the insulation materials and the heater elements For this reason before using your ove...

Page 83: ... its handles During cleaning and maintenance Always turn the appliance off before operations such as cleaning or maintenance You can do it after plugging the appliance off or turning the main switches off Do not remove the control knobs to clean the control panel TO MAINTAIN THE EFFICIENCY AND SAFETY OF YOUR APPLIANCE WE RECOMMEND YOU ALWAYS USE ORIGINAL SPARE PARTS AND TO CALL ONLY OUR AUTHORIZED...

Page 84: ......

Page 85: ...Figure 2 ...

Page 86: ...Figure 3 3 ...

Page 87: ...50 200 Max 250 100 150 50 200 Max 250 100 150 Figure 4 Figure 5 Figure 6 Figure 5 Figure 6 ...

Page 88: ...efanstartsoperating To use the defrost function take your frozen food and place it in the oven on a shelf placed in the third slot from the bottom It is recommended that you can place an oven tray under the defrosting food to catch the water accumulated due to melting ice This function will not cook or bakeyourfood itwillonlyhelptodefrostit Fan Function The oven s thermostat and warning lights wil...

Page 89: ...s recommendedtopre heattheovenabout10minutes Warning When grilling the oven door must be closed and the oven temperature should be 0 adjustedto190 C s thermostat and warning Double Grill and Fan Function The oven lights will be turned on the grill and upper heating elementsandfanwillstartoperating The function is used for faster grilling of thicker foods and for covering a larger surface area Both...

Page 90: ......

Page 91: ......

Page 92: ......

Page 93: ......

Page 94: ......

Page 95: ......

Page 96: ......

Page 97: ...MK 4 J INOX ...

Page 98: ......

Page 99: ......

Page 100: ......

Page 101: ......

Page 102: ......

Page 103: ......

Page 104: ......

Page 105: ......

Page 106: ...т ќе ја допре дрвената површина на шкафот стегнете ги шрафовите Ако рерната се поставува под плочата растојанието меѓу работната површина и горната страна на рерната мора да биде најмалку 50 мм и растојанието меѓу работната површина и горната страна на контролниот панел мора да биде минимум 25 мм Работна површина мин 50 мм мин 25 мм Плоча за вградување Рерна за вградување 2 ...

Page 107: ...3 3 ...

Page 108: ...50 200 Max 250 100 150 50 200 Max 250 100 150 4 5 6 5 6 ...

Page 109: ......

Page 110: ...à à çàãðååòå ðåðíàòà 10 ìèíóòè Ïðåäóïðåäóâàœå Êîãà ñå ïå å íà ãðèë âðàòà íà ðåðíàòà ìîðà äà áèäå çàòâîðåíà 0 è òåìïåðàòóðàòà íà ðåðíàòà äà áèäå ïîñòàâåíà íà 190 C Ôóíêöè à íà äâîåí ãðèë ñî âåíòèëàòîð Òåðìîñòàòîò íà ðåðíàòà è ñâåòèëêèòå çà ïðåäóïðåäóâàœå ñå âêëó óâààò ãðå à èòå íà ãðèëîò ãîðíèòå ãðå à è è âåíòèëàòîðîò çàïî íóâààò äà ðàáîòàò Îâàà ôóíêöè à ñå êîðèñòè çà ïîáðçî ïå åœå íà äåáåëè ïàð èœ...

Page 111: ......

Page 112: ......

Page 113: ......

Page 114: ......

Page 115: ......

Page 116: ...86 Потрошувачка на енергија струја со вентилатор kWh циклус 0 78 Број на рерни 1 Извор на топлина НА СТРУЈА Јачина л 65 Совети за штедење енергија Рерна Готвењето го јадењето заедно ако е можно Времето за првично загревање на рерната треба да биде кратко Не продолжувајте го времето за готвење Не заборавајте да ја исклучите рерната на крајот на готвењето Не отворајте ја вратата на рерната додека го...

Page 117: ...SR 4 J INOX ...

Page 118: ......

Page 119: ......

Page 120: ......

Page 121: ...be su pod nadzorom ili su dobile instrukcije oko upotrebe ureðaja na bezbedan naèin i razumeju povezane opasnosti Deca se ne smeju igrati ureðajem Èišæenje i održavanje se ne sme obavljati sa strane dece bez nadzora UPOZORENJE Ureðaj i njegovi dostupni delovi postaju vruæi tokom rada Ne dodirati grejne elemente Deca manja od 8 godina trebaju se držati dalje od ureðaja osim ako nisu ispod konstantn...

Page 122: ...aæa upotreba komercijalne svrhe ili za grejanje sobe Ne pokušavati podiæi ili pomerati ureðaj vuèenjem za kvaku vrata Preuzete su sve moguæe bezbednosne mere da bi se osigurala vaša bezbednost Jer se staklo može slomiti morate paziti ne ogrebati ga tokom èišæenja Izbegavati udarati staklo dodacima Osigurati se da je napojni kabel nije zaglavljen tokom instalacije Ako se isporuèeni kabl za napajanj...

Page 123: ...reðaj dugaèije vreme iskljuèite ga iz struje Držite glavni prekidaè iskljuèani Kada ne koristite ureðaj držite gasni ventil zatvoreni Uveriti se da su kontrolni preidaèi ureðaja na poziciju 0 stop svaki put kada ga ne koristite Tacne se naginju kada ih vucite Paziti ne prosipati tekuæine Kada su vrata ili fioka peæi otvorena ne ostavljati ništa na njih Možete izvaditi ureðaj iz ravnoteže ili polom...

Page 124: ...1 ...

Page 125: ...aze na ramu rerne Kada ram proizvoda dodirne drvenu površinu ormara zategnite zavrtnje Ako se rerna instalira ispod ploče za kuvanje razdaljina između radnje ploče i gornje ploče rerne mora da bude najmanje 50 mm a razdaljina između gornje ploče i vrha kontrolne table mora da bude najmanje 25 mm Slika 2 ...

Page 126: ...Slika 3 3 ...

Page 127: ...50 200 Max 250 100 150 50 200 Max 250 100 150 Slika 4 Slika 5 Slika 6 Slika 4 Slika 5 ...

Page 128: ...12 4 KORIŠÆENJE PROIZVODA Funkcije rerne ...

Page 129: ...li masti koje kaplje Preporuèuje se da prethodno zagrejete rernu oko 10 minuta Upozorenje Prilikom grilovanja vrata rerne moraju biti zatvorena a temperaturu rerne 0 treba podesiti na 190 C Funkcija grejanje i ventilator Termostat i svetiljka za upozorenje na rerni æe se ukljuèiti donji grejaè i ventilator æe poèeti da rade Funkcija donji grejaè i ventilator je idealna za brzo i jednako grejanje h...

Page 130: ......

Page 131: ......

Page 132: ...Slika 7 ...

Page 133: ......

Page 134: ......

Page 135: ...52265653 ...

Reviews: