Fasep 2000 srl
Rev. 1.6
Videotronic V548.G4: User’s Manual
15 April 2019
5
2
INSTALLATION
2.1
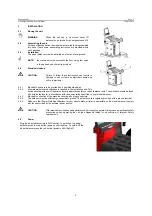
Moving the unit
WARNING
When the unit has to be moved: never lift
balancer by motor shaft or by neighborhood of it.
2.2
Assembling the unit
For ease of transportation, the wheel balancer might be disassembled
into units. If necessary, assembling instruction are provided within
each package..
2.3
Installation
The wheel balancer must be installed on a firm and level ground.
NOTE
:
the machine must be secured to the floor. Using four holes
in the base and anchor bolts provided
2.4
Electrical Hookup
!
CAUTION:
Failure to follow these instructions can results in
damage to unit or create an electrical hazard and
will void warranty..
2.4.1
Electrical hookup is to be provided by a qualified electrician.
2.4.2
A fusible wall-mounted switchbox is required at the installation site. This
switch should provide on-off control and overload protection for your wheel balancer only. The switchbox should be fused
with time-delay fuse(s) in accordance with the power rating specified on your wheel balancer.
2.4.3
Electrical connection of the machine should be by plug connectors.
2.4.4
The balancer must be effectively connected to ground. The electric cord is regularly provided with a ground terminal.
2.4.5
Make sure that Power Rate Specifications for your wheel balancer (refer to nameplate on the wheel balancer) comply
with those provided by the external power source.
!
CAUTION
After electrical hookup has been performed unit is ready to operate. Always observe pertinent safety
precautions when operating the unit (see Appendix tables for an overview of relevant Safety
requirement).
2.5
Power
Plug the wheel balancer into a 220V socket. To switch on the wheel
balancer press the red button (power) untill it light up. To swicth off the
wheel balancer press the red button (power) untill it light off.


