


25
SID
èREA
4.2
RAdiO COnTROL COMMAndS
11
4
ISTRUZIONE
D’USO
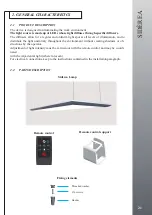
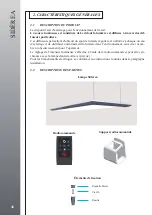
4.1 MODALITA D’USO
La lampada si accende
e si regola tramite il radiocomando in dotazione.
L’accensione e lo spegnimento può avvenire anche
tramite l’interruttore omnipolare presente nel
locale.
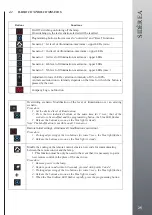
4.2 COMANDI RADIOCOMANDO
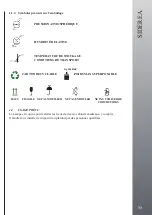
Tasti Funzione
On/Off: accensione/spegnime
nto della lampada.
All’accensione viene richiamato l’ultimo scenario selezionato
Tasto programmazione: permette di acceder
e alle funzioni di “Sovrascrittura” e
“Reset”.
Scenario 1: 1°livello d’illuminame
nto m led superiori (min.)
Scenario 2: 2° livello d’illu
minamento m led superiori
Scenario 3: 3° livello d’illu
minamento m led superiori
Scenario 4: 4°livello d’illu
minamento m led superiori
Scenario 5: 5° livello d’illuminamento m led superiori (max)
Regolazione led inferiori: variazione
intensità da 0% a 100%.
L’aumento/riduzione d’intensità dipende da
l tempo di pressione del tasto da parte
dell’utente
Logo azienda, nessuna funzione
12
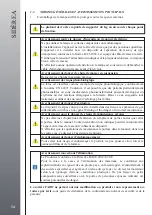
+
Sovrascrittura scenario: Modi
fica del livello di illuminamento su uno scenario
esistente.
Procedura:
1. Impostare il livello d’ illuminamento desiderato.
2. Premere contemporaneamente per 3s i due tasti indicati: quello dello
scenario da modificare e quello di programmazione, il led blu lampeggia.
3. Rilasciare i tasti appena il led blu diventa fisso.
Nota: la Modifica è possibile su tutti e 5 gli scenari
+
Ripristino impostazioni iniziali: elimina tutte le modifiche effettuate.
Procedura:
1. Pressione contemporanea e prolungata per circa 5s di due tasti, il led blu
lampeggia.
2. Rilasciare i tasti appena il led blu diventa fisso.
+
+
Modifica della codifica del radioc
omando: crea una
nuova codifica di
comunicazione tra il radiocomando e la lampada.
1. Questa funzione deve essere utilizzata solo nel caso fosse necessario
abbinare un nuovo radiocomando al posto di quello in uso.
Procedura:
1. Togliere alimentazione alla lampada.
2. Ridare alimentazione ed entro 60 secondi procedere ai punti 3 e 4
3. Pressione contemporanea e prolungata per circa 5s di due tasti, il led blu
lampeggia.
4.
Rilasciare i tasti appena il led blu diventa fisso.
5.
Quando il led blu sulla Siderea lampeggia velocemente premere il tasto di
programmazione
4.3 SOSTITUZIONE BATTERIA DEL RADIOCOMANDO
Tramite lo sportello sito sul retro del radiocomando si accede alla batteria, sostituirla con una
delle medesime caratteristiche, rispettando la polarità indicata:
MOD: LR-23A/12V
Buttons
Functions
On/Off: switching on/turning off the lamp.
On switching on, the last scenario selected will be recalled
Programming button; allows access to “overwrite” and “Reset” functions.
Scenario 1: 1st level of illumination, m upper LEDs (min.)
Scenario 2: 2nd level of illumination, m upper LEDs
Scenario 3: 3rd level of illumination, m upper LEDs
Scenario 4: 4th level of illumination, m upper LEDs
Scenario 5: 5th level of illumination, m upper LEDs (max.)
Adjustment to lower LEDs; variation in intensity of 0% to 100%.
An increase/reduction in intensity depends on the time for which the button is
pressed by the user.
Company Logo, no function
Overwriting scenario: Modification of the level of illumination over an existing
scenario.
Procedure:
1. Set the desired level of illumination.
2. Press the two indicated buttons at the same time for 3 secs.; that of the
scenario to be modified and the programming button, the blue LED flashes
3. Release the buttons as soon as the blue light is steady.
Note: The Modification is possible on all 5 scenarios
Restore initial settings; eliminates all modifications carried out.
Procedure:
1. Prolonged pressing of the two buttons for some 5 secs., the blue light flashes.
2. Release the buttons as soon as the blue light is steady.
Modify the coding of the remote control; create a new code for communicating
between the remote control and the lamp.
1. This function must be only be used in the event that it is necessary to pair a
new remote control in the place of the one in use.
Procedure:
1. Remove power to the lamp.
2. Restore power and within 60 seconds, proceed with points 3 and 4
3. Prolonged pressing of the two buttons for some 5 secs., the blue light flashes.
4. Release the buttons as soon as the blue light is steady.
5. When the blue Sidèrea LED flashes rapidly, press the programming button


