


23
SID
èREA
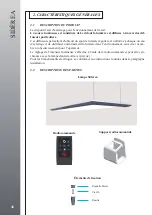
3.2
POSiTiOninG
3.3
AFFiXinG TO THE CEiLinG
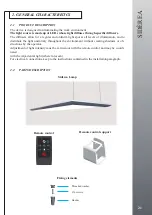
The Sidèrea lamp is complete with elements for affixing to the ceiling.
Included:
• Sidèrea Lamp
• 4 plugs with Ø 6 mm screws
• Threaded washers plus bush
• 4 steel cables for hooking the environment lamp to the ceiling
3.4
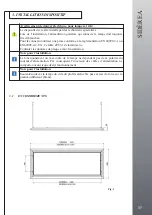
inSTALLATiOn PROCEdURE
• Drill the ceiling at the required position with a suitable bit (for heights, see 3.1-fig.1)
and insert the plugs.
FIG. 3 Ceiling
•
1)
Position the threaded washers at the holes drilled into the ceiling
•
2)
Block the washers with Ø 6 screws
•
3)
Thread the steel cable into the bushes and screw them to the threaded washers
FIG. 4 Sidèrea Lamp
•
1)
Partly unscrew the knob
•
2)
Press the knob
•
3)
Insert the steel cable
• Hook the lamp up using the system of steel cables
• Fix the height of the lamp at a height of between 2200/2400 mm.
• To adjust the height, use the 4 knobs situated on the upper part of the environment
lamp
• Check that it is level
Fig. 2


