background image

12

Revision date: 03.08.17

Bottom Rail

111610Z144S4

Mullion

(see table)

Mullion

(see table)

Top Rail

111611Z14400S4

A

B

C

End Wall Power Vent

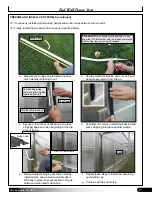
1.  Locate the frame parts and the 112166 #10 screws, and assemble the vent frame as shown. Assemble the frame 

in sections and add to the building. (Frame can also be assembled on the building. This method is not shown.) 

Polycarbonate panels (cut from the end wall cladding in a previous step) are prepared and added to the frame 

after the frame is attached to the building. Use the 112166 screws to secure the 111609 mullions to the top and 

bottom rails. Top and bottom rails are cut to fit as needed. 

ASSEMBLE VENT FRAME  (continued)

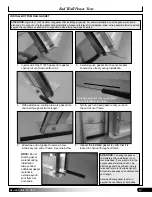
ATTENTION:

 For best results, hand-

tighten the 112166 screw until snug. 

Do not overtighten! Doing so may twist 

the screw off. Use a clamp if needed 

to hold the components in place. If you 

use a power tool to install the screws, 

adjust the torque setting so the screw 

is snug when installed. 

If no torque 

adjustment is available, install with 

hand tool only

. Use a square to check 

corners during assembly.

VIEW:

 The side of the frame shown on 

this page will be against the building 

once the frame is attached. 

Review 

all photos to ensure you have 

assembled the frame correctly.

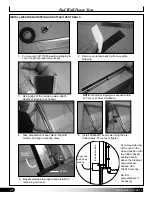
IMPORTANT: 

Outside-to-outside 

measurement of the completely 

assembled vent frame will be the same 

as the inside-to-inside measurement of 

the vent opening.

Mullion

Bottom 

Rail

C

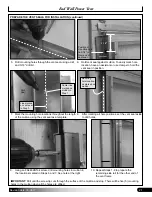
NOTE:

 Seat end of each mullion tight to 

top or bottom rail, align mounting hole 

with center groove in mullion, and secure 

using one 112166 #10 screw for each 

connection. See circle in Figures 1 & 2 

below. 

(Drill mounting holes if needed.)

Fig. 2a

Mounting 

Hole

INSTALLATION OF MULLIONS & MULTIPLE TOP AND BOTTOM RAILS:

 View all pertaining information and diagrams 

before


beginning assembly. Vent systems with multiple top and bottom rails connected by splices require the installation of mullions in 

specific locations. Use the diagrams to help determine these locations. 

Location is based on panel width.

Mullion

Top Rail

B

Fig. 2b

112166 Screw

Mullion

Bottom Rail

Fig. 1

C

Mullion

Bottom Rail

A

Mullion

Bottom Rail

VENT MULLIONS

VENT HEIGHT

MULLION SKU

36" 

111609Z03513

48" 

111609Z04713

60" 

111609Z05913

Summary of Contents for Growers Supply GrowSpan 500 Series

Page 1: ...Supply All Rights Reserved Reproduction is prohibited without permission Series 500 Greenhouse Kit w Blackout System Ventilation Evaporative Cooling GB30PVBROWN 30 Wide Series 500 End Wall Vent Kit Al...

Page 2: ...mbly steps This information identifies at what point during the assembly the respective components are installed or attached to the main building frame Since we cannot anticipate changes made by the c...

Page 3: ...aint splotch and continue on the next page with the end wall vent installation ATTENTION Recommended installation order is not critically definitive Installation of film cladding will protect the inte...

Page 4: ...will help ensure the proper assembly of the end wall vent system The steps outlining the assembly process are as follows 1 Verify that all parts are included in the shipment Notify customer service fo...

Page 5: ...and lengths additional numbers and letters may appear in the sku number for each of these items Consult the diagrams if provided for your vent system during assembly to position the different profile...

Page 6: ...l 111610Z144S4 End Wall Vent Bottom Rail AA15GYL04956S01 End Wall Vent Seal 112906 Bump On 111602PLG Hinge Stopper with FA4474B Tek Screws 113370 Bottom Rail Gasket End View of 113370 Gasket 111610SPL...

Page 7: ...drill cordless with extra batteries works best and drill bit set Small hammer and gloves Level 6 or longer preferred String line or chalk line Square to check vent frame during assembly Wrench or sock...

Page 8: ...from diagram for clarity X X X X X X Align inner support posts with end wall columns Support posts will be in line and parallel with the end wall columns and the outer walls of the evaporative coolin...

Page 9: ...ront View No Panels Top Rail 111611Z144 Mullion Top Rail Vent Sash 111614Z144 Bottom Rail 111610Z144 Bottom Rail 111610Z Mullion Mullion Mullion End Wall Power Vent Sample Frame Front View With 8mm Pa...

Page 10: ...g pages shows the assembly of a 4 W x 8 L sample panel section Use the steps that follow as guides when assembling your vent system 1 Locate the vent sash 111614Z144 for the vent and attach these to t...

Page 11: ...attach vent sash splice 111614SPL using FA4484B screws d Line the top edge of the entire run of 11614Z144 vent sash with a thick bead of DE4007 silicone sealant to prevent water leakage Installed Spli...

Page 12: ...ool only Use a square to check corners during assembly VIEW The side of the frame shown on this page will be against the building once the frame is attached Review all photos to ensure you have assemb...

Page 13: ...s if present and add the sections to the building 5 Consult diagrams on the next two 2 pages for top and bottom rail splice part identification and install these splices 6 Test the vent operation Vent...

Page 14: ...end wall cladding was laid out and cut for the vent opening Consult the Polycarbonate Panel Installation pages for additional details Polycarbonate Vent Panels previously cut from end wall cladding A...

Page 15: ...Work panel down and center over drain channel in bottom rail 9 Check panel position Adjust as needed to center panel between mullions Tape to mark UV protected surface DE8002 Foil Tape TOP or 104774 P...

Page 16: ...ween end caps first 10 Prepare and install the next panel adjacent to the first 13 Press mullion cap tight against the polycarbonate panels 14 Secure mullion cap to mullion using 112166 screws Tighten...

Page 17: ...re weather stripping expands carefully install mullion cap as previously described With cap in place seal will expand to fill gap between mullion and mullion cap c Expose a few inches of adhesive and...

Page 18: ...etween bottom rail and panel b Take an FA4476B Tek screw and 102921B neo bonded washer and drive it through the panel only Ensure that end of screw will not contact building frame when driven through...

Page 19: ...days if desired 4 Gently push and pull gasket until you reach the end of vent frame 5 Allow free end of gasket to extend a few inches beyond end of frame See note below 6 Inspect the installed gasket...

Page 20: ...mullion top to bottom B o t t o m R a i l Set a 3 8 gap between vent seal and seal surface Vent Seal Center of Mullion Seal Surface Move vent seal down to view line Top Rail Seal Surface previously i...

Page 21: ...After marking all hole positions set the vent seal aside to drill holes Vent Seal Center line marked on mullion in Step 1 Line marked on vent seal in Step 3 7 Mark the mounting hole locations througho...

Page 22: ...ipping will expand within an hour or so after installation 4 Take prepared vent seal place it against mullion and align mounting holes 5 Install FA4482B Tek screws using the pre drilled holes Do not o...

Page 23: ...cket will be installed on the outside of the previous installed end wall polycarbonate FA4486 tek screw will go through the bracket vent sash polycarbonate and into the end wall cross bracing Cap each...

Page 24: ...follow to correctly install the vent components for purchased vent B A Motor B Motor Vent Opened Panel Open Position not to exceed 40 Vent rack is not shown Inside Greenhouse Support Post Support Post...

Page 25: ...hain NOTE After adding one spacer push connecting link through the chain a little to hold spacer in place Then add the second spacer Push connecting link through second spacer until ends of connecting...

Page 26: ...Check connecting link to ensure it is tight against chain 11 Verify that all spacers are in place and that locking clip is secure 9 Place locking clip over the ends of connecting link 12 Repeat these...

Page 27: ...are aligned with motor sprockets 4 Mark plate position and secure plates to the support posts Use FA4482 Tek screws 5 Slide 1 315 drive shaft tube 131S147 into place and verify that it turns freely in...

Page 28: ...t all drive tubes are seated and drill a 5 16 hole through each pipe at each splice 15 Secure all drive tube splices using FAG334B 5 16 bolts and FALF37B locknuts 12 Connect rack to vent window connec...

Page 29: ...s prevent vent systems from opening too far which can cause vent panel to drop out of vent sash causing damage Complete the following steps to install vent rack u bolts for drive components mounted ou...

Page 30: ...nsure that u bolt stops panel before it drops out of vent sash NOTE Reposition u bolt if needed to prevent panel from dropping out of vent sash 11 Reinstall the 111602PLG hinge stopper removed in Step...

Page 31: ...t drive chain and sprocket Clean and lubricate as needed Visually inspect all electrical connections If electrical issues exist disconnect main power and contact an electrician to inspect and repair i...

Page 32: ...al Check Before operation and throughout the season lubricate vent bearing plate and vent rack drive in the locations shown Use multi purpose grease suitable for exterior environments Lubricate here L...

Reviews: